# Releases

{% updates format="full" %}
{% update date="2026-07-30" %}

## Smart Links

Route traffic across multiple campaigns from a single link. Distribute clicks by equal or custom weights.

For more info, click [here](https://docs.tracknow.io/features/smart-links).
{% endupdate %}

{% update date="2026-06-29" %}

## Affiliate Coupon Requests

Added the option to allow affiliates to request coupon codes.

For more info, click [here](https://docs.tracknow.io/affiliates/coupon-requests).&#x20;
{% endupdate %}

{% update date="2026-04-29" %}

## Newsletter Emails Status

We've added a detailed view of the outgoing email [newsletters](https://docs.tracknow.io/features/news-and-newsletter) status.
{% endupdate %}

{% update date="2026-04-13" %}

## Custom Commission Splits for Sub-Affiliates

Parent affiliates can now define custom commission splits for each of their direct sub-affiliates, with support for default values and configurable maximum limits.\
\
For more info, click [here](https://docs.tracknow.io/features/custom-commission-splits-for-sub-affiliates-mlm).
{% endupdate %}

{% update date="2026-04-13" %}

## Added Thai Language Support&#x20;

Thai language support added to the affilaite portal.
{% endupdate %}

{% update date="2026-03-23" %}

## Clients Screen

Introduced a new **Clients** screen under the **Performance** tab, enabling the creation of client profiles, visibility into conversion activity per client, and streamlined management of client-to-affiliate associations.\
\
For more info, click [here](https://docs.tracknow.io/features/clients).
{% endupdate %}

{% update date="2026-02-24" %}

## Payout Group Automation

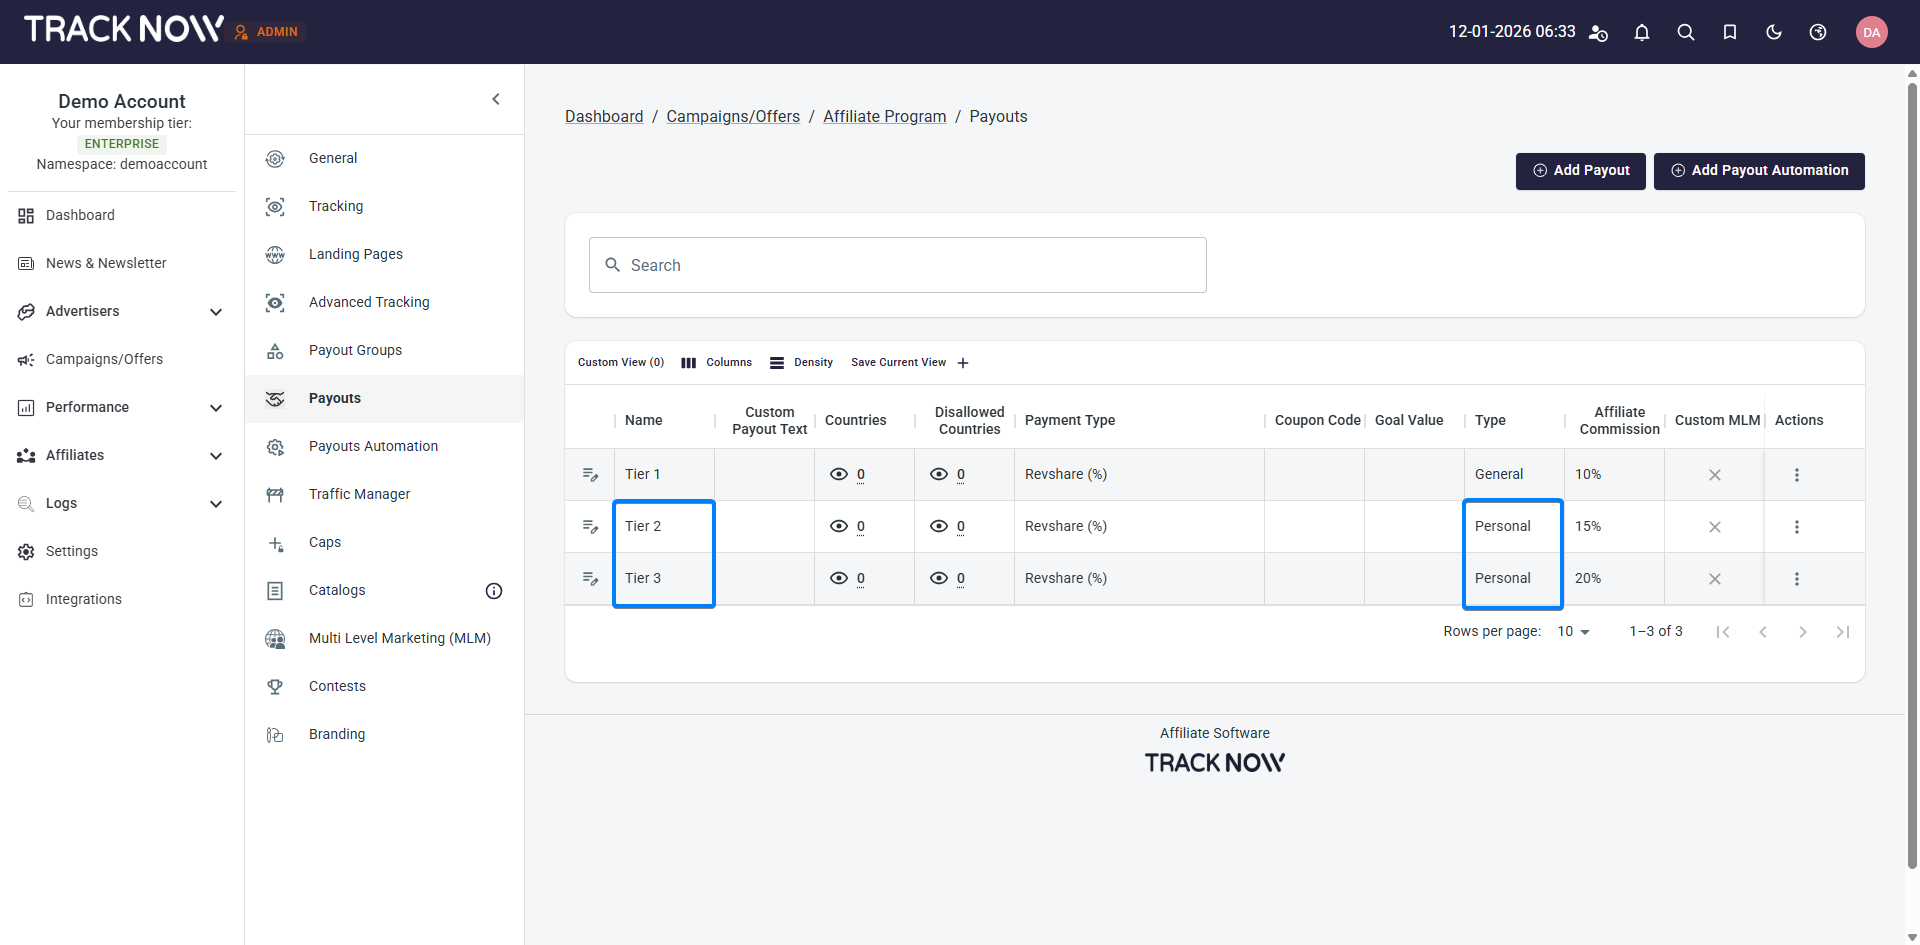
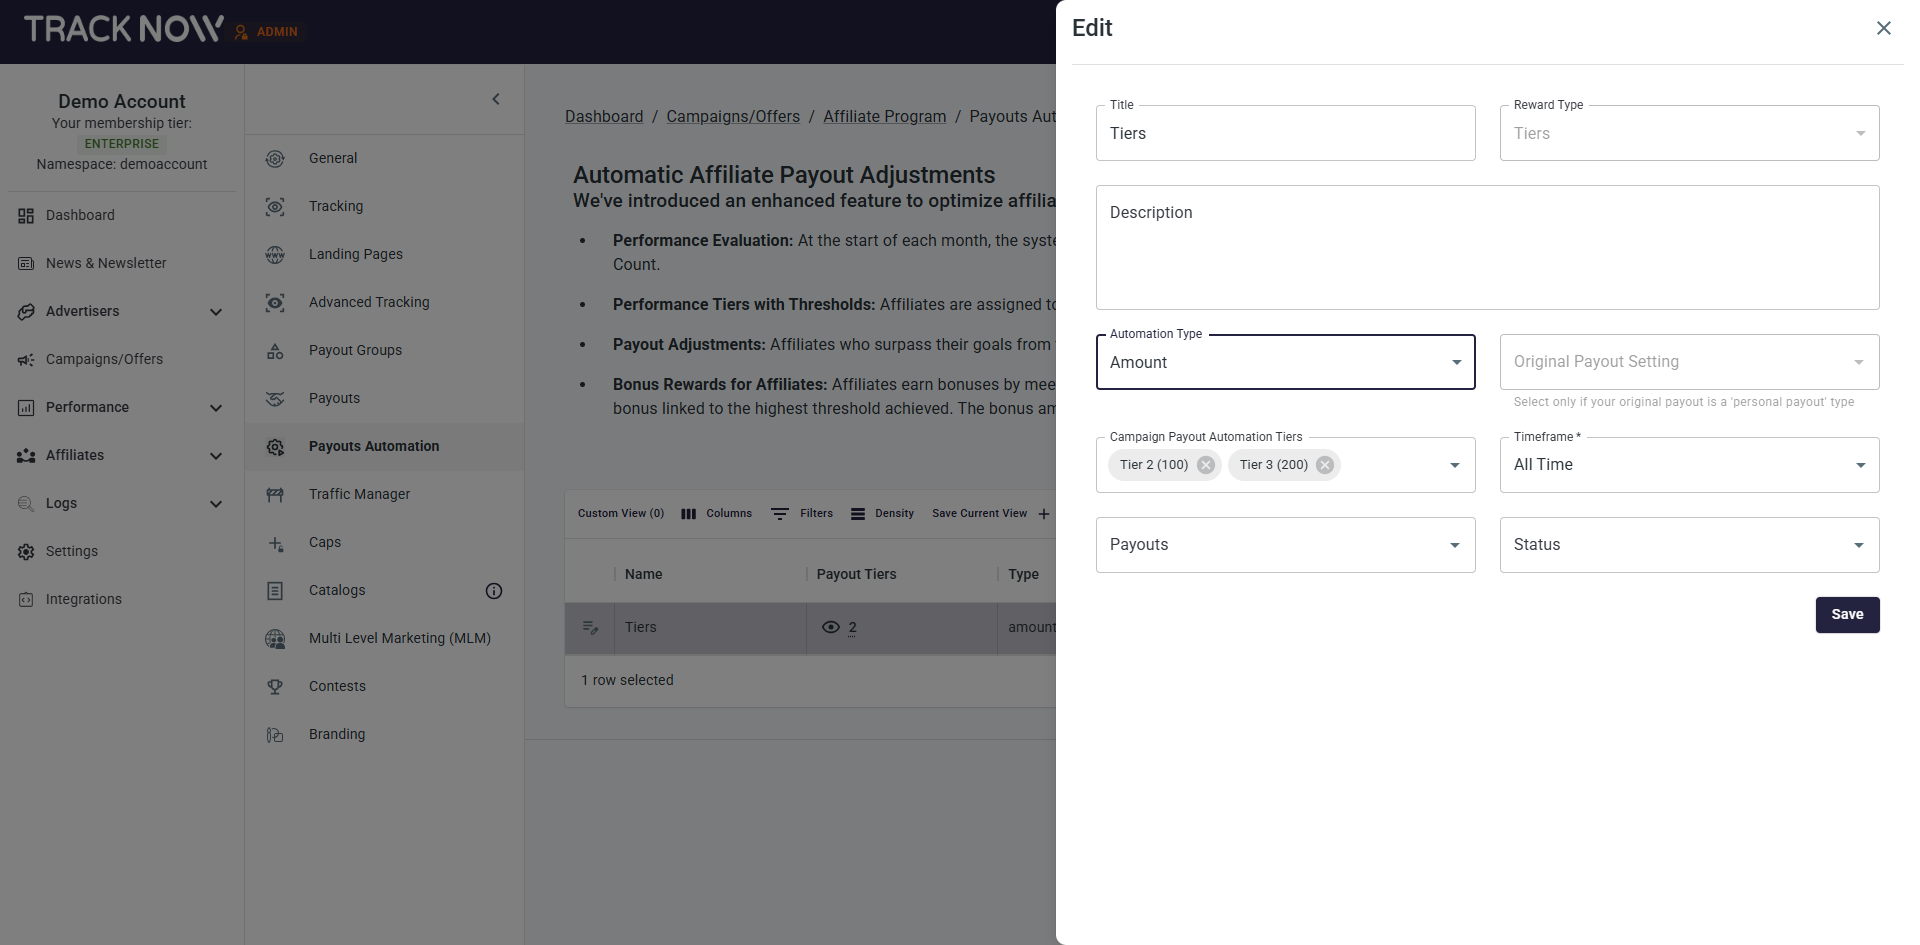
Added support for payout groups in tier configuration. Tiers can now be assigned either individual payouts or grouped payout structures for simplified management and improved consistency.
{% endupdate %}

{% update date="2026-02-23" %}

## Internal Marketing Sources

This new feature enables you to track not only affiliate activity, but also the performance of your internal marketing campaigns (e.g., Google Ads, Meta Ads, and other paid channels) within the same reporting framework.
{% endupdate %}

{% update date="2025-12-29" %}

## New Affiliate Campaign Application Status

{% endupdate %}

{% update date="2025-12-24" %}

## Automatic Affiliate Group Allocation

{% endupdate %}

{% update date="2025-12-19" %}

## New CPC/CPM Logic

{% endupdate %}

{% update date="2025-12-15" %}

## Affiliate Carousels & Banners

{% endupdate %}

{% update date="2025-12-11" %}

## Forex Qualification Groups

{% endupdate %}

{% update date="2025-12-06" %}

## iGaming Multi Currency Payments

{% endupdate %}

{% update date="2025-12-02" %}

## iGaming New Reports

{% endupdate %}

{% update date="2025-11-28" %}

## LP Section

{% endupdate %}

{% update date="2025-11-24" %}

## Leads Macros

{% endupdate %}

{% update date="2025-11-19" %}

## Progressive Commission Model

{% endupdate %}

{% update date="2025-11-14" %}

## Multi-Currency Balances

{% endupdate %}

{% update date="2025-11-10" %}

## New Revshare Payments

{% endupdate %}

{% update date="2025-11-04" %}

## New Signup Page

{% endupdate %}

{% update date="2025-10-24" %}

## Split MLM Tier

{% endupdate %}

{% update date="2025-10-19" %}

## Custom Permissions Roles

{% endupdate %}

{% update date="2025-10-13" %}

## New Hybrid Payouts

{% endupdate %}

{% update date="2025-10-06" %}

## New Languages

{% endupdate %}

{% update date="2025-09-29" %}

## Affiliate KPIs

{% endupdate %}

{% update date="2025-09-23" %}

## Customize Dashboard

{% endupdate %}

{% update date="2025-09-16" %}

## Send News Notifications

{% endupdate %}

{% update date="2025-09-08" %}

## Landing Page Section

{% endupdate %}

{% update date="2025-08-28" %}

## Live Tracking Feed

{% endupdate %}

{% update date="2025-08-22" %}

## Affiliate Contests

{% endupdate %}

{% update date="2025-08-15" %}

## Manager Allocation Rules

{% endupdate %}

{% update date="2025-08-07" %}

## Notification Section

{% endupdate %}
{% endupdates %}


# Smart Links

Smart Links allow you to create a single affiliate link that can redirect referrals to multiple landing pages across different campaigns included in the Smart Link configuration.

You can control how traffic is distributed between the selected campaigns by assigning each one a **weight**.

* **Equal Weights** – All selected campaigns have the same priority, so each click is randomly distributed between them with an equal probability.
* **Custom Weights** – Assign a higher weight to specific campaigns to increase the likelihood that users will be redirected to those campaigns. The higher the weight, the greater the share of traffic that campaign will receive.

***

### Creating a Smart Link

Navigate to:\
**Smart Links** → **Add Smart Link**

<figure><img src="/files/mqgyCVuTrL7pnock2VaP" alt=""><figcaption></figcaption></figure>

<figure><img src="/files/Qs6hI1boeEQtSVqm9zDj" alt=""><figcaption></figcaption></figure>

<table><thead><tr><th width="253">Field</th><th>Description</th></tr></thead><tbody><tr><td><strong>Name</strong> (Required)</td><td>Give your Smart Link a title (Visible to affiliates)</td></tr><tr><td><strong>Description</strong> (Optional)</td><td>Give your Smart Link a description (Visible to affiliates)</td></tr><tr><td><strong>Metric Type</strong> (Required)</td><td>Choose whether all campaigns receive traffic equally (<strong>Equal wight</strong>) or prioritise specific campaigns (<strong>Custom weight</strong>)</td></tr><tr><td><strong>Fallback URL</strong> (Optional)</td><td>Enter a fallback URL to redirect the user to if none of the selected campaigns are available for the user</td></tr><tr><td><strong>Select Campaigns</strong> (Required)</td><td>Select the campaigns that you wish to include in this smart link </td></tr></tbody></table>

#### Selected Campaigns

<figure><img src="/files/W7ynPn6xDNUjvyFSYTtq" alt=""><figcaption></figcaption></figure>

Once you've selected the campaigns to include in the Smart Link, you can configure additional settings for each campaign individually.

* **Weight** – This field is only displayed when **Custom Weights** is selected. Assign a weight to each campaign to control how traffic is distributed. Campaigns with higher weights are more likely to be selected as the destination when a user clicks the Smart Link. The estimated percentage of traffic each campaign will receive is displayed next to its name and updates in real time as you adjust the weights.
* **Add Smart Redirect** – Allows you to create campaign-specific Smart Redirect rules directly from the Smart Link configuration page. [Learn more about **Campaign Smart Redirects** here](https://docs.tracknow.io/campaigns/smart-redirect).

***

### Smart Link Flow

```mermaid
flowchart TD

    A([User clicks an affiliate Smart Link])
    B[Tracknow selects a campaign based on the configured weights]
    C{Does the selected campaign have Smart Redirect rules?}
    D{Does the user/affiliate match any Smart Redirect rule?}
    E[Redirect the user to the landing page configured for the matching Smart Redirect rule]
    F[Redirect the user to the campaign's default landing page]

    A --> B
    B --> C
    C -->|Yes| D
    C -->|No| F
    D -->|Yes| E
    D -->|No| F
```

***

### Retrieving an Affilaite Smart Link

#### As a Manager

Once you've created a Smart Link, click the **Link** icon in the **Actions** column to select an affiliate and generate their Smart Link.

<figure><img src="/files/1T7WKjhmrpBRi4sqHbWK" alt=""><figcaption></figcaption></figure>

#### As an Affiliate

Navigate to:&#x20;

**Smart Links** screen → **Copy** icon&#x20;

<figure><img src="/files/SnrmLh39K24qPz8I68hV" alt=""><figcaption></figcaption></figure>


# Fraud Protection

Tracknow provides several tools to help you prevent fraudulent conversions and lead reports that could result in unfairly inflated commission amounts.

***

### IP Restriction for Postbacks

{% hint style="info" %}
This tool should only be used if you're sending event data from your website's backend (server-side) and using a static IP address. Enabling IP restriction for other types of integrations may lead to missed conversions and inaccurate tracking
{% endhint %}

Ensures that event data is accepted only from a specified IP address, blocking unauthorized or fraudulent conversion injections from other sources. This is especially useful when sending postbacks from your server using a static IP address.

Navigate to **Campaigns** → Locate the relevant campaign → click the three-dot icon under the **Actions** column → **Edit** → **Tracking** tab → Enter the relevant IP address in the **Allowed IPs** field

<figure><img src="/files/ZNqXEI7slkeo2zp6xvay" alt=""><figcaption></figcaption></figure>

You can also use the **Disallowed IPs** field to block postback from specific IPs.

***

### Fraud Score

Each conversion on the **Conversions** screen has a **Fraud Score** assigned by our system based on various metrics such as:

* VPN Usage
* Proxy Usage
* Time period between the initial click and the postback being sent
* Number of postbacks sent from the same client IP

<figure><img src="/files/2KfFP2qcAl1CceQ9akfk" alt=""><figcaption></figcaption></figure>

***

### Fraud Score Automation

Conversions can be assigned with one of the following scores:

* Safe
* Low Risk
* Medium Risk
* High Risk

Tracknow allows you to automatically set a conversion's status to Denied or Revision based on the Fraud score.

**Denied conversions** are shown to the affiliates and the commissions from those conversions will not become available to the affiliate.

**Revision Conversions** are hidden from the affiliate but shown to the manager , allowing him to review those conversions and decide wether to approve or deny them manually.

Navigate to **Campaigns** → Locate the relevant campaign → click the three-dot icon under the **Actions** column → **Edit** → **General** tab

1. Select the minimum fraud score from which the revision status will be applied
2. Select the minimum fraud score from which the denied status will be applied
3. **Save**

<figure><img src="/files/kAWY7DoGllxMu81KU0GP" alt=""><figcaption></figcaption></figure>

***

### Default Conversion Status

Conversions have several Statuses:

1. **Approved** – Once a conversion is marked as approved, the corresponding commission becomes available for the affiliate to request a payout.
2. **Hold** – A temporary status that keeps the conversion on hold for a predefined time period. If no action is taken during this period, the conversion will be automatically approved once the time expires. (Visible to the affiliate)
3. **Pending** - Commissions for pending conversions are not available yet to the corresponding affiliates, requires manual approval. (Visible to the affiliate)
4. **Denied** - Affiliates will not receive commissions for denied conversions.
5. **Revision** - Commissions for conversions under revision are not available to the corresponding affiliates, requires manual approval. (Conversions are not visible to the affiliate)
6. **Test** - A status for conversions that were made as tests - commissions will not be available for the affiliate. (Visible to the affiliate)

You can select what would be the default status applied to new conversions.

Navigate to **Campaigns** → Locate the relevant campaign → click the three-dot icon under the **Actions** column → **Edit** → **Tracking** tab → Select the **Default Conversion Status** → **Save**

<figure><img src="/files/Lgm7XiopFWjTgu3AUFAt" alt=""><figcaption></figcaption></figure>


# Multi Level Marketing (MLM)

With Tracknow's Multi Level Marketing (MLM) tool you can give your affiliates the ability to recruit new affiliates and reward the recruiting affiliates with extra commissions each time their sub-affiliates generate commissions for themselves.

***

### How it Works?

When MLM is enabled, your affiliates will have access to their unique MLM recruiting link. That link will direct potential affiliates to your affiliate sign up form.

If a new affiliate registers using an existing affiliate’s MLM link, the system automatically associates the new affiliate as a sub-affiliate under the recruiting affiliate.

Each time the sub-affiliate generates a commission for himself, the recruiting affiliate can also receive a commission for that sub-affiliate activity.

The sub-affiliates can also recruit their own sub-affiliates and earn from their activity as well.

This gives your affiliates an incentive to recruit new affiliates and helps you to grow your affiliate count which can be translated to more traffic/sales.

***

### MLM Access

The ability to invite new affialites can be enabled globally for all affiliates or individually for selected ones, determining who can recruit new affiliates and receive commissions.

When MLM is enabled globally, all of your affiliates will have access to their MLM recruiting link and any affiliate can recruit new affiliates and earn commissions from their activity.

When MLM is enabled for specific affiliates, only those affiliates will have access to an MLM recruiting link, and only they can recruit new affiliates and earn commissions from their activity.

To enable global MLM go to **Settings** → **Multi Level Marketing (MLM)**

<figure><img src="/files/8rXQrQbvqp121OxhwoUY" alt=""><figcaption></figcaption></figure>

To enable MLM for specific affiliates only go to **Affiliate Management** → click on the **affiliate's name** → **Custom MLM**

<figure><img src="/files/n4blFsLDLOvcXjWipFWU" alt=""><figcaption></figcaption></figure>

***

### MLM Commission Override

MLM commissions can be configured in 4 scopes:

* **Global** - MLM commission rates that apply to all affiliates
* **Campaign** - MLM commission rates that apply only to affiliates participating in the campaign
* **Personal** - MLM commission rates that apply only to specific affiliates
* **Payout** - MLM commission rates that apply only when a specific payout is triggered

Personal MLM commission settings override all other MLM settings\
Payout MLM commission settings override Campaign MLM & Global MLM.\
Campaign MLM commission settings override Global.

These scopes allow you to implement complex MLM structures.

**For Example**

Set global MLM default commission rates that apply to all affiliates.\
\
If you create a specific campaign where MLM commissions should differ from the defaults, you can assign custom rates for that campaign. Affiliates participating in that campaign will receive the custom MLM rates, while all other affiliates will continue receiving the global default commission rates.\
\
If you have a special agreement with some affiliates about their MLM commissions rates, you can configure their personal MLM that will override all other settings and will reward them accordingly.

***

### Configuring MLM Settings

Every MLM settings page (Global, Campaign, Personal or Payout) consists of two main configurations:

* How many levels will be rewarded for each conversion
* What should the MLM commission calculation be based on

When you start enabling levels in the MLM settings page, you are essentially determining how many levels of an affiliate's upline will be rewarded with MLM commissions for a conversion he generates.

Let's look at the following MLM settings:

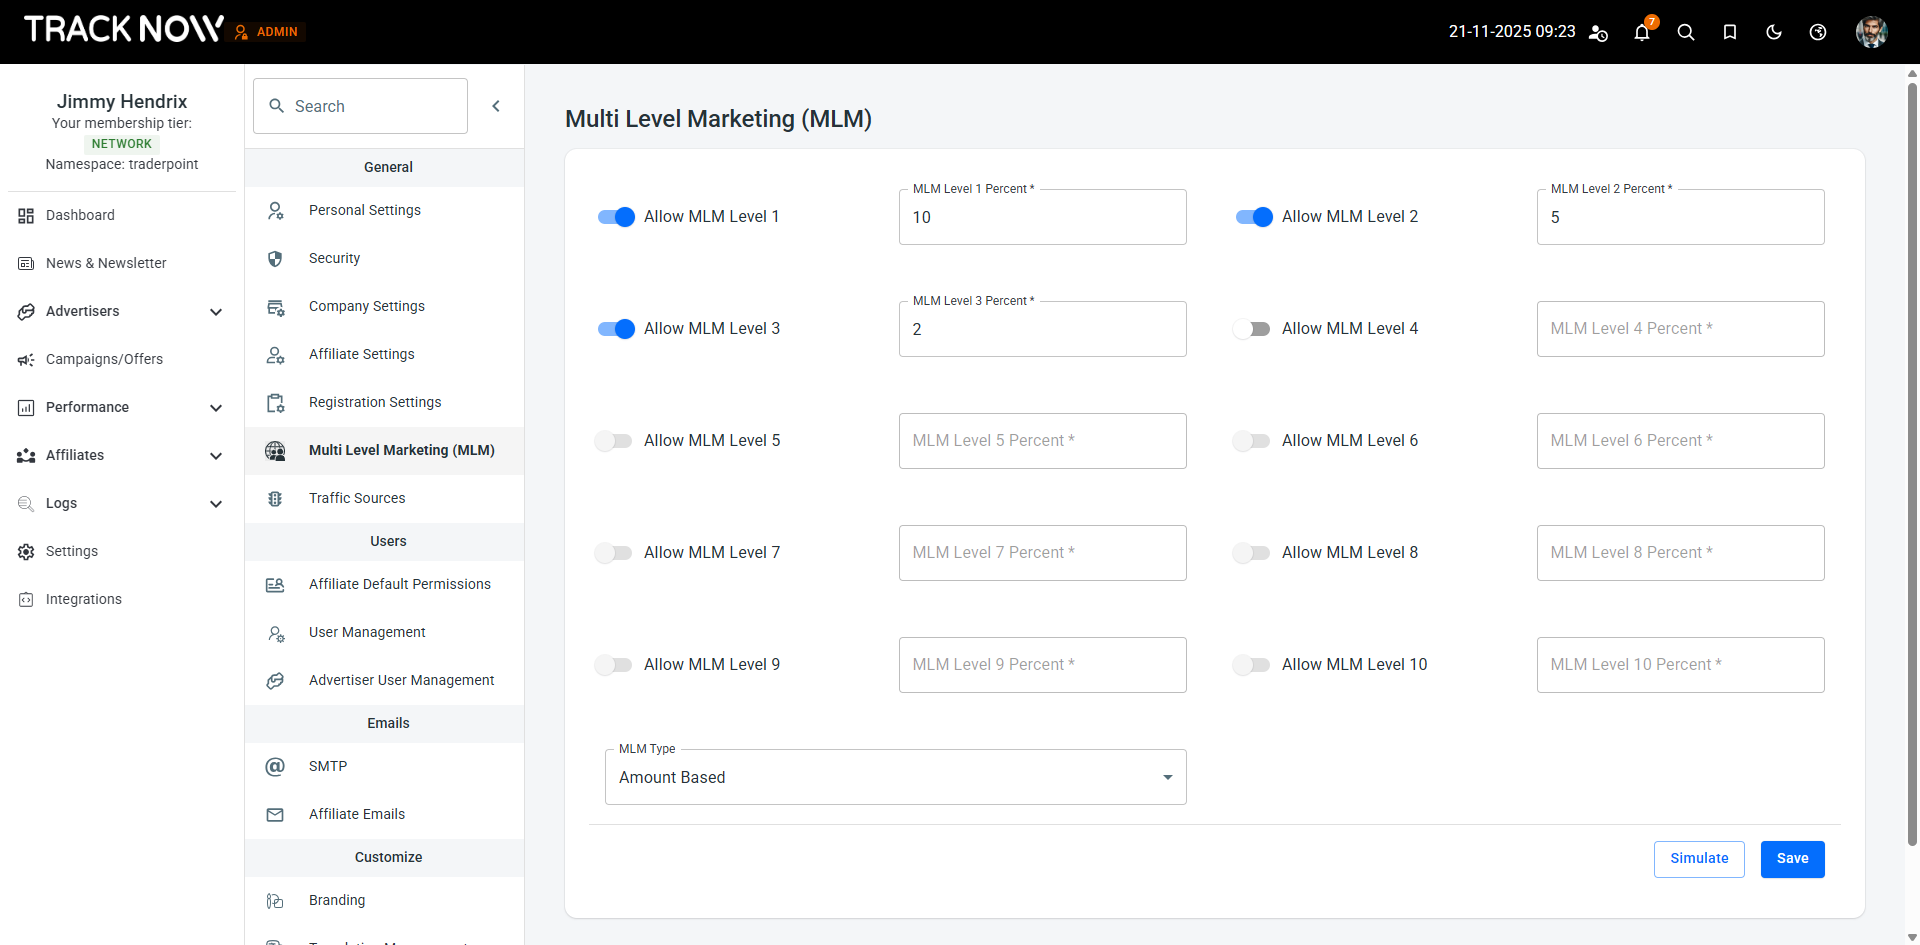
<figure><img src="/files/AqjOWaFlPLyUM9aSThFg" alt=""><figcaption></figcaption></figure>

3 levels are enabled. This means that when an affiliate generates a conversion, 3 affiliates of his upline will be rewarded for that conversion.

The values entered next to each level will determine the commission rate each level will receive according to the selected MLM type.

In this example, the MLM type is 'Amount Based' meaning that the commission will be based on the amount value of the conversion.

When an affiliate generates a conversion, his referring affiliate (the one who is 1 level above him) will receive MLM commission based on the value configured next to 'Allow MLM Level 1'.

That affiliate's referring affiliate (the one who is 2 levels above the affiliate who generated the conversion) will receive MLM commission based on the value configured next to 'Allow MLM Level 2'.

That affiliate's referring affiliate (the one who is 3 levels above the affiliate who generated the conversion) will receive MLM commission based on the value configured next to 'Allow MLM Level 3'.

We'll use the following affiliate hierarchy as an example:

<figure><img src="/files/A97xBim9k6EXxi4uYPad" alt="" width="361"><figcaption></figcaption></figure>

**Mick Jagger** was the first affiliate, which then recruited **Robert Plant** as an affiliate.\
\
**Mick** in this case is one level above **Robert**.\
\
Then, **Robert** recruited **Bruce Springsteen** as an affiliate.\
\
**Mick** is two levels above **Bruce**.\
**Robert** is one level above **Bruce**.\
\
Then, **Bruce** recruited both **Axl Rose** and **John Bon Jovi**.\
\
**Mick** is three levels above **Axl** and **John**.\
**Robert** is two levels above **Axl** and **John**.\
**Bruce** is one level above **Axl** and **John**.\
\
Then, **Axl** recruited **Kurt Cobain** as an affiliate.\
\
**Mick** is four levels above **Kurt**.\
**Robert** is three levels above **Kurt**.\
**Bruce** is two level above **Kurt**.\
**Axl** is one level above **Kurt**.\
**John is not related to Kurt because John is not in Kurt's upline or downline.**

If Kurt generated a conversion (let's say he referred a client that made a purchase for the amount of $100). Kurt will get a commission for that sale which is unrelated to MLM because he is the direct seller for the client, so his commission will be awarded by the payout configured for that campaign.

Axl, who is Kurt's referring affiliate and is 1 level above him, will get an MLM commission for the amount of 10% of the conversion amount (10% of $100 = $10).

Bruce, who is 2 levels above Kurt, will get an MLM commission for the amount of 5% of the conversion amount (5% of $100 = $5)

Robert, who is 3 levels above Kurt, will get an MLM commission for the amount of 2% of the conversion amount (2% of $100 = $2)

So in total, the sale that Kurt made, triggered the following commissions:\
$10 + $5 + $2 + the commission Kurt received from the campaign payout.

***

### MLM Commission Types

{% tabs %}
{% tab title="Commission Based" %}

<figure><img src="/files/V1OpvXlEFfVGCuaO2CeJ" alt=""><figcaption></figcaption></figure>

Each level's MLM commission will be calculated as a percentage from the commission earned by the affiliate who generated the conversion.

**Example**\
Kurt made a sale and received $50 in commission from the campaign payout.\
Axl (1 level above Kurt) will receive a commission that is 10% of Kurt's commission ($5).\
Bruce (2 levels above Kurt) will receive a commission that is 5% of Kurt's commission ($2.5).\
Robert (3 levels above Kurt) will receive a commission that is 2% of Kurt's commission ($1).\
Total commissions triggered by this sale: $50 + $5 + $2.5 + $1 = $58.5
{% endtab %}

{% tab title="Fixed Commission" %}

<figure><img src="/files/XIflesHrTp2modYlkEP5" alt=""><figcaption></figcaption></figure>

Each level's MLM commission will be calculated as a fixed commission for the amount you input next to each level.

**Example**\
Kurt made a sale and received $50 in commission from the campaign payout.\
Axl (1 level above Kurt) will receive a commission that is $10.\
Bruce (2 levels above Kurt) will receive a commission that is $5.\
Robert (3 levels above Kurt) will receive a commission that is $2.\
Total commissions triggered by this sale: $50 + $10 + $5 + $2 = $67
{% endtab %}

{% tab title="Amount Based" %}

<figure><img src="https://help.tracknow.io/wp-content/uploads/2025/11/image-6.png" alt=""><figcaption></figcaption></figure>

Each level's MLM commission will be calculated as a percentage from the amount of the conversion.

**Example**\
Kurt made a sale where the client paid $200.\
Axl (1 level above Kurt) will receive a commission that is 10% of the conversion amount ($20).\
Bruce (2 levels above Kurt) will receive a commission that is 5% of the conversion amount ($10).\
Robert (3 levels above Kurt) will receive a commission that is 2% of the conversion amount ($4).\
Total commissions triggered by this sale: $20 + $10 + $4 + the commission Kurt received from the campaign payout
{% endtab %}

{% tab title="Relative Commission" %}

<figure><img src="https://help.tracknow.io/wp-content/uploads/2025/11/image-7-1024x504.png" alt=""><figcaption></figcaption></figure>

Each level's MLM commission will be calculated as a percentage based on the commission the affiliate below them received.

**Example**\
Kurt made a sale and received $50 in commission from the campaign payout.\
Axl (1 level above Kurt) will receive a commission that is 10% from Kurt's commission ($5).\
Bruce (2 levels above Kurt) will receive a commission that is 5% from Axl's commission ($0.25).\
Robert (3 levels above Kurt) will receive a commission that is 2% from Bruce's commission ($0.005).\
Total commissions triggered by this sale: $50 + $5 + $0.25 + $0.005 = $55.225
{% endtab %}

{% tab title="Split Commission" %}

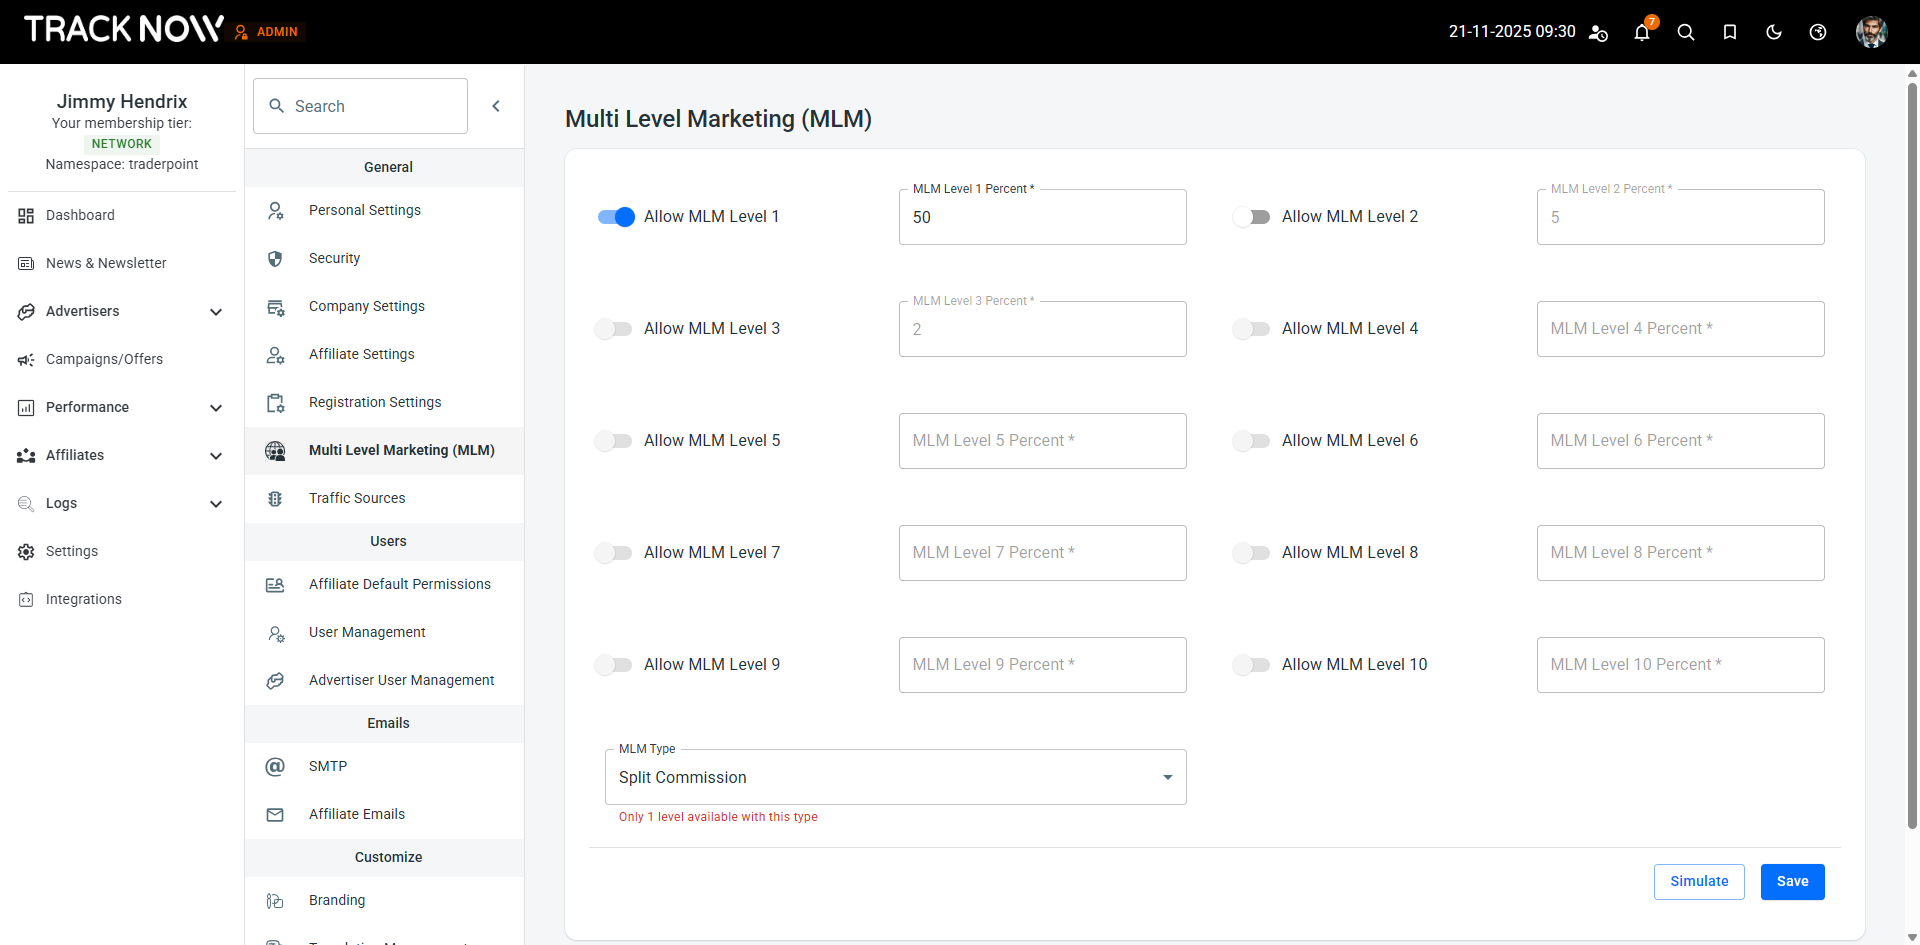
<figure><img src="https://help.tracknow.io/wp-content/uploads/2025/11/image-8.png" alt=""><figcaption></figcaption></figure>

This MLM type can only be applied to 1-level MLM structures. The referring affiliate’s commission is calculated as a percentage of the commission earned by the affiliate who generated the sale, and this amount is deducted from the commission of the affiliate who made the sale.

**Example**\
Kurt made a sale and should receive $50 in commission from the campaign payout.\
Axl (1 level above Kurt) will receive a commission that is 10% from Kurt's commission ($5).\
Kurt's actual commission will be $45 ($50 -$5).
{% endtab %}
{% endtabs %}


# Custom Commission Splits for Sub-Affiliates (MLM)

When using [Multi-Level Marketing (MLM)](/features/multi-level-marketing-mlm), affiliates can recruit new affiliates into the program. You can designate certain affiliates as **Master Affiliates** and allow them to control the commission split with the affiliates they directly recruit under them.

***

### Designating a Master Affiliate

Navigate to **Affiliates** → **Management** → Locate the relevant affiliate and click on his name → **Custom MLM** → **Enable Custom MLM** → Toggle on **Master Affiliate**

<figure><img src="/files/rxUKw4UEOMa7QnT4I6qE" alt=""><figcaption></figcaption></figure>

<figure><img src="/files/vnH1C54qI59xAa9deKqz" alt=""><figcaption></figcaption></figure>

<table><thead><tr><th width="221">Field</th><th>Description</th></tr></thead><tbody><tr><td><strong>Allow MLM Level 1</strong> (Toggle)</td><td>When using the Split Commission MLM model, it is limited to a single level. This means the referring affiliate can only split commissions with their direct sub-affiliates (affiliates one level below them).</td></tr><tr><td><strong>MLM Level 1 Percent</strong> (Input Field)</td><td>If a parent affiliate has not set a split for a sub-affiliate, this value will be used as the default. Enter the percentage the parent affiliate should receive from commissions generated by their sub-affiliates.</td></tr><tr><td><strong>Max Commission Split %</strong> (Input Field)</td><td>You can set a maximum percentage that a parent affiliate can allocate to themselves from commissions generated by their sub-affiliates.</td></tr></tbody></table>

#### Example

<figure><img src="/files/5Cy74UAwcvBIeEBWNRW4" alt=""><figcaption></figcaption></figure>

Based on the settings above, the default commission split is:

* 30% to the parent affiliate
* 70% retained by the sub-affiliate

The parent affiliate can set custom splits for each sub-affiliate, but cannot exceed a maximum of 80% for themselves (leaving at least 20% for the sub-affiliate).

***

### Master Affiliate: Configuring Custom Splits for Sub-Affiliates

In the Master Affiliate portal, navigate to **Referrals** → **Sub-Affiliates**.

<figure><img src="/files/OcprT2OW1qHMNJK1RyNA" alt=""><figcaption></figcaption></figure>

This screen allows the Master Affiliate to view all direct sub-affiliates and manage the commission split for each one.

To edit the split percentage for a specific sub-affiliate, click the **Edit** button next to that sub-affiliate.

<figure><img src="/files/MQtN4RIzP6Yi7ZLdsXCR" alt=""><figcaption></figcaption></figure>


# Custom Notifications

Configuring custom notifications for various metrics allows you to better track your campaign and affiliate activity. For example, get notified which affiliates generated less than 10 conversions last week, or which campaign generates more then $1000 in sales each day.

***

### How to create a new notification

Navigate to **Settings** → **Custom Notifications** → **Create New Notification**

<figure><img src="/files/UKmp5JENbSc57qnN63uR" alt=""><figcaption></figcaption></figure>

***

### Configuring a notification

<figure><img src="/files/YvtTUOu2tedS2MsZFhRa" alt=""><figcaption></figcaption></figure>

| Field                   | Description                                                                                                          | Options                                                                                                                                                                                                                                                                                                                                                               |
| ----------------------- | -------------------------------------------------------------------------------------------------------------------- | --------------------------------------------------------------------------------------------------------------------------------------------------------------------------------------------------------------------------------------------------------------------------------------------------------------------------------------------------------------------- |
| **Name**                | Give your notification a clear, descriptive name. This helps you quickly identify what the alert tracks              |                                                                                                                                                                                                                                                                                                                                                                       |
| **Notification Type**   | Choose what kind of activity will be measured (affiliate activity or campaign activity)                              |                                                                                                                                                                                                                                                                                                                                                                       |
| **Affiliates**          | Select specific affiliates you want to include in the measurement. Leave empty to include all affiliates             |                                                                                                                                                                                                                                                                                                                                                                       |
| **Campaigns/Offers**    | Select specific campaigns you want to include in the measurement. Leave empty to include all campaigns               |                                                                                                                                                                                                                                                                                                                                                                       |
| **Lookback Time**       | Define the time period over which the system will measure performance                                                |                                                                                                                                                                                                                                                                                                                                                                       |
| **Metric**              | Choose which metric will be measured                                                                                 | <p><strong>Amount</strong> - Will measure the total amount value of your conversions.<br><strong>Conversions</strong> - Will measure the total count of conversions.<br><strong>Commission</strong> - Will measure total commissions amount value of your conversions.<br><strong>Lifetime Connections</strong> - Will measure the count of lifetime connections.</p> |
| **Comparison Type**     | Select how the system should compare the measured value against your threshold ('Greater than' or 'Less than')       |                                                                                                                                                                                                                                                                                                                                                                       |
| **Threshold**           | Enter the target value the metric will be compared against                                                           |                                                                                                                                                                                                                                                                                                                                                                       |
| **Payment Types**       | Only include conversions with the selected payout types are applied (CPS, CPA, REG). Leave blank to include all      |                                                                                                                                                                                                                                                                                                                                                                       |
| **Conversion Statuses** | Only include conversions with the selected statuses applied (approved, pending, on hold). Leave blank to include all |                                                                                                                                                                                                                                                                                                                                                                       |

***

### Example

A notification will trigger if an affiliate generated less then 3 conversions in a time period of 1 week.

<figure><img src="/files/goxbfw9z3HqF4yVo5Ry5" alt=""><figcaption></figcaption></figure>

The settings used:

| Field                   | Value                                                         |
| ----------------------- | ------------------------------------------------------------- |
| **Name**                | Affiliate makes less then 3 conversions in a week             |
| **Notification Type**   | Affiliate. Because we are measuring affiliate activity        |
| **Affiliates**          | Blank. Because we want to measure all affiliates              |
| **Campaigns/Offers**    | Blank. Because we want to measure activity from all campaigns |
| **Lookback Time**       | 1 week                                                        |
| **Metric**              | Conversions                                                   |
| **Comparison Type**     | Less than                                                     |
| **Threshold**           | 3                                                             |
| **Payment Types**       | Blank. Because we want to include all conversions             |
| **Conversion Statuses** | Blank. Because we want to include all conversions             |


# Additional Currencies

By default, your Tracknow dashboard displays all financial data such as commissions, transaction amounts, and payout requests using a single currency: the **company currency** configured in your settings.

With the **Additional Currencies** feature, you can enable multiple currencies and apply a specific currency per campaign. Affiliates that participate in that campaign will earn their commission in the selected currency.

Affiliates that participate in multiple campaigns that have different campaign currencies will see multiple balances for each currency and they will be able to request a payout for each balance.

<figure><img src="/files/kNnTFiayIAiSGPwa7Z0L" alt=""><figcaption></figcaption></figure>

***

### Adding Currencies

Navigate to **Settings** → **Additional Currencies** → **Add New**

<figure><img src="/files/i01R6MjjXR3dsX3ydD60" alt=""><figcaption></figcaption></figure>

***

### Choosing The Campaign Default Currency

Navigate to **Campaigns/Offers** → **Three-dot icon** under the **Actions** column → **Edit** → **Campaign Default Currency**

<figure><img src="/files/YapG6glUhQ6RMTVvX34n" alt=""><figcaption></figcaption></figure>

Selecting a Campaign Default Currency means that all financial data associated with this campaign will be displayed in the chosen currency. (Leaving this setting blank will use the Company Currency as the Campaign Currency)

If you send conversion data to this campaign (via Postback for example) and specify a currency that is different from the Campaign Default Currency, our system will convert the amount to the Campaign Default Currency.

**For example**

If the selected Campaign Default Currency is USD and a conversion is sent to that campaign with an amount value of 100 and specified currency of EUR, our system will display the conversion amount with the converted value to USD (100 EUR ≈ 115.2 USD). Otherwise, every postback that doesn't specify a currency, the amount value will be displayed in the Campaign Default Currency.

***

### Configuring Payment Methods Per Currency

When allowing affiliates to accumulate commissions in various currencies, you can configure your payment methods for specific currencies as well.

For example, if an affiliate wants to request his USD balance and you support transferring funds in USD using PayPal only, you can limit your PayPal payment method to USD only.

To configure that, navigate to **Settings** → **Payment Methods** → Edit an existing Payment Method or create a new one

<figure><img src="/files/VnbO6aQYMcvoth7Wa8IX" alt=""><figcaption></figcaption></figure>


# Clients

Tracknow automatically creates a dedicated profile for each client who completes a conversion through an affiliate referral. When a `customer_id` is provided, this profile enables clear visibility into individual clients within the platform, including their full conversion history and the commissions they generate for associated affiliates.

***

### Clients Screen

Navigate to **Performance** → **Clients**

<figure><img src="/files/mSViLhjBe2HrnGqau79h" alt=""><figcaption></figcaption></figure>

On this screen you can:

* View the list of clients that completed conversion after being referred by an affiliate
* Click on each client to open their overview page for more details
* Add clients manually or import them
* Control the client's association with an affiliate

***

### Requirements for Client Profile Creation

In order for the system to successfully create a client profile, the following parameter must be included in the postback you sent for conversions:

* `customer_id` - A client identifier like email address or your webstore's internal identifier string representing the client.

#### Postback Example

```
https://example-tracking.tracknow.info/postback?click_id=aed548f8-ca63-454c-a05a-a02726cc136f&campaign_id=1&order_id=11295&amount=150&customer_id=john.doe%40example.com
```

***

### Client Overview Screen

Navigate to **Performance** → **Clients** → Click on the **Client ID** of the relevant client

<figure><img src="/files/K0BUJ5ql5jm4uwWgwbVR" alt=""><figcaption></figcaption></figure>

On this screen you'll be able to see the client's details, which affiliate the client is associated with and view a detailed list of this client's conversions.

***

### Lifetime Attribution

When a postback that includes the following parameters is sent:

* `customer_id={VALUE}`
* `new_customer=true`

The client will automatically be associated with the affiliate who referred him with lifetime attribution. However, in order to enable Lifetime commissions, you'll need to create a [lifetime-type payout](https://docs.tracknow.io/payouts/lifetime-payout).

{% hint style="info" %}
Postbacks for new clients that are sent without `new_customer=true` will still create a client profile but that client will not have a lifetime association with his referring affiliate.
{% endhint %}

***

### Affiliate Access

You can configure [affiliate permissions](https://docs.tracknow.io/affiliates/affiliate-permissions) based on whether you want them to have access to their referred clients list or not.


# Parking Domains

Affiliates have the option to customize their tracking links generated by Tracknow, by adding their own custom subdomains and applying those subdomains to their tracking links.

***

### Enabling/Disabling Parking domains for Affiliates

A manager can control whether affiliates can change the domain of their tracking links by enabling or disabling this feature under [**Affiliate Permissions**](https://docs.tracknow.io/affiliates/affiliate-permissions) **→ Parking Domains**.

***

### How an Affiliate Can Add a Parking Domain?

The affiliate must log in to the service that is hosting his domain, where his DNS records are managed (i.e. GoDaddy, Cloudflare, Google Domains).

{% hint style="info" %}
The field naming may vary between different providers
{% endhint %}

1. Navigate to the area where you manage your DNS records
2. Create a new DNS record of the CNAME type
3. On the 'Name' field enter the sub domain (i.e. **affiliate**)
4. On the 'Value' field enter **whitelabel.tracknow\.io**
5. If given the option to configure proxy status, select 'DNS Only'
6. Save the record

On the affiliate portal, navigate to **Settings** → **Parking Domains** → **Add New**

<figure><img src="/files/OkpVP69Bxu5uqvaUIe3g" alt=""><figcaption></figcaption></figure>

Input the subdomain → **Save**

<figure><img src="/files/Gxtk1phAxENOIybY1C5E" alt=""><figcaption></figcaption></figure>


# Translation Management

Affiliate portals support multiple languages. You can also modify specific terms and text within the portal using the Translation Management tool, allowing you to adjust the wording to match your preferred terminology.

***

### Changing Text

Navigate to **Settings** → **Translation Management** → Locate the column of the language in which you'd like to change the text → Use the column filter option to search for the current text → Double click on the relevant term and enter the desired term instead.

<figure><img src="/files/n3TcqjNR0Eec6lvjuYcG" alt=""><figcaption></figcaption></figure>

***

### Configuring Available Languages for the Affiliate Portal

Tracknow supports multiple languages for the affiliate portal, and you can control which languages are available to affiliates.

Navigate to **Settings** → **Translation Management** → Under **Affiliate Platform Languages**, select the languages you want to make available in the **Preferred Languages** field.

<figure><img src="/files/jpV56g1IPDOCos8FWH0m" alt=""><figcaption></figcaption></figure>

{% hint style="info" %}
If no languages are selected, affiliates will be able to see all supported languages.
{% endhint %}

***

### Setting the Default Language for the Affiliate Portal

You can set a default language for the affiliate portal.

Navigate to **Settings** → **Translation Management** → Under **Affiliate Platform Languages**, select the language you want to the default language in the **Default Language** field.


# Using MCP with Tracknow

The **MCP Integration** enables AI tools and other MCP-compatible clients to securely access your Tracknow account. After configuring the connection, you can use supported applications to retrieve information, manage your affiliate program, and perform supported Tracknow actions using natural language.

***

## Generate an API key

Login to your Tracknow dashboard and navigate to:\
**Settings** → **API Keys** → **Add New**&#x20;

<figure><img src="/files/oNXqrW7tHrzOnhfJtbva" alt=""><figcaption></figcaption></figure>

## Configure the MCP

MCP server URL:

{% code overflow="wrap" %}

```
https://mcp.tracknow.io/mcp
```

{% endcode %}

MCP server configuration:

{% code overflow="wrap" %}

```
{
    "mcpServers": {
      "tracknow-admin": {
        "url": "https://mcp.tracknow.io/mcp",
        "headers": {
          "Authorization": "Bearer YOUR_API_KEY"
        }
      }
    }
  }
```

{% endcode %}

{% hint style="info" %}
Replace YOUR\_API\_KEY with your actual generated API key.

You can rename **tracknow-admin** to any name you prefer.
{% endhint %}


# Adding New Managers

Tracknow users can be divided into two main groups: **Affiliates** and **Managers**.\
Each group has its own login page. **Managers** log in to the Tracknow **Admin Portal**, while **Affiliates** log in to the Tracknow **Affiliate Portal**.

You can add multiple members of your team as **Managers** in Tracknow and configure their permissions according to their specific roles. Each manager will have their own login credentials, and their access to pages and actions will be limited based on the permissions assigned to them.

***

### Adding a New Manager

Navigate to **Settings** → **User Management** → **Add User Manager**

<figure><img src="/files/25Xx8zAAwUwxAw3JJLp4" alt=""><figcaption></figcaption></figure>

Fill out the user's details.

<table><thead><tr><th>Field</th><th data-type="checkbox">Mandatory</th><th>Description</th></tr></thead><tbody><tr><td>First Name</td><td>true</td><td>The user's first name</td></tr><tr><td>Last Name</td><td>true</td><td>The user's last name</td></tr><tr><td>Email</td><td>true</td><td>The user's email address used to log in to Tracknow</td></tr><tr><td>Custom ID</td><td>false</td><td>You can set a custom value unique to this user, which can be passed as a macro to a landing page</td></tr><tr><td>Phone Number</td><td>false</td><td>The user's phone number</td></tr><tr><td>Password</td><td>true</td><td>The user's password</td></tr><tr><td>Affiliate Managed Groups</td><td>false</td><td>If the role of this user is to manage affiliates, you can assign specific <a href="https://docs.tracknow.io/affiliates/affiliate-groups">affiliate groups</a> to this manager</td></tr><tr><td>Assignable Manager</td><td>false</td><td>Toggle <strong>on</strong> if this user’s role includes managing affiliates; otherwise, toggle <strong>off</strong></td></tr></tbody></table>

***

### Manager Permission Presets

When adding users with different roles, you can create **permission presets** and save them for future use, making it easy to assign the same permissions when adding new team members with similar roles.

When configuring permissions for a specific role for the first time, adjust the permissions for the relevant user. A **`Save Preset`** button will then appear next to the **Permissions** selection box.\
Click this button to save the preset once the permissions have been configured.

<figure><img src="/files/UH8CecRseN3EjRbZ3XBu" alt=""><figcaption></figcaption></figure>

***

### Emailing the New User his Credentials

Once the new user's details are filled in and permissions are configured, you can check the **Send Credentials by Email** checkbox below the **Permissions** section. This will send the login credentials to the email address provided for the user.

<figure><img src="/files/Q0e4lt1MlcWQYV1LGMxN" alt=""><figcaption></figcaption></figure>


# Assigning Affiliates to Managers

Each affiliate is assigned to a manager upon registration.

Affiliates who register through the default registration link are assigned based on your system configuration: they can be assigned to the default manager, a random manager, or the manager with the fewest affiliates.

Each manager also has a unique registration URL. Affiliates who register through a manager’s dedicated link are automatically assigned to that specific manager.

Affiliates can be reassigned to a different manager at any time from the Affiliate Management screen.

***

### Affiliate Registration URL

The affiliate registration URL can be found on the dashboard of every manager.

<figure><img src="/files/9yNPWrDqwTng967534Bu" alt=""><figcaption></figcaption></figure>

Managers have the option to generate:

1. A unique registration URL that assigns registering affiliates to this specific manager
2. A default registration URL that assigns registering affiliates to the default manager configured in the system
3. A URL to the affiliate login page

<figure><img src="/files/5asGkywYt4LCYDXRFLDD" alt=""><figcaption></figcaption></figure>

***

### Setting Up the Manager Association Flow

Navigate to **Settings** → **Registration Settings** → Select the **Manager Allocation Type**

<figure><img src="/files/vaG3y5a7NyygRaCRgIwr" alt=""><figcaption></figcaption></figure>

This setting applies only to affiliates who register through the default registration link.

It does not apply to registrations made through manager-specific links, which include the `mid=` parameter.

***

### Setting Up the Default Manager

Navigate to **Settings** → **Registration Settings** → Select the **Default Manager**

<figure><img src="/files/MUxRXMxKbDfZTwjgmNqg" alt=""><figcaption></figcaption></figure>

***

### Manual Affiliate Reassignment

Navigate to **Affiliates** → **Management** → Click on the name of the affiliate you want to reassign → **Partner Details** → Select the manager to whom you wish to reassign the affiliate → **Save**

<figure><img src="/files/oUrKl8TPxNwbpjr6idc4" alt=""><figcaption></figcaption></figure>


# Manager Commissions

If your affiliate program includes assigning commissions to a manager on your team, Tracknow supports manager commissions.

A manager will be able to accumulate commissions from every conversion generated by affiliates that  are directly assigned under him.

Keep in mind that managers are internal admin users in the system, meaning members of your team, not affiliates.

{% hint style="info" %}
Keep in mind that managers cannot submit payment requests for their accumulated commissions, as they are not affiliates but internal team members. Manager commissions are reflected on all relevant conversions and are also available in reports.
{% endhint %}

***

### Configuring Commissions for Managers

Navigate to **Settings** → **User Management** → Click on the name of the manager you want to start assigning commissions → **Edit Manager Commissions** → **Enable Manager Commissions** → Select the commission calculation type and enter the commission rate.

<figure><img src="/files/Z0AY7SPtjNiu0q8ugdA6" alt=""><figcaption></figcaption></figure>

<figure><img src="/files/gORX8cMgE0By29YARdRM" alt=""><figcaption></figcaption></figure>

#### Commission Types

{% tabs %}
{% tab title="Commission Based" %}
A manager’s commission is calculated as a percentage of the affiliate’s commission.

**Example:**\
An affiliate generates a conversion with a $10 commission.\
The manager’s commission is set to 10% (commission-based).

In this case, the manager earns $1, resulting in a total of $11 in commission allocated between the affiliate and the manager.
{% endtab %}

{% tab title="Fixed Commission" %}
A manager’s commission is a fixed amount, not dependant on anything.

**Example:**\
An affiliate generates a conversion with a $10 commission.\
The manager’s commission is set to $2 (fixed-commission).

In this case, the manager earns $2, resulting in a total of $12 in commission allocated between the affiliate and the manager.
{% endtab %}

{% tab title="Amount Based" %}
A manager’s commission is calculated as a percentage of the conversion amount value.

**Example:**\
An affiliate generates a conversion with an amount value of $100.\
The manager’s commission is set to 2% (amount-based).

In this case, the manager earns $2.
{% endtab %}

{% tab title="Split Commission" %}
A manager’s commission is calculated as a percentage of the affiliate’s commission and the manager's commission will be deducted from the affialite's commission.

**Example:**\
Your camapign payouts are configured to reward affilaites with 10% of the conversion amount.\
Affialite generates a conversion with an amount value of $100.\
Affialite's commission should be $10.\
The manager’s commission is set to 50% (split-commission).

In this case, the manager earns $5, leaving the affialite with a commission of $5 instead of $10.\
Resulting in a total of $10 in commission allocated between the affiliate and the manager.
{% endtab %}
{% endtabs %}

***

### Where the Manager Commissions are Shown

Manager commissions can be seen on every conversion item (on both affiliate and admin portal).

**Performance** → **Conversions**

<figure><img src="/files/y7CTzyEnUw9dICGZ8Jpe" alt=""><figcaption></figcaption></figure>

Manager commission can also be seen on reports.

**Performance** → **Reports**

<figure><img src="/files/JyiNZBPGiuiKwJHqhV2Y" alt=""><figcaption></figcaption></figure>


# News & Newsletter

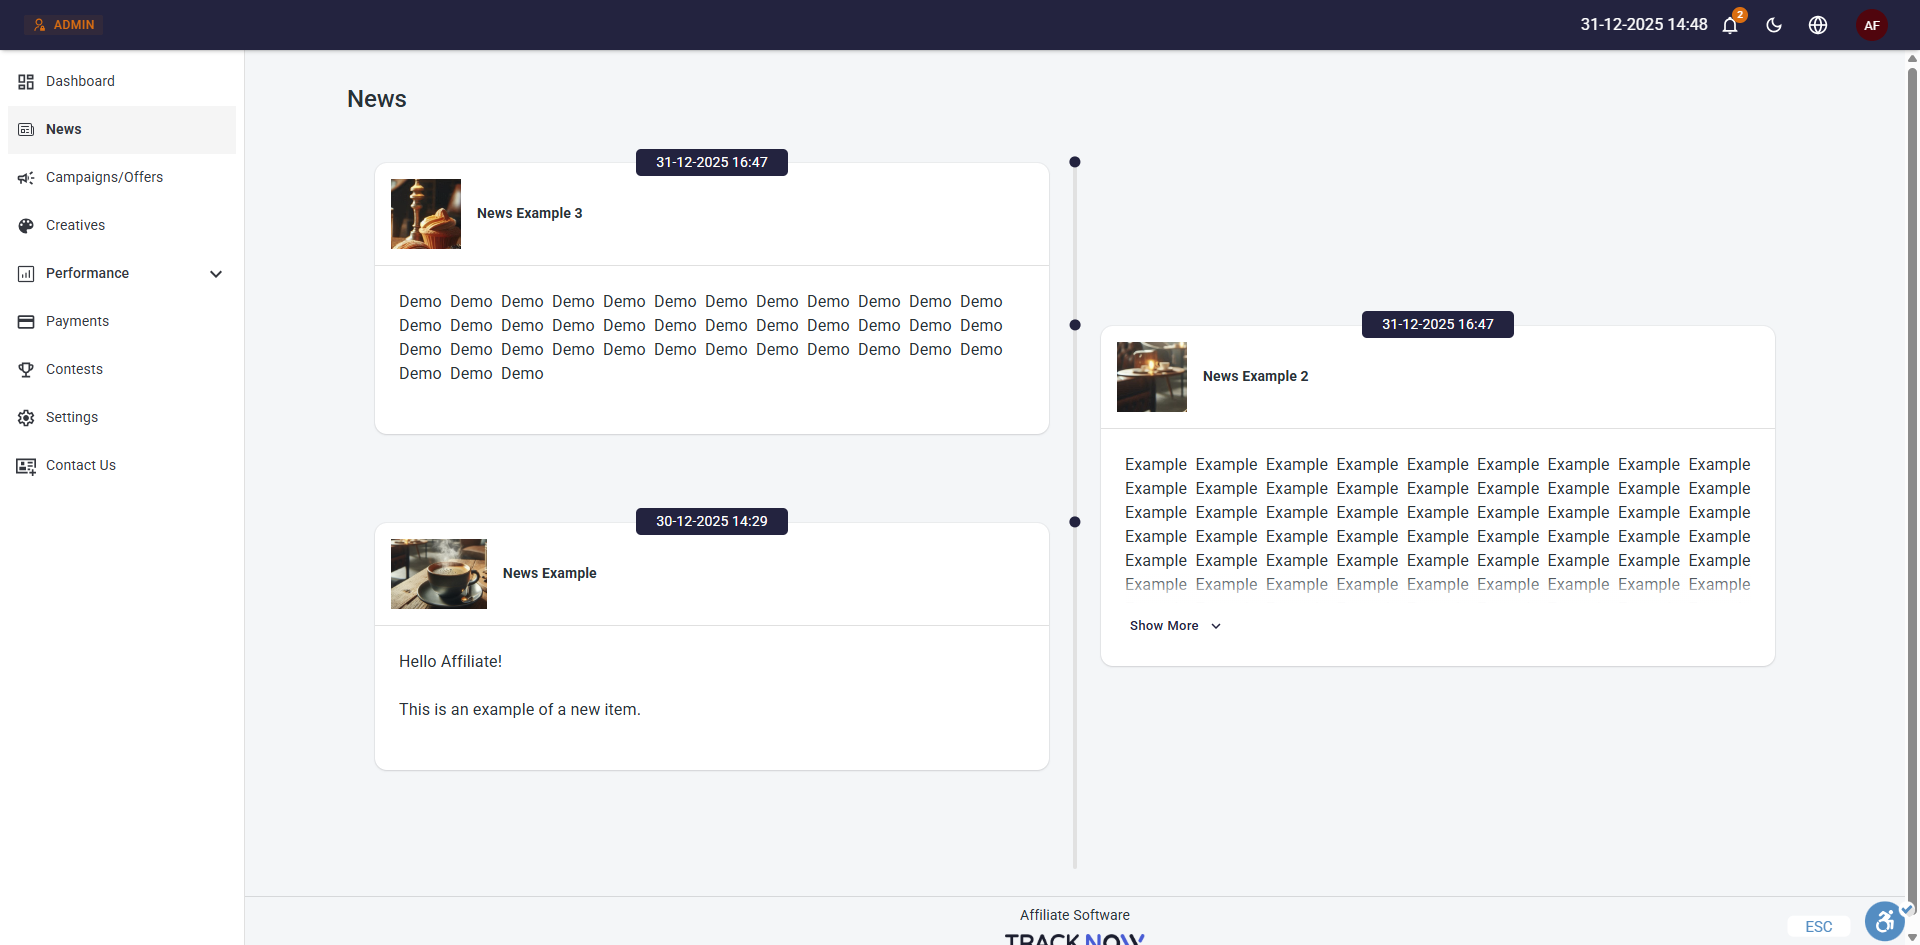
This feature allows you to create news items that will be visible to affiliates on their portal (News, updates, etc.)

<figure><img src="https://help.tracknow.io/wp-content/uploads/2025/12/image-4.png" alt=""><figcaption></figcaption></figure>

***

### Creating News

**News & Newsletter** → **Add News**

<figure><img src="/files/UgZHNpuwYPQIqKTTcl4U" alt=""><figcaption></figcaption></figure>

<figure><img src="/files/9HhLW3P2M18ywQPe99nF" alt=""><figcaption></figcaption></figure>

| Field                | Description                                                                                                                                                |
| -------------------- | ---------------------------------------------------------------------------------------------------------------------------------------------------------- |
| **Available Macros** | Use dynamic parameters within the content to personalize it for each affiliate (for example, affiliate name)                                               |
| **Title**            | Set a title for your news item (visible to affiliates)                                                                                                     |
| **Status**           | Choose the item's status (Active - visible to affiliates, Draft - not visible to affiliates, Inactive - to hide existing news items)                       |
| **Campaigns/Offers** | Select one or more campaigns to make this news item visible only to affiliates participating in those campaigns. (Leave blank to include all campaigns)    |
| **Affiliate Group**  | Select one or more affiliate groups to make this news item visible only to affiliates that are a part of those groups. (Leave blank to include all groups) |
| **Start/End Date**   | Set the start and end dates for when the news item is visible to affiliates                                                                                |
| **Thumbnail**        | Upload an image to use as the news item’s thumbnail, visible to affiliates                                                                                 |
| **Text Box**         | Enter the content of your news item                                                                                                                        |

***

### Affiliate Notifications for News Items

**News & Newsletter** → click the **three-dot icon** under **Actions** → **Send As Notification**

<figure><img src="/files/D3KQRlZCFVnwZWvvwk61" alt=""><figcaption></figcaption></figure>

This will trigger a real-time pop-up and notification in the relevant affiliates’ portal when a new news item is added. Clicking it will direct them to the News screen to view the item.

<figure><img src="/files/JeFpPfvMrkQftPGDp00a" alt=""><figcaption></figcaption></figure>

***

### Email News Items to Affilaites

{% hint style="info" %}
You must configure a [custom email address](https://help.tracknow.io/knowledge-base/custom-email-address/) to use this feature.
{% endhint %}

**News & Newsletter** → click the **three-dot icon** under **Actions** → **Send As Newsletter**

<figure><img src="/files/ZEZ8VXHwg3zPyieXtf7a" alt=""><figcaption></figcaption></figure>

This will send the news item by email to the relevant affiliates, but only to those who agreed to receive promotional materials during registration.

The outgoing emails status can be viewed by hovering over the status value under the Email column.<br>

<figure><img src="/files/mza1BIWSKbPw5q2wswSW" alt=""><figcaption></figcaption></figure>

<figure><img src="/files/oi9CwPlYpTiaXQy5hhLl" alt=""><figcaption></figcaption></figure>

You can first send a test email to yourself to confirm the appearance of the email.


# Guides

**Guides** is a dedicated section where you can create and manage documentation, instructions, and other resources for your affiliates.

Each guide can be displayed only to specific affiliates by defining its visibility scope:

* **Campaign Scope** – Select one or more campaigns to make the guide available only to affiliates participating in those campaigns.
* **Affiliate Group Scope** – Select one or more affiliate groups to make the guide available only to affiliates who belong to those groups.

Once the first guide is created and its status is set to **Active**, a new **Guides** section will automatically appear in the affiliate portal, allowing eligible affiliates to access the guides available to them.

***

## Adding Guides

Navigate to:\
**Engagement Hub** → **Guides** → **Add New**

<figure><img src="/files/s5cJYKwhuTOVbDorM54E" alt=""><figcaption></figcaption></figure>

### Configuration

<figure><img src="/files/F1JdWbLaTymnbUKAhhZ8" alt=""><figcaption></figcaption></figure>

<table><thead><tr><th width="239">Field</th><th>Description</th></tr></thead><tbody><tr><td><strong>Available Macros</strong> (Optional)</td><td>Tracknow placeholders that are automatically replaced with affiliate-specific values when the guide is displayed, allowing you to personalize its content for each affiliate.</td></tr><tr><td><strong>Title</strong> (Required)</td><td>Set a title for the guide item. (Visible to affiliates).</td></tr><tr><td><strong>Status</strong> (Required)</td><td>Set the status of the guide item.</td></tr><tr><td><strong>Campaigns</strong> (Optional)</td><td>Select one or more campaigns to make this guide available only to affiliates participating in the selected campaigns. Leave empty to include all campaigns.</td></tr><tr><td><strong>Affiliate Group</strong> (Optional)</td><td>Select one or more affiliate groups to make this guide available only to affiliates participating in the selected groups. Leave empty to include all groups.</td></tr><tr><td><strong>Thumbnail</strong> (Optional)</td><td>Upload a thumbnail for the guide preview. (Visible to affiliates).</td></tr><tr><td><strong>Description</strong> (Optional)</td><td>Set a short description for the guide preview (Visible to affiliates).</td></tr><tr><td><strong>Content</strong> (Required)</td><td>Add the content of the guide.</td></tr></tbody></table>

#### Available Macros

<table><thead><tr><th width="243">Macro</th><th width="239">Description</th><th>Example</th></tr></thead><tbody><tr><td><strong><code>{affiliate_first_name}</code></strong></td><td>Affiliate's first name</td><td>John</td></tr><tr><td><strong><code>{affiliate_last_name}</code></strong></td><td>Affiliate's last name</td><td>Doe</td></tr><tr><td><strong><code>{affiliate_name}</code></strong></td><td>Affiliate's full name</td><td>John Doe</td></tr><tr><td><strong><code>{affiliate_id}</code></strong></td><td>Tracknow affiliate ID</td><td>4</td></tr><tr><td><strong><code>{email}</code></strong></td><td>Affiliate's email address</td><td>john@example.com</td></tr><tr><td><strong><code>{ref_code}</code></strong></td><td>Affiliate's MLM referral code</td><td>ksBAKI</td></tr><tr><td><strong><code>{affiliate_platform_name}</code></strong></td><td>The Affiliate Portal Name configured under <em>Settings → Branding</em></td><td>Affiliate Portal</td></tr><tr><td><strong><code>{company_name}</code></strong></td><td>The Company Name configured under <em>Settings</em> → <em>Company Settings</em></td><td>Tracknow</td></tr><tr><td><strong><code>{platform_url}</code></strong></td><td>Affiliate login page URL</td><td>https://aff.example.com/login</td></tr></tbody></table>

#### Statuses

<table><thead><tr><th width="94">Status</th><th>Description</th></tr></thead><tbody><tr><td><strong>Active</strong></td><td>Makes the guide visible to eligible affiliates in the affiliate portal.</td></tr><tr><td><strong>Draft</strong></td><td>Saves the guide without making it visible to affiliates.</td></tr><tr><td><strong>Inactive</strong></td><td>Hides the guide from affiliates.</td></tr></tbody></table>

***

### Affiliate Access

Affiliates can access the guides available to them by going to the **Guides** page:

<figure><img src="/files/zbaHEpRY2w7k3QAr08w6" alt=""><figcaption></figcaption></figure>


# Announcements

**Announcements** allow you to display informational banners on the Affiliate Portal to communicate important updates with your affiliates.

You can use announcements to notify affiliates about changes that may affect them or actions they need to take. For example, you can inform them when a new required document has been added and needs to be uploaded.

***

## Permission Requirements

There are two permissions that can affect a manger's ability to create/edit/view announcements:

* **Affiliate Announcements** - This permission allows managers to create and edit their own announcements. Disabling this permission hides the Announcements page from the manager
* **Manage All Announcements** - This permission allows managers to create and edit all announcements. \
  ***Note:** When editing an announcement created by another manager, the **Audience** setting cannot be modified.*

***

## Adding Announcements

Navigate to:\
**Engagement Hub** → **Announcements** → **Add New**

<figure><img src="/files/KxdJ9fKB5zG8axcpdoCD" alt=""><figcaption></figcaption></figure>

### Configuration

<figure><img src="/files/m533ikkOv2W6cANnFdAy" alt=""><figcaption></figcaption></figure>

<table><thead><tr><th width="208">Field</th><th>Description</th></tr></thead><tbody><tr><td><strong>Title</strong> (Required)</td><td>Set a title for the announcement.</td></tr><tr><td><strong>Content</strong> (Required)</td><td>Set the content of the announcement.</td></tr><tr><td><strong>Color</strong></td><td>Select the banner color </td></tr><tr><td><strong>Action</strong></td><td>Predefined buttons that direct affiliates to a specific page. <a href="#action-buttons">See Actions below for details.</a></td></tr><tr><td><strong>Dismissal Behavior</strong></td><td>Choose whether affiliates can dismiss this announcement</td></tr><tr><td><strong>Preview</strong></td><td>A live preview of the banner</td></tr><tr><td><strong>Audience</strong></td><td>Select whether this announcement is visible to all affiliates or only to targeted affiliates</td></tr><tr><td><strong>Show to new affiliates</strong></td><td>Show this announcement to future affiliates who match the targeting criteria</td></tr><tr><td><strong>Active</strong></td><td>Activate the announcement to make it visible to affiliates</td></tr><tr><td><strong>Schedule</strong></td><td>Set a start and end date to display the announcement for a limited time</td></tr></tbody></table>

### Action Buttons

<table><thead><tr><th width="160">Button</th><th>Description</th></tr></thead><tbody><tr><td>Complete KYC</td><td>Banner button that directs the affiliate to the required documents page</td></tr><tr><td>View Campaign</td><td>Banner button to that directs the affiliate to a specific campaign page</td></tr><tr><td>Custom Action</td><td>Banner button to that directs the affiliate to a custom page you select</td></tr></tbody></table>


# Importing Affialites

One of the methods to add affiliates into your dashboard is importing them from a CSV file.

Navigate to **Affiliates** → **Management** → **Import Affilaites**

<figure><img src="/files/UrxTbzRmifOtyeKRATAR" alt=""><figcaption></figcaption></figure>

You can download a sample file that includes all of the fields you can fill out about each affiliate, edit it with your own values and import it to the system.

| Column                              | Description                                                                                                                                                                |
| ----------------------------------- | -------------------------------------------------------------------------------------------------------------------------------------------------------------------------- |
| **Email** (Mandatory)               | Fill out the affiliate's email address                                                                                                                                     |
| **First Name** (Mandatory)          | Fill out the affiliate's first name                                                                                                                                        |
| **Last Name** (Mandatory)           | Fill out the affiliate's last name                                                                                                                                         |
| **Password** (Optional)             | Enter a password for the affiliate (they can later reset it)                                                                                                               |
| **Affiliate** (Optional)            | If the affiliate is a part of company, you can specify the affiliate's company name. Otherwise you can re-enter his name there.                                            |
| **Custom Id** (Optional)            | Add a custom ID associated with this affiliate (for example, an identifier from your previous affiliate software)                                                          |
| **Custom Parent Ref Id** (Optional) | If you are using MLM, you can specify the parent affiliate's Custom Id value to add the current affiliate under him in the MLM structure                                   |
| **Campaign Id** (Optional)          | If you know which campaign this affiliate will promote and you want to add him to that campaign during import, fill out the campaign ID                                    |
| **Payout Group Name** (Optional)    | If you already have a configured [payout group](https://docs.tracknow.io/payouts/payout-groups) to which you'll want to add this affiliate, specify the name of that group |


# Affiliate Statuses

Depending on the affiliate onboarding flow, affiliates may progress through several statuses. Each status represents a specific stage in the onboarding process, as described below.

***

#### Approved

The user has been approved as an affiliate.

* Can login
* Has access to his full portal (according to his permissions)

<figure><img src="/files/ch6NB7XThVLxAD5zLlEa" alt=""><figcaption></figcaption></figure>

***

#### Rejected

The user has been rejected as an affiliate.

* Can login
* Doesn't have access to the full portal.
* A message will be displayed indicating that the user has been rejected, along with the reason for the rejection.

<figure><img src="/files/yDd3tR6Tp2qnEaZRPCHU" alt=""><figcaption></figcaption></figure>

***

#### Pending

The user registered as an affiliate but needs to upload a document or complete a required step.

* Can login
* Doesn't have access to the full portal.
* A message will be displayed indicating that the user is pending, along with any required documents that need to be uploaded.

<figure><img src="/files/six38sYJNYAn8RlVVvPK" alt=""><figcaption></figcaption></figure>

***

#### Needs Attention

The user has uploaded the required documents and is now awaiting manager review and final approval of their status.

* Can login
* Doesn't have access to the full portal.
* A message will be displayed indicating that the user status.

<figure><img src="/files/wQQSvPR15SwAwI4lJWAG" alt=""><figcaption></figcaption></figure>

***

#### Incomplete

The user has uploaded incomplete or invalid documents and needs to fix it.

* Can login
* Doesn't have access to the full portal.
* A message will be displayed indicating that the user status is Incomplete and managers can add more context in the status reason field.

<figure><img src="/files/RgFXvDKbAd7QgVAFx5Qi" alt=""><figcaption></figcaption></figure>

***

#### Archived

The user has been archived.

* Cannot login
* When attempting to login a message will be shown "our account is no longer active. Please contact support."

<figure><img src="/files/Xm1ChUBPs7WrzfnErDYM" alt=""><figcaption></figcaption></figure>

***

### Changing an Affiliate's Status

Navigate to **Affiliates** → **Management** → Locate the relevant affiliate → Click the three-dot icon under the **Action** column → **Update Status**

<figure><img src="/files/276GmwStmODqdzPRqkJK" alt=""><figcaption></figcaption></figure>


# Affiliate Approval

When setting up your affiliate onboarding process, you can choose whether:

1. All newly registered affiliates require manual approval by a manager
2. Only affiliate that registered under specific managers require manual approval
3. No requires manual approval

***

### Enabling/Disabling manual approval

Navigate to **Settings** → **Affiliate Settings** → **Affiliate Manual Approval**

<figure><img src="/files/hCePvCIH5zvBReue3sqm" alt=""><figcaption></figcaption></figure>

If manual approval is enabled, affiliates will still be able to register and log in to their portal. However, until they are approved by a manager, they will not have access to any content or performance metrics. Instead, upon logging in, they will see the following screen:

<figure><img src="/files/ZGiHs3iALzaVep6pLD0s" alt=""><figcaption></figcaption></figure>


# Affiliate Permissions

You can control which data or screens affiliates have access to on their portal by adjusting their permissions.

***

### Default Permissions for Newly Added Affiliates

Navigate to **Settings** → **Affiliate Default Permissions**

<figure><img src="/files/khFtF2CAhYkeWixZy7dM" alt=""><figcaption></figcaption></figure>

The permissions you configure here will be applied by default to any new affiliate.

You also have the option to change the permissions of existing affiliates by checking the **Apply to all affiliates** checkbox.

***

### Custom Permissions for Individual Affiliates

You can change and adjust permissions for specific affiliates.

Navigate to **Affiliates** → **Management** → Locate the relevant affiliate and click his name → **Permissions**

<figure><img src="/files/n0Mu3LO0m0CXwhyir8ep" alt=""><figcaption></figcaption></figure>


# Payment Requests

Once affiliates accrue commissions, their earnings can be queued for payout through a payment request. Each request is presented to managers with the necessary details to process it, including the affiliate, the payout amount, the selected payment method, and the current status (e.g., Pending, Paid, Denied).

Tracknow provides several options for how payout requests are handled:

1. **Affiliate-initiated:** Affiliates can submit payout requests manually once they have enough eligible commissions.
2. **Automatic Generation:** Tracknow can automatically generate payout requests on a set schedule (weekly or monthly) for affiliates with available commissions.
3. **Manager-initiated:** Managers can create payout requests manually on behalf of affiliates.

***

### General

* A payment request can only be submitted for conversions with an **Approved** status.

  The system automatically calculates the payment request amount based on the total affiliate commissions earned from the selected approved conversions.
* Each payment request is directly linked to the relevant conversions, and those conversions can be viewed within the payment request details.
* Once a payment request is submitted, the status of the related conversions changes from **Approved** to **Processing**. While in the **Processing** status, these conversions are locked and cannot be edited or modified until the payment request is either approved or denied.
* If the payment request is approved, the related conversions are automatically updated to **Paid** status. Paid conversions are considered finalized and can no longer be edited or changed.

***

### Affiliate-Initiated Payout Requests

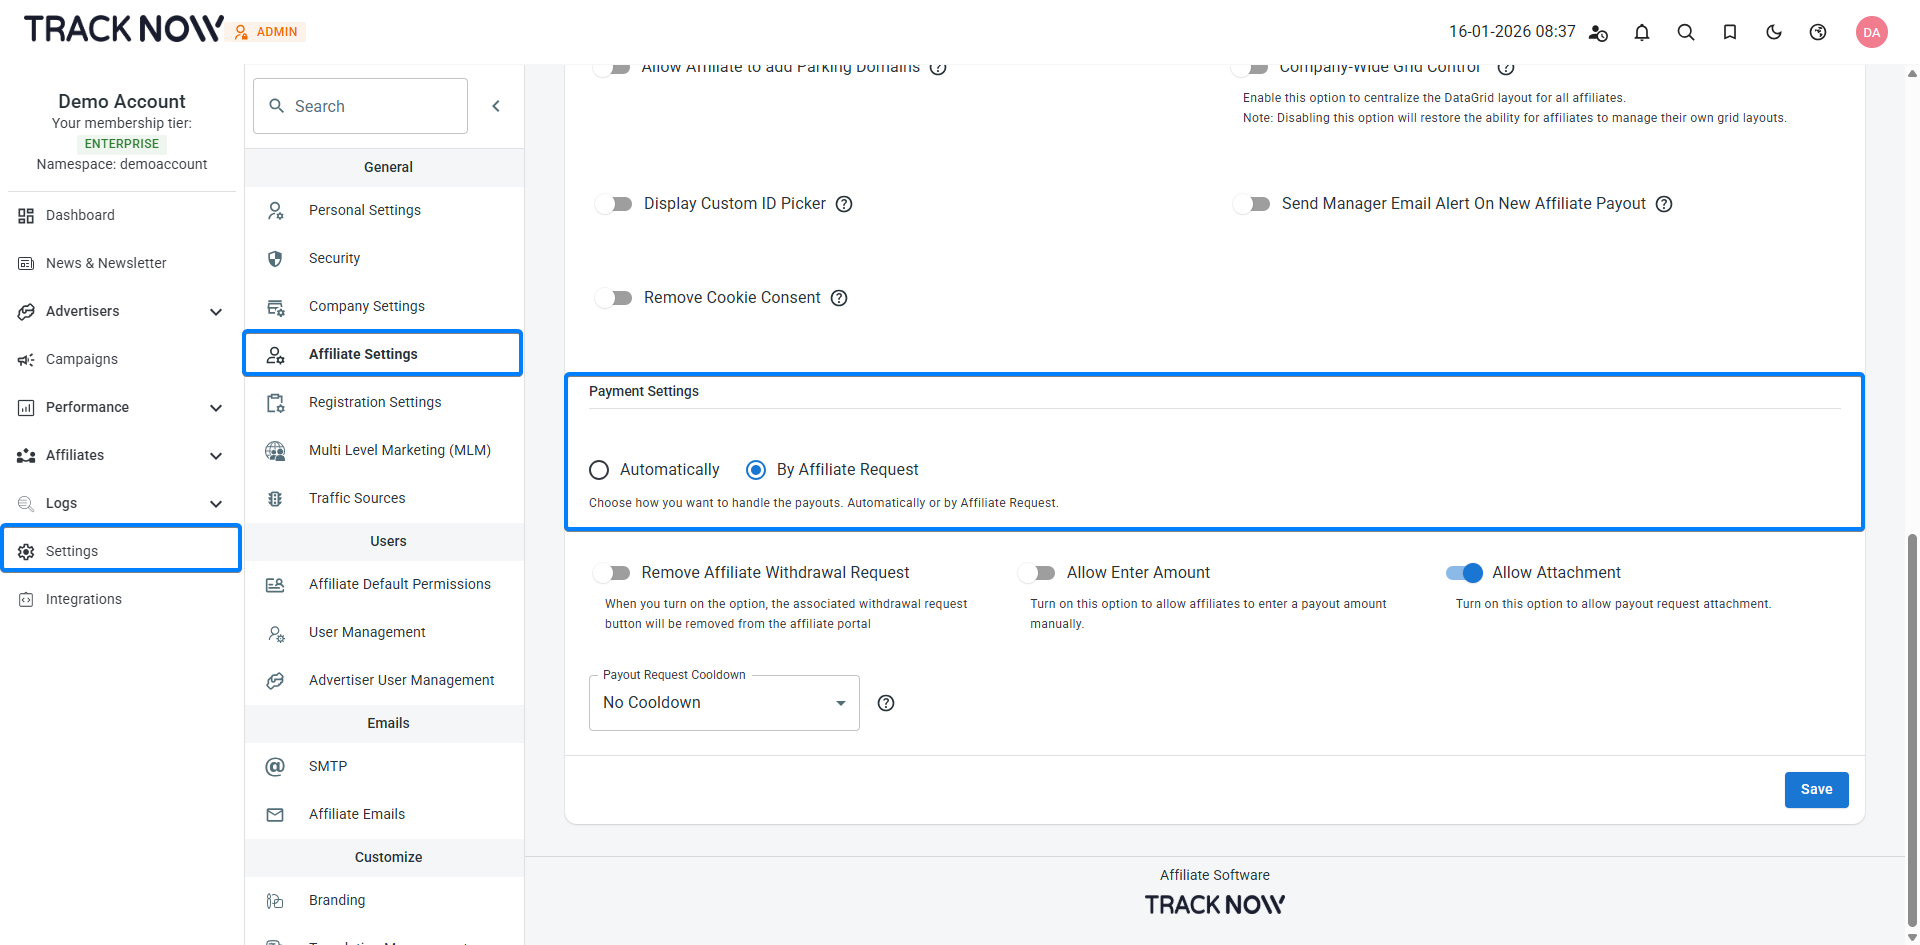
Navigate to **Settings** → **Affiliate Settings** → **Payment Settings** → Select **By Affiliate Request** → **Save**

<figure><img src="https://help.tracknow.io/wp-content/uploads/2025/07/image.png" alt=""><figcaption></figcaption></figure>

Once manual payouts are enabled, a **Request Payout** button will appear in the affiliate portal under the **Available for Payout** widget, allowing affiliates to submit a payout request:

<figure><img src="/files/TzcOr2UTAxIK7dkgsCDe" alt=""><figcaption></figcaption></figure>

***

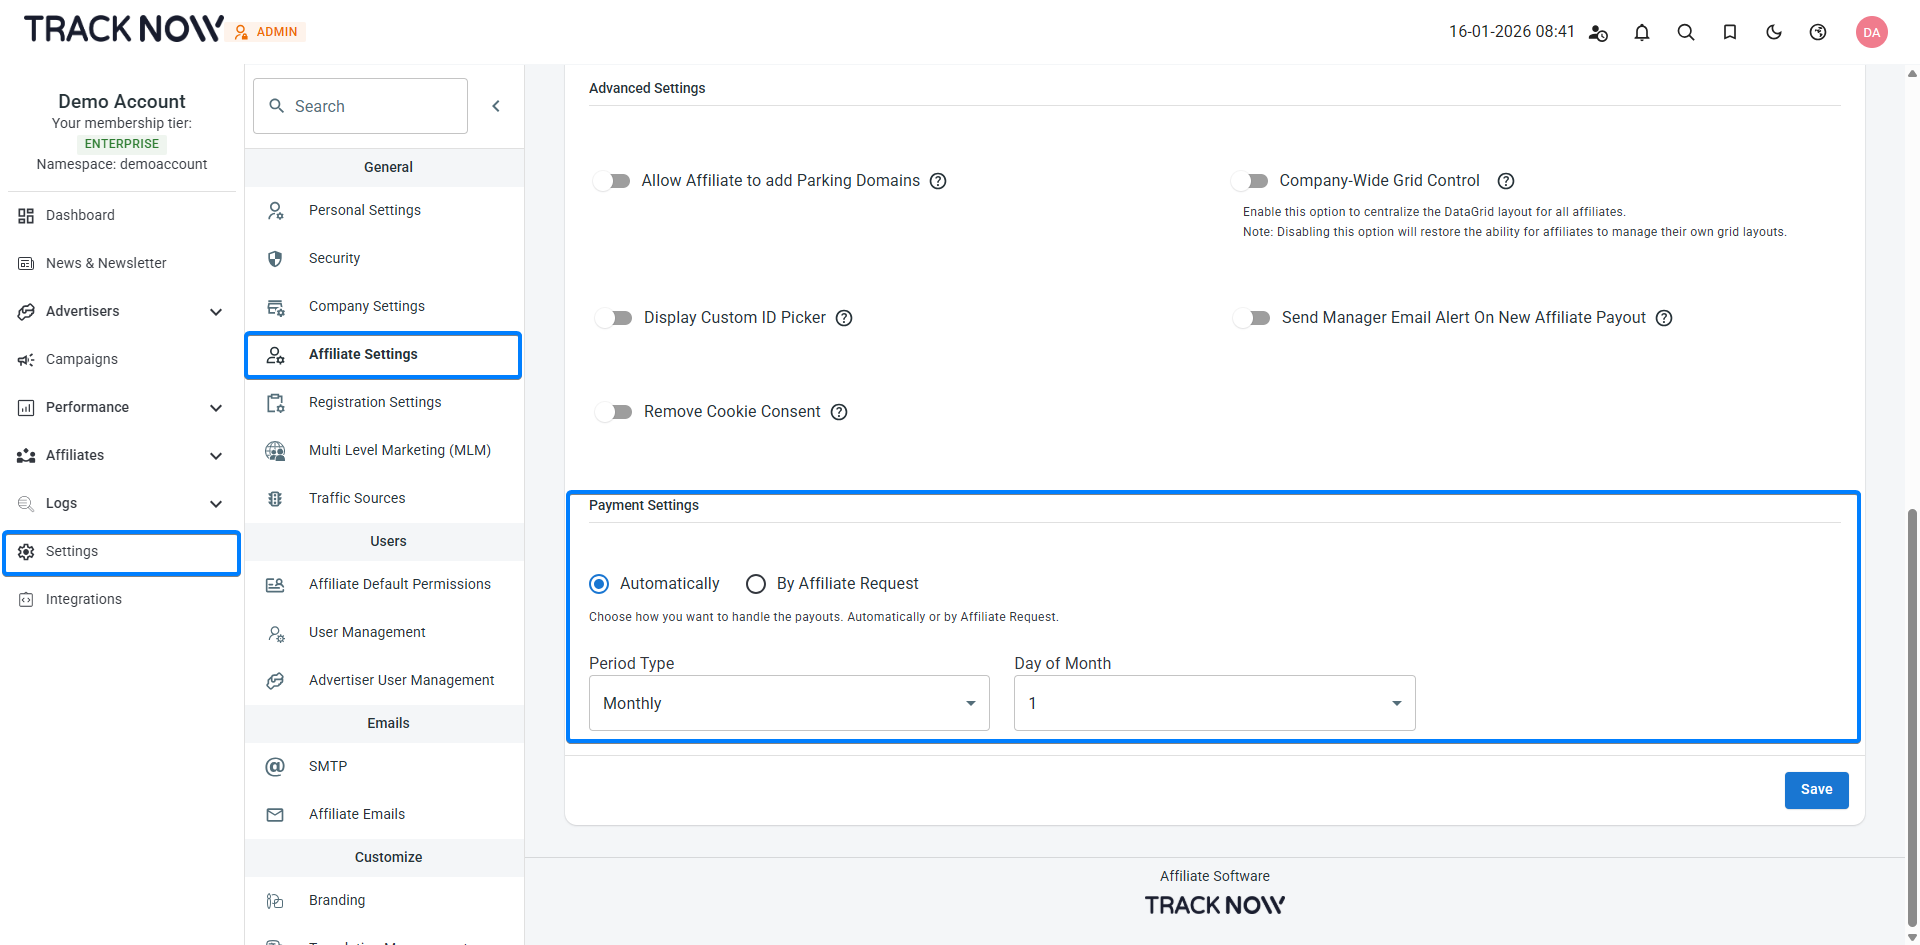
### Automatically Generated Payout Requests

Navigate to **Settings** → **Affiliate Settings** → **Payment Settings** → Select **Automatically** → Choose the relevant time period → **Save**

<figure><img src="https://help.tracknow.io/wp-content/uploads/2025/07/image-3.png" alt=""><figcaption></figcaption></figure>

Once automatic payouts are enabled, a request payout will be created for affiliates that have available commissions every cycle according to the time period selected.

***

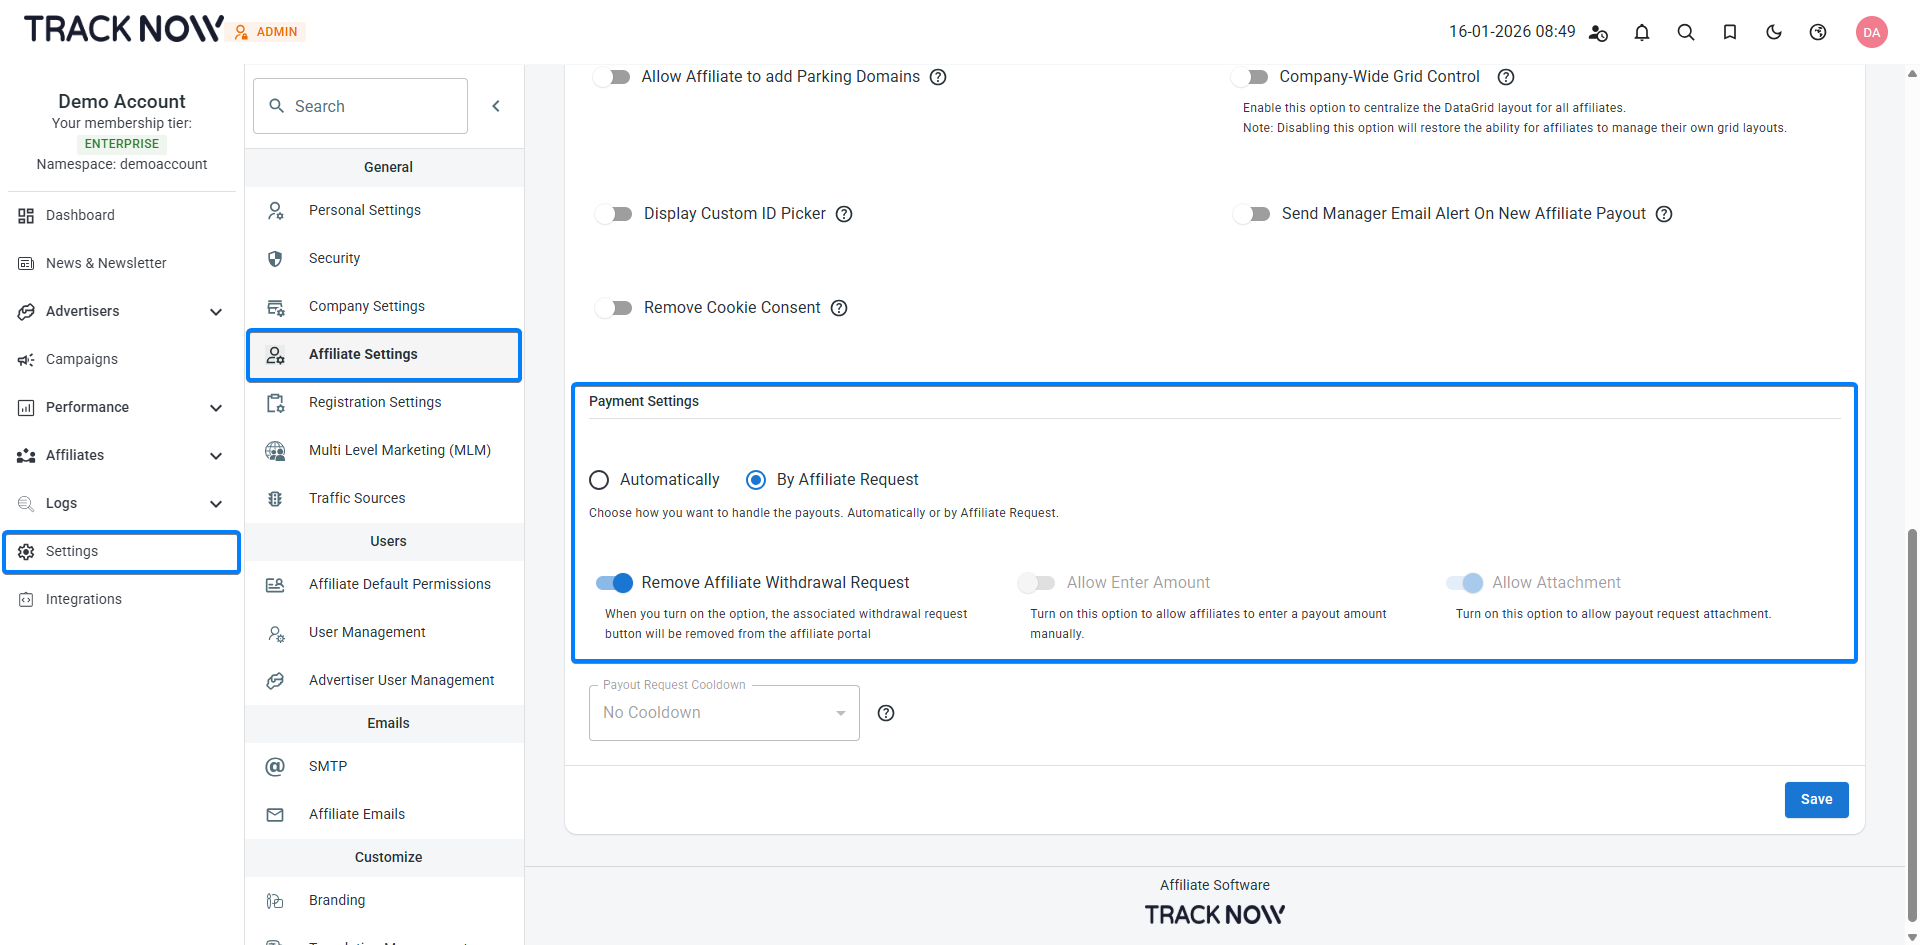
### Manager-Initiated Payout Requests

Navigate to **Settings** → **Affiliate Settings** → **Payment Settings** → Select **By Affiliate Request** → Toggle on **Remove Affiliate Withdrawal Request** → **Save**

<figure><img src="https://help.tracknow.io/wp-content/uploads/2025/07/image-4.png" alt=""><figcaption></figcaption></figure>

Selecting **By Affiliate Request** ensures that Tracknow does not generate payout requests automatically. Enabling **Remove Affiliate Withdrawal Request** prevents affiliates from creating payout requests themselves.

A manager can create a payout request for affiliates in several ways:

#### From the Affiliate Management Screen

Navigate to **Affiliates** → **Management** → Click on the **affiliate name** to open his manage page → Click the three-dot icon and select **Create Payment**

<figure><img src="/files/tlYJtntYQeH4HcvgbwLx" alt=""><figcaption></figcaption></figure>

#### From the Balance Report Screen

Navigate to **Affiliates** → **Balance Report** → **Create Payment** next to the relevant affiliate

<figure><img src="/files/mNJcGYAIQaHXnjCuIX7f" alt=""><figcaption></figcaption></figure>

***

### Importing Payout Requests From a CSV File

Navigate to **Affiliates** → **Payouts** → **Import**

<figure><img src="/files/U5MRjvxoCVDd3qpzA8ae" alt=""><figcaption></figcaption></figure>

***

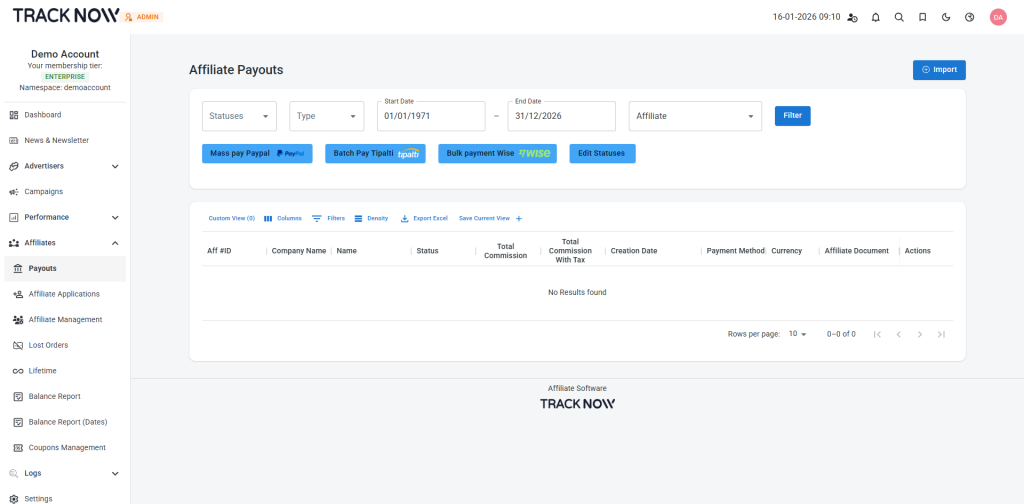
### Where Admins Approve or Deny Payout Requests

Navigate to **Affiliates** → **Payouts** → **Edit Statuses** button > Select the relevant payout request and change their status

<figure><img src="https://help.tracknow.io/wp-content/uploads/2025/07/image-5-1024x504.png" alt=""><figcaption></figcaption></figure>

When a payout request is approved, the affiliate’s available commissions are updated accordingly: the approved amount is removed from their available balance and moved to **Total Paid**.

***

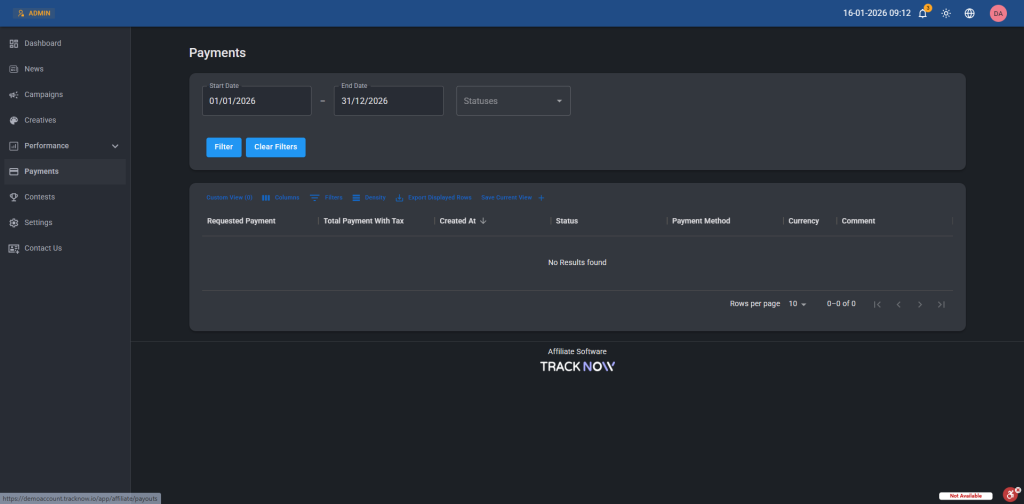
### Where Affiliates See Their Payout Requests

On the affiliate portal → **Payments**

<figure><img src="https://help.tracknow.io/wp-content/uploads/2025/07/image-6-1024x504.png" alt=""><figcaption></figcaption></figure>


# Affiliate Payments with Stripe

Tracknow integrates with your Stripe account to enable direct affiliate payouts. When an affiliate submits a payment request and selects **Stripe** as their preferred payment method, you can approve the request and Tracknow will transfer the approved commission directly to the affiliate through Stripe.

***

## Integration with Stripe

Navigate to **Settings** → **Integrations** → **Connect Stripe Payouts**

Fill out each required field.

### Generate a Stripe API key

Visit Stripe's documentation on API keys [here](https://docs.stripe.com/keys).

The Stripe API key allows Tracknow to securely communicate with your Stripe account on your behalf.

It is used to perform the actions required for the Stripe Connect integration, including:

* Creating onboarding links so affiliates can connect their Stripe accounts.
* Retrieving information about connected Stripe accounts to verify their payout status.
* Initiating transfers to affiliates when you approve Stripe payment requests.

You create a general API key or a restricted API key.

{% hint style="info" %}
If you opt to use a restricted API key, make sure to set the following permissions:

Account → **Read**\
Connect > Accounts → **Write**\
Connect > Account Links → **Write**\
Transfers → **Write**\
\
The rest of the permissions can be set to **None**
{% endhint %}

### Create two webhooks

Visit Stripe's documentation on Webhooks [here](https://docs.stripe.com/api/webhook_endpoints/create?api-version=2026-06-24.preview\&rds=1).

Webhooks allow Stripe to automatically notify Tracknow when specific events occur in your Stripe account. This keeps affiliate payout and connected account information synchronized without requiring Tracknow to continuously check Stripe for updates.

{% hint style="info" %}
Use the following URL endpoint for both webhooks:

{% code overflow="wrap" %}

```
https://api-merchant.tracknow.io/api/webhook/stripe
```

{% endcode %}
{% endhint %}

#### **Webhook 1**

* **Scope:** Your Account
* **Event:** `transfer.reversed`

This webhook notifies Tracknow whenever a transfer to an affiliate is reversed. We use it to update the payment status in Tracknow and keep your payout records accurate.

#### **Webhook 2**

* **Scope:** Connected Accounts
* **Event:** `account.updated`

This webhook notifies Tracknow whenever one of your affiliates' connected Stripe accounts is updated. We use it to detect changes to the account's verification status, capabilities, and payout eligibility so affiliates can receive payments as soon as their accounts are ready.


# Affiliate Groups

On Tracknow, you can create **affiliate groups** and assign affiliates to them.

Affiliate groups offer better organization and control. They allow you to:

1. **Assign a group to a manager**, so the manager can only view the activity and data of affiliates within that specific group.
2. View performance **reports** filtered by a specific affiliate group

***

### Creating an Affiliate Group

Navigate to **Settings** → **Affiliate Group** → **Add New**

<figure><img src="/files/eZMt8gYcb2L1JJttqAr6" alt=""><figcaption></figcaption></figure>

***

### Adding Affiliates Into the Group

Navigate to **Affiliates** → **Management** → Click on the name of the relevant affiliate  → **Partner Details** → Select the **Affiliate Group** → **Save**

<figure><img src="/files/vqENB742fRKMBgw4bK5T" alt=""><figcaption></figcaption></figure>

***

### Assigning an Affiliate Group to a Manager

Navigate to **Settings** → **User Management** → Click the three dot icon under the actions column → **Edit** → Select the **Affiliate Managed Groups** → **Save**

<figure><img src="/files/VEhmzeOnF1gdnAz86yv3" alt=""><figcaption></figcaption></figure>

{% hint style="info" %}
Make sure the **Manage All Affiliates** permission is enabled for this manager. This ensures the manager can see all affiliates within the group even if they didn't register directly under that manager.
{% endhint %}


# Single Campaign Mode

When running multiple campaigns/offers, affiliates will be able to see them all in the list of campaigns (unless the campaigns are set as 'Private').

If you plan to onboard new affiliates that will be dedicated to only one of your campaigns and you don't want to them to be subjected to the other campaigns, you can do this by applying the **Single Campaign Mode** to them.

Single Campaign Mode means that the affiliate will only be able to see and participate in one selected campaign.

***

### Methods of Applying Single Campaign Mode

There are several methods to restrict an affiliate to a single campaign and enforce Single Campaign Mode, depending on the overall setup and flow you want to achieve.

{% columns %}
{% column %}
**Direct campaign registration**

You can generate a unique registration URL for a specific campaign. Any affiliate who registers through that link will be automatically limited to that campaign, with Single Campaign Mode enabled by default.

This method is ideal when you know in advance which campaign the affiliate should be assigned to, allowing you to share a dedicated registration link tied to that campaign.
{% endcolumn %}

{% column %}
**Default campaign registration**

You can set a default campaign that all new affiliates will be automatically assigned to and limited under, with Single Campaign Mode enabled by default.

This method is ideal when you have multiple campaigns but want all affiliates initially restricted to one specific campaign, with the flexibility to assign them to additional campaigns later if needed.
{% endcolumn %}

{% column %}
**Manual assignment**

You can manually enable Single Campaign Mode for selected affiliates and assign them to a specific campaign.

This method is ideal when you want to limit an affiliate to a specific campaign at any given time.
{% endcolumn %}
{% endcolumns %}

***

### Direct Campaign Registration

Navigate to **Campaigns** → Locate the relevant campaign → click the three-dot icon under the **Actions** column → **Campaign Registration URL**

<figure><img src="/files/se2dCYXWrxm2gkgwv7No" alt=""><figcaption></figcaption></figure>

Copy the generated link and share it with the affiliate you want to register directly under that campaign. The affiliate will be limited to that campaign upon registration.

***

### Default Campaign Registration

Navigate to **Settings** → **Affiliate Settings** → **Campaign Settings** → Enable **Single Campaign Mode** → Select the **Default Campaign** → **Save**

<figure><img src="/files/FB3XrwTmnLBpiAd4hMwO" alt=""><figcaption></figcaption></figure>

This will limit all registering affiliates to that specific campaign.

***

### Manual Assignment

Navigate to **Affiliates** → **Management** → Click on the relevant affiliate's name → **Payout Group Settings** tab → Toggle on **Single Campaign Mode** → Set the campaign that the affiliate should be limited to as **Active**

<figure><img src="/files/oUJ8JgaNolatHwWoJmv8" alt=""><figcaption></figcaption></figure>


# Short Links

Tracknow allows affiliates to generate short links based on their tracking links.\
Managers can also create custom short links on behalf of affiliates.

***

### Affiliate Short Link

In the Affiliate Portal, affiliates can view all of their tracking links for every landing page included in the campaigns they participate in.

Next to each URL, there is a magic wand icon that allows them to generate a short link for the specific tracking link they are viewing.

<figure><img src="/files/H70bNCofVPMv1el5dx6r" alt=""><figcaption></figcaption></figure>

***

### Manager Generated Custom Short Links

Navigate to **Campaigns** → Click on the name of the campaign that holds the landing page for which you want to generate the custom URL for → **Tracking Tools/Creatives** → **Landing Page**&#x20;

1. Select the affiliate for which the custom URL is being generated for&#x20;
2. Click the magic wand icon next to the URL
3. Insert the custom path to be used on the URL
4. Click **Generate**
5. Copy the generated URL  and share it with your affiliate

<figure><img src="/files/BvnxFLJVae6Ip3EEQWnD" alt=""><figcaption></figcaption></figure>


# Coupon Requests

A campaign can be configured to allow affiliates to request coupon codes. When enabled, affiliates can submit requests for their desired coupon codes directly from the affiliate portal.

You can choose between two approval workflows:

* **Manual approval** - A manager reviews and approves each request before the coupon is created.
* **Automatic approval** - Coupon requests are automatically sent to your system, where the requested coupon codes are created without manual intervention.

***

### Enabling Coupon Requests

Navigate to:

**Campaigns** → Locate the campaign you want to enable this on → **Actions** → **Edit** → **Affiliate Coupon Creation** setting

<figure><img src="/files/1Wnaj1kByEMFU35EnhDm" alt=""><figcaption></figcaption></figure>

#### Setting Options

**Never (Default)**\
Affiliates cannot request coupon codes.

**Approve Manually**\
Affiliates can submit coupon code requests. Each request must be reviewed and approved by a manager, and the coupon must be created manually in your system.

**Approve Automatically**\
Affiliates can submit coupon code requests. Configure a GET endpoint to receive these requests and create the coupons in your system automatically. If your endpoint responds with HTTP status `200` or `201`, indicating that the coupon was created successfully, Tracknow will automatically approve the request and create the coupon on the affiliate's account.<br>

**Example**

{% code overflow="wrap" %}

```
GET https://your-domain.com/api/create-coupon?coupon={coupon_code}
```

{% endcode %}

> **{coupon\_code}** - A macro that Tracknow replaces with the coupon code requested by the affiliate before sending the GET request to your endpoint.

***

### Affiliate Submitting a Coupon Request

Affiliates can request coupons on the campaign page.

**Campaign/s** → Click on the relevant campaign → **Coupons** section → **Request Coupon** → Fill out the coupon value → **Submit**

<figure><img src="/files/rc0qcTWXZ9BbENMzJ412" alt=""><figcaption></figcaption></figure>

***

### Manager Manual Coupon Approval

Once an affiliate submits his coupon for manual approval, his manager will get a notification.

<figure><img src="/files/lZQXrZIA5HsyYyBbCqK1" alt=""><figcaption></figcaption></figure>

Clicking on the notification will take he manager to the coupon request.

Alternatively, you can reach the coupon list by clicking **Affiliates** → **Coupons.**

To approve or decline a coupon request, click **Actions** → **Edit** → Change the **Status** → **Save.**

<figure><img src="/files/dzY3yXWIoSwYD1tm9lur" alt=""><figcaption></figcaption></figure>

The affiliate associated with the request will recieve a notification that his coupon request was Approved/Declined.

<figure><img src="/files/6P3yW1hBpyB4mhbe31x4" alt=""><figcaption></figcaption></figure>


# Creating Campaigns

Campaigns are the core unit for configuring and managing your affiliate program.

Typically, a separate campaign is created for each website where tracking is implemented. However, multiple campaigns can also be used for the same website when different setups or objectives are required.

Within a campaign, you can control:

* Which affiliates are eligible to participate
* Which landing pages affiliates can promote
* What tracking parameters are passed to each landing page
* The commission structure and payout terms
* Affiliate contests and performance incentives

***

### Campaigns Screen

Navigate to **Campaigns**

<figure><img src="/files/oqkwJGqKb69Z441oQiuq" alt=""><figcaption></figcaption></figure>

This screen displays the complete list of your campaigns.

From here, you can create new campaigns, edit existing ones, and manage their status, including activating, pausing, or disabling them.

You can also use the filter bar to quickly locate specific campaigns.

***

### Creating a New Campaign

Navigate to **Campaigns** → Click **Add Campaign**

<figure><img src="/files/If9rmvwDTWqn4ptgxVbq" alt=""><figcaption></figcaption></figure>


# Smart Redirect

This tool allows you to configure redirection rules for an affiliate’s default tracking URL.

When creating a campaign, you define a **default landing page -** the page users are directed to after clicking the standard affiliate tracking URL. You can also add multiple additional landing pages, each with its own generated tracking URL.

In addition to these options, you can apply **redirection rules directly to the default tracking URL**, enabling dynamic routing based on specific conditions.

Redirection rules can be configured based on:

* **User geo-location** (determined by IP address):\
  Route users from different countries to specific landing pages.\
  *Example: Users from Country A → Landing Page A; Users from Country B → Landing Page B.*
* **Affiliate source**:\
  Route users based on which affiliate link was clicked.\
  *Example: Traffic from Affiliate A → Landing Page A; Traffic from Affiliate B → Landing Page B.*

***

### Setting Up Redirection Rules

Navigate to **Campaigns** → Locate the relevant campaign → Click the three-dot icon under the **Actions** column → **Edit** → **Smart Redirect** tab → **Add New**

<figure><img src="/files/N9lc9bxDkyl10md6QFvR" alt=""><figcaption></figcaption></figure>

<figure><img src="/files/qOW2JBqNkbzesR6sfpMt" alt=""><figcaption></figcaption></figure>

| Field                           | Description                                                                                                                                                                                                                                                                                                           |
| ------------------------------- | --------------------------------------------------------------------------------------------------------------------------------------------------------------------------------------------------------------------------------------------------------------------------------------------------------------------- |
| **Title** (Mandatory)           | Specify a title for this redirection rule.                                                                                                                                                                                                                                                                            |
| **Available Macros** (Optional) | Dynamic parameters can be appended to the landing page URL to pass specific data to the destination page.                                                                                                                                                                                                             |
| **Landing Page** (Mandatory)    | The landing page URL that users will be redirected to when this rule’s conditions are met.                                                                                                                                                                                                                            |
| **Weight** (Optional)           | <p>When running A/B tests, you can assign a <strong>weight</strong> to each landing page. Pages with higher weights have a greater probability of being selected and shown to users compared to others.</p><p>This field is only relevant when the rule is used for A/B testing. Otherwise, it can be left empty.</p> |
| **Countries** (Optional)        | Only users from the selected countries will be redirected to this landing page. All other users will be directed to the campaign’s default landing page.                                                                                                                                                              |
| **Affiliate** (Optional)        | Only users who click the default tracking URL of the selected affiliates will be redirected to this landing page. All other users will be directed to the campaign’s default landing page.                                                                                                                            |


# Landing Pages

When you configure a campaign you can set the default landing page URL - this will be the URL users will be redirected to when affiliates share their main tracking URL for that campaign.

You also have the option to add additional landing pages to your campaign under the 'Landing Pages' screen, and Tracknow will create unique tracking URLs for each affiliate automatically.

When affiliates enter the campaign page on their affiliate portal, they will be able to select which landing page they wish to promote and when they select it, Tracknow will show them their tracking link for that landing page.

***

### How to add multiple landing pages

Navigate to **Campaigns** → **three-dot icon** under the **Actions** column → **Edit** → **Landing Pages** → **Add New**

<figure><img src="/files/goS70YzwPjiKQAbBoi54" alt=""><figcaption></figcaption></figure>

***

### Configuring the landing page

When adding a new landing page you have several options when configuring it.

<figure><img src="/files/r4FTJuQXTFT3ORE2bE8v" alt=""><figcaption></figcaption></figure>

| Field                           | Description                                                                                                                                                                                                                                                                                                                                                                                                               |
| ------------------------------- | ------------------------------------------------------------------------------------------------------------------------------------------------------------------------------------------------------------------------------------------------------------------------------------------------------------------------------------------------------------------------------------------------------------------------- |
| **Title**                       | Add a title to the landing page to help you and your affiliates easily identify and understand its purpose                                                                                                                                                                                                                                                                                                                |
| **URL**                         | Add the URL of the landing page, this will be the URL users will be redirected to after clicking the affiliate's tracking URL associated with this landing page. You can also use the macros (dynamic parameters) shown at the top if you need to pass any data to the landing page URL                                                                                                                                   |
| **Start/End Date (Optional)**   | You can define start and end dates for your landing pages to control when they’re visible to affiliates. After the end date passes, the page will no longer appear for the affiliate. However, any previously shared tracking links will remain active and continue to record clicks and conversions, this ensures you don’t lose traffic                                                                                 |
| **Add to Dashboard (Optional)** | Checking this option will add the landing page’s tracking link directly to the affiliate’s dashboard, allowing them to access it easily. Note that this feature only applies to affiliates who have 'Single Campaign Mode' enabled for the specific campaign the landing page belongs to. Leaving this option unchecked means that affiliates can access their tracking link for this landing page from the campaign page |
| **Private (Optional)**          | Checking this option will display a list of affiliates participating in the campaign, allowing you to select which affiliates should have access to this landing page. Affiliates who are not selected will not be able to see this landing page. Leaving this option unchecked means all affiliates participating in the campaign will see this landing page                                                             |


# Creatives

Each campaign includes a dedicated **Creatives** section, where you can upload and manage promotional assets for affiliates to use in their marketing efforts.

Creatives can be shared with all affiliates in the campaign or restricted to selected affiliates only.

#### Supported Types:

<table><thead><tr><th width="115">Type</th><th>Description</th></tr></thead><tbody><tr><td><strong>Banner</strong> </td><td>Image files: Tracknow automatically generates a clickable, trackable HTML snippet for each image, allowing affiliates to easily embed it on their website.</td></tr><tr><td><strong>HTML</strong></td><td>HTML files: You can either paste your HTML code directly into the code field or drag and drop an HTML file into the code block for easy upload.</td></tr><tr><td><strong>Email</strong></td><td>HTML files meant to be sent as emails: You can either paste your HTML code directly into the code field or drag and drop an HTML file into the code block for easy upload.</td></tr><tr><td><strong>Link</strong></td><td>URLs: Add links to relevant pages or files that you want affiliates to have access to.</td></tr><tr><td><strong>Video</strong></td><td>Video files: Upload video assets that affiliates can download and use in their promotions.</td></tr><tr><td><strong>Coupon</strong></td><td>Coupon codes: Share general-use coupon codes that affiliates can promote (distinct from unique, affiliate-specific codes used for attribution).</td></tr><tr><td><strong>ZIP</strong></td><td>Any file type: Upload files in a compressed ZIP format for easy distribution and download.</td></tr><tr><td><strong>HTML5</strong></td><td>ZIP files: Upload a ZIP file containing your HTML5 creative, with the <code>index.html</code> file located at the root of the archive.</td></tr></tbody></table>

***

### Adding Creatives to a Campaign

Navigate to **Campaigns** → Click on the name of the relevant campaign → **Tracking Tools / Creatives** → **Add New**

<figure><img src="/files/adnAxCg73du6ld5hUCMY" alt=""><figcaption></figcaption></figure>

<figure><img src="/files/HvPSmzrIBkZ74M9TcT34" alt=""><figcaption></figcaption></figure>

<table><thead><tr><th width="222">Field</th><th>Description</th></tr></thead><tbody><tr><td><strong>URL (Optional)</strong></td><td>For clickable creatives, you can specify a destination URL for users to be directed to. If no URL is provided, the campaign’s default landing page will be used.</td></tr><tr><td><strong>Sub 1 (Optional)</strong></td><td>Pass a value in the <code>sub1</code> parameter to append it to the tracking link and store it with the click record.</td></tr><tr><td><strong>Info (Optional)</strong></td><td>Description for the creative (visible to affiliates)</td></tr><tr><td><strong>Start/End Date (Optional)</strong></td><td>Set a start and/or end date to control when the creative is visible to affiliates, making it available from a specific date and automatically hiding it once the end date is reached.</td></tr><tr><td><strong>Private (Optional)</strong></td><td>When disabled, the creative is available to all affiliates. When enabled, you can restrict access by selecting specific affiliates.</td></tr></tbody></table>

***

### Where Affiliates Can Access the Creatives

Affiliates can view available creatives in the **Creatives** section of their affiliate portal.

<figure><img src="/files/0sg3lOUUpkxNmDuuguxu" alt=""><figcaption></figcaption></figure>


# Catalogs

Our **Catalogs** feature allows you to link a **product list or feed** to your campaigns.\
With this setup, you can assign different commission rates to each product and create payouts based on the catalog. This means affiliates can earn varying commissions depending on which products their referred clients purchase.

**You can also choose to share the product list with your affiliates.**\
Affiliates will be able to download the list of products. When a product URL is specified, the list will contain the affiliate's unique tracking link that will redirect potential customers directly to the corresponding product page.

Product feeds can be added in two ways:

1. Manually upload a CSV file containing the product list details and commissions
2. Add a link to a live updating XML or JSON product feed

{% hint style="info" %}
If your live product feed doesn't include the affiliate commission values, you will need to input them manually for each product.
{% endhint %}

***

### Uploading a CSV Catalog

Navigate to **Campaigns** → Locate the relevant campaign → click the three-dot icon under the **Actions** column → **Edit** → **Catalogs** → **Add New** → Fill out the catalog details → **Save**

<figure><img src="/files/eyloqEtw3AIKo9KIaJPz" alt=""><figcaption></figcaption></figure>

| Field                | Description                                                                                                                                                    |
| -------------------- | -------------------------------------------------------------------------------------------------------------------------------------------------------------- |
| **Name**             | Specify a name for your catalog                                                                                                                                |
| **Description**      | Provide a description for the catalog                                                                                                                          |
| **Private**          | Toggle **off** to make this catalog available to all affiliates. Toggle **on** to restrict access and select the specific affiliates who can view this catalog |
| **Enable Live Sync** | Toggle off to upload a CSV catalog                                                                                                                             |

Once the catalog is created, click the three dot icon under the **Actions** column next to the catalog and click **Import Items**

<figure><img src="/files/QIhFlc6mHhBh7GL3vYe1" alt=""><figcaption></figcaption></figure>

Download the sample file to review the required format, then upload your completed CSV file accordingly

<figure><img src="/files/5g4JrSDCrVzvVj5UwV9c" alt=""><figcaption></figcaption></figure>

<figure><img src="/files/KCnrulR4Sv87qbeEZBAn" alt=""><figcaption></figcaption></figure>

<table><thead><tr><th width="197">Field</th><th width="93">Type</th><th>Description</th></tr></thead><tbody><tr><td>Item ID <strong>(Required)</strong></td><td><code>String</code></td><td>The ID of item in the store (SKU)</td></tr><tr><td>Name <strong>(Required)</strong></td><td><code>String</code></td><td>The name of the item</td></tr><tr><td>Description <strong>(Optional)</strong></td><td><code>String</code></td><td>A description of the item</td></tr><tr><td>Default Affiliate Commission <strong>(Required)</strong></td><td><code>Integer</code></td><td>Affiliate commission (percentage): Enter the commission as a percentage of the item price. For example, type 25 if the commission is twenty-five percent. <strong>(Do not include the % symbol)</strong></td></tr><tr><td>Default Merchant Commission <strong>(Optional)</strong></td><td><code>Integer</code></td><td>Merchant commission (percentage): Enter the commission as a percentage of the item price. For example, type 50 if the commission is fifty percent. <strong>(Do not include the % symbol)</strong></td></tr><tr><td>Coupon <strong>(Optional)</strong></td><td><code>String</code></td><td>A coupon code relevant to this item <strong>(Informative only, does not trigger any commission logic)</strong></td></tr><tr><td>Price <strong>(Required)</strong></td><td><code>Integer</code></td><td>Item price: Enter only the numeric value of the item price, without the currency. For example, if the price is 1099 USD, enter 1099. If your campaign uses a different currency, convert the amount first and then enter the converted number only.</td></tr><tr><td>Link <strong>(Optional)</strong></td><td><code>String</code></td><td>A URL to the product/product page.</td></tr><tr><td>Image Link <strong>(Optional)</strong></td><td><code>String</code></td><td>A URL to the product image.</td></tr></tbody></table>

***

### Uploading a Live Catalog Feed

Navigate to **Campaigns** → Locate the relevant campaign → click the three-dot icon under the **Actions** column → **Edit** → **Catalogs** → **Add New** → Fill out the catalog details → **Save**

<figure><img src="/files/eyloqEtw3AIKo9KIaJPz" alt=""><figcaption></figcaption></figure>

| Field                | Description                                                                                                                                                    |
| -------------------- | -------------------------------------------------------------------------------------------------------------------------------------------------------------- |
| **Name**             | Specify a name for your catalog                                                                                                                                |
| **Description**      | Provide a description for the catalog                                                                                                                          |
| **Private**          | Toggle **off** to make this catalog available to all affiliates. Toggle **on** to restrict access and select the specific affiliates who can view this catalog |
| **Enable Live Sync** | Toggle on to upload a live catalog                                                                                                                             |

Once Live Sync is enabled, specify:

1. Sync Period
2. Feed URL (if your endpoint requires any headers you can add them as well)
3. Input the **tag/field name** representing items in the JSON/XML file&#x20;
4. Select the **type of file (JSON/XML)**

<figure><img src="/files/uNsxZvfeHN9el5JhAklC" alt=""><figcaption></figcaption></figure>

Click **Next** to proceed to the mapping step.

Our system will parse the product feed and try to map the various properties each product has. Use the mapping feature to associate the relevant properties with the corresponding fields.

You can then preview the data and save the mapping.

<figure><img src="/files/VdZmNulPf58uVgA0PG7i" alt=""><figcaption></figcaption></figure>

Click **Save** to create the catalog


# Tiered Commissions

Tracknow’s **Payout Automation** tool enables you to build dynamic, tiered commission structures that automatically adjust based on affiliate performance. Tiers can be configured to reset automatically at regular intervals, such as monthly, or to remain fixed, ensuring that once an affiliate advances to a higher tier, they retain it permanently.

***

### Creating the tiers

First, you'll need to create each tier as payout.

Navigate to the **Payout** settings under the relevant campaign and create a payout for each tier according to the commission structure you desire.

Make sure that for the payouts that are not the default one, you select the payout type to be **Personal Payout** as you don't want the higher payouts to be visible to affiliates until they actually reach that tier.

<figure><img src="https://help.tracknow.io/wp-content/uploads/2026/01/image.png" alt=""><figcaption></figcaption></figure>

***

### Setting up the tier automation

After defining your tiers, you can set up payout automation to automatically assign affiliates to the appropriate tier based on the performance metric you’ve selected. This is done directly from the **Payout Automation** section of the campaign.

<figure><img src="https://help.tracknow.io/wp-content/uploads/2026/01/image-1.png" alt=""><figcaption></figcaption></figure>

| Field                                | Description                                                                                                                                                                                           | Options                                                                                                                                                                                                                                                                                                                                                                                                                                                                                                                                                                                                                                                                                                                                                                                                                                                                                                                                                                                                                                                                                                                   |
| ------------------------------------ | ----------------------------------------------------------------------------------------------------------------------------------------------------------------------------------------------------- | ------------------------------------------------------------------------------------------------------------------------------------------------------------------------------------------------------------------------------------------------------------------------------------------------------------------------------------------------------------------------------------------------------------------------------------------------------------------------------------------------------------------------------------------------------------------------------------------------------------------------------------------------------------------------------------------------------------------------------------------------------------------------------------------------------------------------------------------------------------------------------------------------------------------------------------------------------------------------------------------------------------------------------------------------------------------------------------------------------------------------- |
| **Title**                            | Give your automation a title that briefly describes what it's for (The title is visible to affiliates)                                                                                                |                                                                                                                                                                                                                                                                                                                                                                                                                                                                                                                                                                                                                                                                                                                                                                                                                                                                                                                                                                                                                                                                                                                           |
| **Reward Type**                      | Select whether the automation is for tiers or a bonus                                                                                                                                                 |                                                                                                                                                                                                                                                                                                                                                                                                                                                                                                                                                                                                                                                                                                                                                                                                                                                                                                                                                                                                                                                                                                                           |
| **Description (Optional)**           | Add a short description about the automation (Visible to affiliates)                                                                                                                                  |                                                                                                                                                                                                                                                                                                                                                                                                                                                                                                                                                                                                                                                                                                                                                                                                                                                                                                                                                                                                                                                                                                                           |
| **Automation Type**                  | Select the performance metric that will be measured in order to advance affiliates between tiers                                                                                                      | <p><strong>Amount</strong> - Measures the Amount property of conversions generated by the affiliate<br><strong>Conversions</strong> - Measures the count of conversions generated by the affiliate<br><strong>Volume</strong> - Measures the volume property of transactions (Financial Solution) made by clients referred by the affiliate<br><strong>FTD</strong> - Measures the count of first time deposits made by clients referred by the affiliate<br><strong>Commission</strong> - Measures the amount of commissions generated by the affiliate<br><strong>Lifetime Connections</strong> - Measures the amount of clients associated with the affiliate via the Tracknow Lifetime tool</p>                                                                                                                                                                                                                                                                                                                                                                                                                       |
| **Original Payout Setting**          | Select the initial payout (Tier 1) from which affiliates will advance. If Tier 1 is configured as a **General Payout**, leave this field blank. If it is set as a **Personal Payout**, select it here |                                                                                                                                                                                                                                                                                                                                                                                                                                                                                                                                                                                                                                                                                                                                                                                                                                                                                                                                                                                                                                                                                                                           |
| **Campaign Payout Automation Tiers** | Set performance thresholds by selecting each tier and configuring the required measured value an affiliate must achieve to move into that tier.                                                       |                                                                                                                                                                                                                                                                                                                                                                                                                                                                                                                                                                                                                                                                                                                                                                                                                                                                                                                                                                                                                                                                                                                           |
| **Timeframe**                        | Select the time period for measuring and automatic tier reset.                                                                                                                                        | <p></p><p><strong>All Time</strong> - Measures the affiliate's selected performance metric for all historical data (tier will not reset, can only advance).<br><strong>This Month</strong> - Affiliate performance is evaluated on a monthly basis using the selected metric. Affiliates may move up tiers during the month, but their tier will reset to the initial tier at the beginning of the next month.<br><strong>Last Month</strong> - At the start of each month, the affiliate’s tier is automatically determined based on their performance in the previous month. The affiliate then remains in that tier for the entire month.<br><strong>This Year</strong> - Affiliate performance is evaluated on a yearly basis using the selected metric. Affiliates may move up tiers during the year, but their tier will reset to the initial tier at the beginning of the next year.<br><strong>Last Year</strong> - At the start of each year, the affiliate’s tier is automatically determined based on their performance in the previous year. The affiliate then remains in that tier for the entire year.</p> |
| **Payouts**                          | Select the specific payouts that should participate in this automation in case you have more that one automation planned                                                                              |                                                                                                                                                                                                                                                                                                                                                                                                                                                                                                                                                                                                                                                                                                                                                                                                                                                                                                                                                                                                                                                                                                                           |
| **Status**                           | Select the conversion status to ensure that only conversions with the chosen statuses are included in the measurement. Leave this field blank to count conversions across all statuses                |                                                                                                                                                                                                                                                                                                                                                                                                                                                                                                                                                                                                                                                                                                                                                                                                                                                                                                                                                                                                                                                                                                                           |

***

### Example

In the example below, we'll demonstrate how to create the following tier structure:

* Four tiers structure for sales
* Tier 1 - 5% commission, Tier 2 - 7% commission, Tier 3 - 9% commission, Tier 4 - 12% Commission
* The affiliate will advance tiers based on the count of sales he generates
* Tier 1 (0-4 Sales), Tier 2 (5-9 Sales), Tier 3 (10-14 Sales), Tier 4 (15+ Sales)
* Once the affiliate advances a tier, he will not move back, he can only advance more
* Only approved conversions will be counted

First, we create these tiers as payouts:

<figure><img src="/files/Tol1T8bEl3UZWFeUnWTh" alt=""><figcaption></figcaption></figure>

Note that Tiers 2 through 4 are configured as **Personal Payouts**, while Tier 1 is set as a **General Payout**. This is because all affiliates begin at Tier 1, making it universally available. Higher tiers are configured as personal payouts and remain hidden from affiliates until they advance to the relevant tier.

Next, we configure the automation part:

<figure><img src="/files/rv7cfTQKmIIv5WnN6Jpq" alt=""><figcaption></figcaption></figure>

The **Automation Type** is set to **Conversions**, as the tier progression is based on sale count, with each sale recorded as a conversion.

The **Original Payout Setting** field is left empty because Tier 1 is configured as a **General Payout**.

The **Campaign Payout Automation Tiers** are defined with the following thresholds:

* **Tier 2:** 5 conversions
* **Tier 3:** 10 conversions
* **Tier 4:** 15 conversions

The **Timeframe** is set to **All Time**, ensuring that tiers do not reset and affiliates can only advance to higher tiers over time.

In the **Payouts** section, all relevant payouts are selected for inclusion in this automation.

In the **Status** section, only **Approved** conversions are selected, so only approved sales are counted toward tier progression.

***

### How affiliates see their progression

Creating a Payout Automation automatically adds a widget to the affiliate portal, allowing affiliates to view their current tier and progression toward higher tiers.

<figure><img src="/files/2GoXj2tBqVEUSJWcgYG9" alt=""><figcaption></figcaption></figure>


# Lifetime Payout

A **Lifetime** payout enables affiliate commissions for conversions generated by clients that have a lifetime association with the affialite (even if they do not visit the affiliate link or use an affilaite coupon code).

***

### Creating a Lifetime Payout

Navigate to **Campaigns** → Locate the relevant campaign → Click the three dot icon under the **Actions** column → **Payout Settings** → **Add Payout** → Choose **Lifetime** as the **Payment Type**

<figure><img src="/files/KLcbVQmaxhtAwVPHcUw2" alt=""><figcaption></figcaption></figure>

The rest of the payout settings can be configured based on your requirements.

***

### Creating a New Lifetime Association

New lifetime association can only be created when the client is **new.**

To indicate to our system that the client is new, your postback must include `new_customer=true` and it must include a `customer_id={value}` (for example, the client's email address).

#### Payout Example

Let's create a lifetime payout that is triggered on the client's first purchase:

<figure><img src="/files/8486N80f3MPejdBbhNBz" alt=""><figcaption></figcaption></figure>

The following settings were used:

| Field                         | Value          |
| ----------------------------- | -------------- |
| **Title**                     | Purchase       |
| **Custom Payout Text**        | -              |
| **Payout Type**               | General Payout |
| **Commission Type**           | Percentage     |
| **Payment Type**              | Lifetime (%)   |
| **Countries**                 | -              |
| **Disallowed Countries**      | -              |
| **Affiliate Commission**      | 5%             |
| **Max Commission**            | -              |
| **Goal Value**                | -              |
| **Default Conversion Status** | -              |

When a new customer completes a purchase and the postback includes both `customer_id` and `new_customer=true`, the Lifetime payout is triggered.

At that point:

* The referring affiliate receives **5% of the purchase amount**.
* Tracknow creates a **lifetime association** between that `customer_id` and the affiliate.

Once this association is established, the affiliate will automatically earn commissions on all future qualifying purchases made under that same `customer_id`.

#### Postback Example

```
https://example-tracking.tracknow.info/postback?click_id=48645abf-a999-43b1-8831-9074b41bcd4a&order_id=10596&amount=100&new_customer=true&customer_id=john%40gmail.com
```

This postback represents a purchase made by a new client and it contains the following details:

* `click_id=48645abf-a999-43b1-8831-9074b41bcd4a` - Represents the affiliate's identifier that was generated when the client clicked the affiliate's link and passed on to the website's landing page. With this parameter our system knows who the referring affilaite is and what is the correct campaign.
* `order_id=10596` - The store's internal order ID represnting this purchase
* `amount=100` - The purchase amount from which the percentage based commission is calcauted
* `new_customer=true` - Indicates that this is a new client and this is his first purchase
* `customer_id=john%40gmail.com` - The client's email that will be used to form the association with his referring affiliate


# Personal Payouts

When an affiliate program includes individualized agreements with affiliates and commission rates differ per partner, Tracknow provides a solution that allows managers to configure custom payouts for each affiliate based on the specific terms of their agreement. Each personalized payout and commission rate is visible only to the specific affiliate it was configured for.

***

### Method 1: Setting Up Personal Payouts

Navigate to **Affiliates** → **Management** → Locate the relevant affiliate → Three-dot icon under the **Actions** column → **Payout Group Settings**

<figure><img src="/files/PjoPMytenpIjRdGcqHGK" alt=""><figcaption></figcaption></figure>

Click **Add Personal Payout** on the row of the relevant campaign and configure the payout according to the personal agreement with this affiliate.

<figure><img src="/files/cmzprHqK4f8a9KlXAALu" alt=""><figcaption></figcaption></figure>

***

### Method 2: Setting Up Personal Payouts

Navigate to **Affiliates** → **Management** → Locate the relevant affiliate → Click on the affiliate's name → **Payout Group Settings** tab

<figure><img src="/files/yHGbEYu1PVxjmw7SfSft" alt=""><figcaption></figcaption></figure>

<figure><img src="/files/2iP0Pqqodk5DhvmHzHxM" alt=""><figcaption></figcaption></figure>

On this screen, you can assign the affiliate to campaigns they are not yet part of.\
Select the relevant campaign from the **Select a Campaign** dropdown, then click **Add** to assign the affiliate to that campaign.

<figure><img src="/files/7c2YnWUU4a4mfU8yOrac" alt=""><figcaption></figcaption></figure>

Click **Add Personal Payout** on the row of the relevant campaign and configure the payout according to the personal agreement with this affiliate.

<figure><img src="/files/eOAhqHw3XlnSXhGNtN8U" alt=""><figcaption></figcaption></figure>


# Goal-Based Payouts

The **goal parameter** is a unique value used to trigger specific payouts. When you set a goal value within a payout rule, any conversion that includes this goal will activate that specific payout. This allows you to track special events and assign a different commission rate instead of using the default one.

***

### How to Setup a Payout With a Goal Value?

Let's explain this with an example.

In this example, the affiliate program has a single payout: affiliates earn 5% of the purchase amount. This is set as a **General payout**, which means it serves as the default payout rate applied to all affiliates.

<figure><img src="/files/Pvc6anF2U0G3wRBxugjG" alt=""><figcaption></figcaption></figure>

As mentioned earlier, goals can be used to trigger specific payouts for certain events.

In this example, the special event is a purchase from a specific product category - *Electronics*.\
For regular purchases, affiliates will earn a 5% commission (the default General payout). However, for purchases in the *Electronics* category, we’ll apply a goal-based payout that gives affiliates an 8% commission.

Let's create a new payout, we'll make it a General payout as well because it is relevant for all affiliates, the affiliate commission will be 8% and we'll add a goal value: *electronics*.

<figure><img src="/files/exGRyXufRktCkrEusMBc" alt=""><figcaption></figcaption></figure>

By creating this payout, we've added a rule to the system:

When a postback is received, the system will check for a *goal* parameter with the value *electronics*. If this value is found, the system will apply this specific payout (8% commission) instead of any other payout, including the default one.

***

### Passing the Goal Parameter in a Postback

Now that we’ve created a payout with a goal parameter, all that’s needed to trigger it is to include the *goal* parameter in the postback, making sure its value matches the one configured in the payout (*electronics* in this case)

Example of a postback that will **not trigger** the goal-based payout (5% commission will be applied):

<pre><code>https://exmaple-tracking.tracknow.info/postback?click_id={value}&#x26;campaign_id={value}&#x26;order_id=<a data-footnote-ref href="#user-content-fn-1">{value}</a>&#x26;amount={value}&#x26;first_name={value}&#x26;email={value}
</code></pre>

Example of a postback that will **trigger** the goal-based payout (8% commission will be applied):

```
https://exmaple-tracking.tracknow.info/postback?click_id={value}&campaign_id={value}&order_id={value}&amount={value}&first_name={value}&email={value}&goal=electronics
```

{% hint style="info" %}
It is the responsibility of your development team to implement the logic that determines whether the event being sent via postback should include the `goal` parameter. This ensures that goal-specific payouts are only triggered when the appropriate conditions are met.
{% endhint %}

[^1]:


# CPA Qualification

CPA Qualification payouts are a specialized payout structure that allows you to define multiple conditions a referred client must meet before an affiliate/IB becomes eligible for the CPA commission. These conditions include requirements such as a minimum number of lots traded, a minimum deposit amount, or a minimum number of positions opened.

<figure><img src="/files/ODx5vhmnAn9VX6GKixSx" alt=""><figcaption></figcaption></figure>

***

### Adding a CPA Payout to Affiliates/IBs

When a new affiliate/IB is onboarded, you can configure their CPA Qualification payout.

\
Navigate to **Affiliates** → **Affiliate Management** → **Three-dot icon** under the **Actions** column → **Payout Groups Settings** → **Add Personal Payout** → Select Payment Type to be **CPA Qualification**

<figure><img src="/files/Tsse9Lii3yucJ87M6iic" alt=""><figcaption></figcaption></figure>

***

### CPA Configuration

<figure><img src="/files/jfrUFWJ6ZIXH2Hjpz30Z" alt=""><figcaption></figcaption></figure>

| Field                                                  | Description                                                                                                                                                                                                                                                                                                                                            |
| ------------------------------------------------------ | ------------------------------------------------------------------------------------------------------------------------------------------------------------------------------------------------------------------------------------------------------------------------------------------------------------------------------------------------------ |
| **Title**                                              | Enter a title for this payout to easily understand what this payout is and who is it for.                                                                                                                                                                                                                                                              |
| **Custom Payout Text**                                 | The CPA payout commission value the affiliate/IB will see. If left blank, our system will show the affiliate the commission rates of this payout.                                                                                                                                                                                                      |
| **Payment Type**                                       | Should be CPA Qualification.                                                                                                                                                                                                                                                                                                                           |
| **Lots**                                               | Set a minimum amount of lots a client must meet in order for the affiliate/IB to qualify for this payout.                                                                                                                                                                                                                                              |
| **Net Deposit**                                        | Set a minimum amount deposited, a client must meet in order for the affiliate/IB to qualify for this payout.                                                                                                                                                                                                                                           |
| **Position Count**                                     | Set a minimum amount of positions opened, a client must meet in order for the affiliate/IB to qualify for this payout.                                                                                                                                                                                                                                 |
| **Qualification Group**                                | You can create multiple CPA Qualification payouts and assign them to the same group number. When an affiliate/IB qualifies for any payout within that group, their commission will be calculated based on the specific payout they qualified for, and they will no longer be eligible to receive commissions from other CPA payouts in the same group. |
| **Tiers (Deposits Amount/FTD/Progressive Commission)** | You can structure this payout’s commission amount using tiers based on any of the three available metrics. This allows you to reward affiliates/IBs according to the client’s FTD amount, the client’s total net deposits, or to enable ongoing commissions as long as the client continues depositing.                                                |
| **Countries/Disallowed Countries**                     | Limit the clients that will be measured for this CPA payout to specific countries.                                                                                                                                                                                                                                                                     |
| **Affiliate Commission**                               | The default commission amount that the affiliate/IB will get when the conditions of this payout are met if no tiers have been configured or if tiers have been configured but not met.                                                                                                                                                                 |

***

### Example

<figure><img src="/files/Soi8aKcLint1xOcG5c0w" alt=""><figcaption></figcaption></figure>

| Field                                                  | Description                                                                                 |
| ------------------------------------------------------ | ------------------------------------------------------------------------------------------- |
| **Title**                                              | FTD & Lot CPA Affiliate #13                                                                 |
| **Custom Payout Text**                                 | Blank                                                                                       |
| **Payment Type**                                       | CPA Qualification.                                                                          |
| **Lots**                                               | 10                                                                                          |
| **Net Deposit**                                        | Blank                                                                                       |
| **Position Count**                                     | Blank                                                                                       |
| **Qualification Group**                                | 1                                                                                           |
| **Tiers (Deposits Amount/FTD/Progressive Commission)** | <p>FTD<br>From $50 to $100 - Commission $80<br>From $101 to $99999999 - Commission $400</p> |
| **Countries/Disallowed Countries**                     | Blank                                                                                       |
| **Affiliate Commission**                               | $0                                                                                          |

With this setup, we've created a CPA Qualification payout. In order for an affiliate/IB to receive the commission for this payout, the client he referred must reach 10 lots in trading.

Once that condition is met, the system will check this client's FTD amount, if the FTD was between $50 and $100, the affiliate/IB will receive a commission of $80. If the FTD was between $101 and $99999999, the commission will be $400.\
If the FTD was lower than $50, then the commission amount will be determined by the value configured on the 'Affiliate Commission' field which is $0 in this case.

***

### Qualification Progress

The progress of each client qualification can be viewed on the client's page.

**Analytics Report** → **Clients** → Click on the **client's ID** → **Qualification**

<figure><img src="/files/PRiaB9IcOJ9U0UICx1Bk" alt=""><figcaption></figcaption></figure>


# Payout Groups

If you track multiple events and want to offer different commission rates for each, you can use the **Payout Groups** feature to manage this. It allows you to create multiple groups, each with its own set of payout rates for the same events. When adding a new affiliate, simply assign them to the appropriate payout group based on your agreed commission terms.

#### Example

{% columns %}
{% column %}
**Payout Group 1**&#x20;

Registration: $1\
Sale: 7%\
Sale + Coupon: 5%
{% endcolumn %}

{% column %}
**Payout Group 2**&#x20;

Registration: $2\
Sale: 10%\
Sale + Coupon: 8%
{% endcolumn %}

{% column %}
**Payout Group 3**

Registration: $3\
Sale: 12%\
Sale + Coupon: 10%
{% endcolumn %}
{% endcolumns %}

***

### Creating Payout Groups

Navigate to **Campaigns** → Locate the relevant campaign → Click the three-dot icon under the **Actions** column → **Edit** → **Payout Groups** tab → **Create Group**

<figure><img src="/files/rGX7GJLruuSSICD5UpnY" alt=""><figcaption></figcaption></figure>

1. Set a name for the payout group
2. You can already select existing affiliates to be added to that group and earn commissions based on the payouts you'll configure under that payout group

***

### Creating Payouts Under the Group

Expand the newly created payout group by clicking the **+** icon next to the title → **Add Payout** → Configure the desired payout → **Save**

<figure><img src="/files/c9AmXXtRQ9xadWJa0RZ5" alt=""><figcaption></figcaption></figure>


# Coupons

When you create coupon codes for your affiliates in your store, you can add those coupons to Tracknow and associate each one with the corresponding affiliate. The assigned coupons will be displayed in the affiliate's portal and used for commission attribution.

When a purchase event is sent from your store to Tracknow, our system can use the coupon code included in the event data to identify the affiliate responsible for the sale and attribute the commission accordingly.

{% hint style="info" %}
This allows affiliates to earn commissions from coupon-based referrals even when the customer did not click an affiliate tracking link before making the purchase.
{% endhint %}

***

### Coupon Types (Coupon Payout vs Coupon Code)

Tracknow supports two ways of associating coupon codes with affiliates:

<table><thead><tr><th width="187">Feature</th><th>Coupon Payout</th><th>Coupon Code</th></tr></thead><tbody><tr><td><strong>Purpose</strong></td><td>Apply a custom commission rate for coupon-driven sales</td><td>Attribute sales to affiliates using existing commission rules</td></tr><tr><td><strong>Commission Rate</strong></td><td>Custom rate defined on the coupon payout</td><td>Uses the commission rate from the existing payout</td></tr><tr><td><strong>Overrides Default Commission</strong></td><td>Yes</td><td>No</td></tr><tr><td><strong>Attribution Method</strong></td><td>Coupon code</td><td>Coupon code</td></tr><tr><td><strong>Typical Use Case</strong></td><td>Coupon sales should pay a different commission than link referrals</td><td>Coupon sales should pay the same commission as link referrals</td></tr></tbody></table>

#### Use a Coupon Payout When...

You want purchases made with a coupon code to generate a different commission than the default commission configured for the event.

> **Example**
>
> Your affiliate program pays affiliates **15% of the purchase amount** by default. However, you want purchases made using affiliate coupon codes to generate **10% commission**.
>
> In this case, create the coupon as a **Coupon Payout** and configure its commission rate to **10%**. When a purchase event containing that coupon code is received, Tracknow will trigger the coupon payout and award the affiliate 10% commission instead of the default 15%.

#### Use a Coupon Code When...

You want purchases made with a coupon code to generate the same commission that would be awarded through a standard affiliate referral link.

> **Example**
>
> Your affiliate program pays affiliates **15% of the purchase amount** regardless of whether the sale is attributed through an affiliate link or an affiliate coupon code.
>
> In this case, add the coupon as a **Coupon Code**. When a purchase event containing the coupon code is received, Tracknow will attribute the sale to the associated affiliate and trigger the existing **15% Sale payout**, resulting in the same commission that would have been awarded through a standard affiliate link referral.

***

### Creating a Coupon Payout

Navigate to **Affiliates** → **Coupons** → **Coupon Payouts** tab → **Add Coupon Payout**

<figure><img src="/files/aQSr7Bywd6Nl0mWg0iP8" alt=""><figcaption></figcaption></figure>

<figure><img src="/files/iicGQk57Kh4uDYMowEM1" alt=""><figcaption></figcaption></figure>

<table><thead><tr><th width="250">Field</th><th>Description</th></tr></thead><tbody><tr><td><strong>Campaigns</strong> (Required)</td><td>Select the campaign this coupon payout will be added to</td></tr><tr><td><strong>Title</strong> (Required)</td><td>Give the coupon payout a name</td></tr><tr><td><strong>Custom Payout Text</strong> (Optional)</td><td>Enter text to show the affiliate instead of this payout's commission rate</td></tr><tr><td><strong>Payout Type</strong> (Required)</td><td>Select whether it's a <strong>personal payout</strong> (a specific affiliate's code) or a <strong>general payout</strong> (general store coupon)</td></tr><tr><td><strong>Commission Type</strong> (Required)</td><td>Select the commission calculation method</td></tr><tr><td><strong>Payment Type</strong> (Required)</td><td>Select the event type and whether it's a <a href="https://docs.tracknow.io/payouts/lifetime-payout">lifetime type payout</a></td></tr><tr><td><strong>Affiliates</strong> (Required)</td><td>Select the affiliate that this coupon code is associated with</td></tr><tr><td><strong>Countries</strong> (Optional)</td><td>Only purchases by clients from the selected countries can trigger this coupon payout</td></tr><tr><td><strong>Disallowed Countries</strong> (Optional)</td><td>Only purchases by clients <strong>NOT</strong> from the selected countries can trigger this coupon payout</td></tr><tr><td><strong>Catalogs</strong> (Optional)</td><td>Add a <a href="https://docs.tracknow.io/campaigns/catalogs">catalog</a> for item-based commission calculation</td></tr><tr><td><strong>Affiliate Commission</strong> (Required)</td><td>Set the affiliate commission rate</td></tr><tr><td><strong>Max Commission</strong> (Optional)</td><td>Limit the commission amount if it's a percentage based commission rate</td></tr><tr><td><strong>Goal Value</strong> (Optional)</td><td>Read about goal-based payouts <a href="https://docs.tracknow.io/payouts/goal-based-payouts">here</a></td></tr><tr><td><strong>Coupon Code</strong> (Required)</td><td>Ener the coupon code</td></tr><tr><td><strong>Coupon Match Mode</strong> (Required)</td><td>Select how our system will compare the incoming coupon code against the coupon value set in this payout</td></tr><tr><td><strong>Default Conversion Status</strong> (Optional)</td><td>Select the default status for conversion where this payout was applied. When empty, defaults to the campaign setting</td></tr><tr><td><strong>Tier Type</strong> (Optional)</td><td>Add commission tiers to this payout</td></tr><tr><td><strong>New Customer</strong> (Optional)</td><td>Toggle on to trigger this payout only when the event postback contains <code>new_customer=true</code> (First purchases)</td></tr></tbody></table>

***

### Creating a Coupon Code

Navigate to **Affiliates** → **Coupons** → **Coupons** tab → **Add Coupon**

<figure><img src="/files/xeyV6sc9E9N1pGGuxkfh" alt=""><figcaption></figcaption></figure>

<figure><img src="/files/VIHOYM3JUljG2BWm6T1A" alt=""><figcaption></figcaption></figure>

<table><thead><tr><th width="250">Field</th><th>Description</th></tr></thead><tbody><tr><td><strong>Coupon Code</strong> (Required)</td><td>Ener the coupon code</td></tr><tr><td><strong>Coupon Match Mode</strong> (Required)</td><td>Select how our system will compare the incoming coupon code against the coupon value set in this payout</td></tr><tr><td><strong>Discount Text</strong> (Required)</td><td>Enter text to show the affiliate the client discount amount (e.g <code>15% OFF</code>)</td></tr><tr><td><strong>Campaign</strong> (Required)</td><td>Select the campaign this coupon will be added to</td></tr><tr><td><strong>Affiliates</strong> (Required)</td><td>Select the affiliate that this coupon code is associated with</td></tr></tbody></table>

***

### Where Affiliates See Their Coupon Codes

#### Main Dashboard

On the affiliate's **Dashboard** screen, there's a **coupon icon** in the **Tracking URL card**

<figure><img src="/files/6tXoG7jxIrIXLtNVPxXL" alt=""><figcaption></figcaption></figure>

> The coupon codes that will appear are determined by the selected campaign

#### Campaign Page

Affiliates can view the coupon codes associated with each of their campaigns on every campaign page.

**Campaigns** → Click on the relevant campaign name → The coupons will appear on that campaign's page

<figure><img src="/files/yuCvcL9G7Tx7228oZwdv" alt=""><figcaption></figcaption></figure>


# Scheduled Payouts

The **Scheduled Payouts** feature lets you adjust affiliate commission rates based on time. You can set a specific date on which the new commission rates (payouts) will take effect.

***

### How to schedule payouts? <a href="#how-to-schedule-payouts" id="how-to-schedule-payouts"></a>

First, create the new payout or payout group you want to apply to the affiliate once the scheduled date arrives. Be sure to set them as **‘Personal Payout’** types, so affiliates won’t see these payouts until they take effect.

Once you’ve created the commission rates you want to schedule, the next step is to set up the schedule itself.

Navigate to **Affiliates** → **Management** → Click on the relevant affiliate's name → **Payout Group Settings** tab → **Schedule** tab Navigate to **Affiliates** → **Management** → Click on the relevant affiliate's name → **Payout Group Settings** tab → **Add New**

<figure><img src="/files/U9PYR8AOHFYOxBNsZXZl" alt=""><figcaption></figcaption></figure>

1. Select the relevant campaign that the payout rates will change in
2. Select the future payout that you previously created
3. Set the schedule date
4. **Save**


# Import Conversions

You can bulk-upload conversions by importing a CSV file using the **Import** button on the **Conversions** screen.

Navigate to **Performance** → **Conversions** → **Import**

<figure><img src="/files/z2y8Hm97Iz9aeFKP6n6C" alt=""><figcaption></figcaption></figure>

***

### Sample File

When you click the **Import** button, you can download a sample CSV file that shows the required format and the types of data you can include.

| Column                   | Description                                                                                                                                                                                                                                                                                                                                     |
| ------------------------ | ----------------------------------------------------------------------------------------------------------------------------------------------------------------------------------------------------------------------------------------------------------------------------------------------------------------------------------------------- |
| **Order Id**             | Include the conversion’s order ID if you have one. If you leave this field blank, the system will automatically generate a unique order ID.                                                                                                                                                                                                     |
| **Click Id**             | If available, include the click ID linked to this conversion. When a click ID is provided, you don’t need to fill in the Campaign ID or Ref ID columns, as that information is already contained within the click ID.                                                                                                                           |
| **Payout Name**          | If you need a specific payout applied to this conversion, include the payout name exactly as it appears in Tracknow (Payout Title). When a payout name is provided, you don’t need to fill in the Merchant Commission or Affiliate Commission columns, as the system will automatically use the payout’s configured settings.                   |
| **Campaign Id**          | Specify the ID of the campaign (as indicated on Tracknow) that this conversion should be added under. (No need to fill out if you provided a click ID for that conversion).                                                                                                                                                                     |
| **Ref Id**               | Specify the ID of the affiliate (as indicated on Tracknow) that this conversion should be added under. (No need to fill out if you provided a click ID for that conversion).                                                                                                                                                                    |
| **Amount**               | Enter the amount for this conversion. When the payout commission is percentage-based, the system will calculate the commission based on this value.                                                                                                                                                                                             |
| **Merchant Commission**  | <p>If you are a network and did not specify a Payout Name for a conversion, you can enter the commission rate manually. The Merchant Commission represents the amount you earned from the brand you promoted for this conversion.<br>Your net earnings are calculated by subtracting the affiliate commission from the merchant commission.</p> |
| **Affiliate Commission** | If you did not specify a Payout Name for the conversion, you can enter the affiliate's commission amount manually here.                                                                                                                                                                                                                         |
| **Status**               | The status in which the conversion will be imported (**APPROVED, DENIED, TEST, REVISION, PENDING, HOLD**)                                                                                                                                                                                                                                       |
| **Status Comment**       | You can add a comment to the status.                                                                                                                                                                                                                                                                                                            |
| **Conversion Date**      | Enter the date of the conversion using the **dd/MM/yyyy HH:mm** format in **UTC**. If no date is provided, the system will automatically assign the date and time of the import.                                                                                                                                                                |

***

### Mapping

When you upload your file, you'll have the option to map the columns of your file to the corresponding Tracknow columns if you decided to upload a file that does not have the same column titles as the sample CSV file.

Select the column in your file that represents each field in the mapping list. Select 'Not Found' for unnecessary columns.

<figure><img src="/files/yhaqeB5g8S7mHGQvyz2B" alt=""><figcaption></figcaption></figure>


# Editing Conversions

You can edit a conversion after it has been attributed to an affiliate, including updating the affiliate’s commission.

{% hint style="info" %}
Conversions that have already been paid can still be edited; however, these changes will not impact the affiliate’s balance.

If you need to adjust an affiliate’s balance, it is recommended to add a manual conversion with a commission amount that reflects the correction. Negative commission values can be used for deductions.
{% endhint %}

***

### Editing a Conversion

Navigate to **Performance** → **Conversions** (for some users the screen is named **Commissions**) → Locate the relevant conversion → Click the three-dot icon under the **Actions** column → **Edit**

<figure><img src="/files/jHdH01ybHSVTpuVIvqNo" alt=""><figcaption></figcaption></figure>

***

### Editing Conversion in Bulk

To edit multiple conversions, export the relevant conversions, update their details in the file, and then upload the updated CSV back to the system.

#### Exporting Conversions

Navigate to **Performance** → **Conversions** (for some users the screen is named **Commissions**) → Use the filters to narrow the conversion list to the relevant entries → **Download Report**

<figure><img src="/files/Rw2DzgxrjjQCLUsqt0rm" alt=""><figcaption></figcaption></figure>

The report request will be added to the processing queue and will be ready within a few minutes. Once completed, you will receive a notification in the system. Download the file and apply the necessary changes to the conversions and the save the file as a CSV type file.

<figure><img src="/files/F90TD5Pg7v0fsHwN9PPX" alt=""><figcaption></figcaption></figure>

#### Uploading the Updated File to Update Conversions

Navigate to **Performance** → **Conversions** (for some users the screen is named **Commissions**) → **Update** → Choose the updated CSV file

<figure><img src="/files/ArrwfWNd1RTjESuv2mW0" alt=""><figcaption></figcaption></figure>


# Conversion Status

In order for affiliates to earn commissions from the conversions they generated, each conversion must first be **approved**.

<figure><img src="/files/vYZOr1L5rCIMtHsZDwr0" alt=""><figcaption></figcaption></figure>

\
\
The approval process involves updating the conversion status to **Approved**. Only commissions from approved conversions will appear under **Available to Payout**, and affiliates can request payouts only for those.

You can also change the default status by going to Campaign → Edit → Tracking and updating the **Default Conversion Status**.

<figure><img src="/files/UbbzycKgDcNOTERj98dl" alt=""><figcaption></figcaption></figure>

***

### Statuses

1. **Approved** – Once a conversion is marked as approved, the corresponding commission becomes available for the affiliate to request a payout.
2. **Hold** – A temporary status that keeps the conversion on hold for a predefined time period. If no action is taken during this period, the conversion will be automatically approved once the time expires. (Visible to the affiliate)
3. **Pending** - Commissions for pending conversions are not available yet to the corresponding affiliates, requires manual approval. (Visible to the affiliate)
4. **Denied** - Affiliates will not receive commissions for denied conversions.
5. **Revision** - Commissions for conversions under revision are not available to the corresponding affiliates, requires manual approval. (Conversions are not visible to the affiliate)
6. **Test** - A status for conversions that were made as tests - commissions will not be available for the affiliate. (Visible to the affiliate)
7. **Processing** – A status automatically assigned to conversions when a payment request is submitted for the commissions earned from those conversions. Conversions marked as **Processing** cannot be edited or modified. Once the payment request is approved, the conversion status is automatically updated to **Paid**. If the payment request is denied, the conversions revert to the **Approved** status.
8. **Paid** – A status automatically assigned to conversions once a payment request for those conversions has been approved. Conversions marked as **Paid** are finalized and can no longer be edited or modified.

***

### Updating a Conversion's Status

On your admin dashboard, go to the **Conversions** screen.

Use the available filters to narrow down the results. For example, you can filter by a specific affiliate if you want to review and approve their conversions in bulk.

Click the **Bulk Edit** button, then check the boxes next to the conversions you want to update. Select the desired status, and click the **Apply status change to** button to confirm.

<figure><img src="/files/B6uggTIBF70zK9794H06" alt=""><figcaption></figcaption></figure>


# Custom Domain

Tracknow offers the option to set a custom domain for all affiliate-related links such as their login page and their tracking links.

By default, the affiliate login page and affiliate tracking links will be on the Tracknow domain. By creating a custom domain, all affiliate links can be seen as if on your store's subdomain.

<table><thead><tr><th width="166">Type</th><th width="255">Without custom domain</th><th>With custom domain</th></tr></thead><tbody><tr><td><strong>Affiliate registration page</strong></td><td><mark style="color:blue;">your-domain.tracknow.io</mark>/registration</td><td><mark style="color:blue;">affiliates.your-domain.com</mark>/registration</td></tr><tr><td><strong>Affiliate portal login page</strong></td><td><mark style="color:blue;">your-domain.tracknow.io</mark>/login</td><td><mark style="color:blue;">affiliates.your-domain.com</mark>/login</td></tr><tr><td><strong>Affiliate tracking link</strong></td><td><mark style="color:blue;">your-domain-tracking.tracknow.info</mark>/click?campaign_id=1&#x26;ref_id=1</td><td><mark style="color:blue;">affiliates.your-domain.com</mark>/click?campaign_id=1&#x26;ref_id=1</td></tr></tbody></table>

***

### Setting Up a Custom Domain

Log in to the service that is hosting your domain, where you manage your DNS records (i.e. GoDaddy, Cloudflare, Google Domains).

{% hint style="info" %}
The field naming may vary between different providers
{% endhint %}

1. Navigate to the area where you manage your DNS records
2. Create a new DNS record of the CNAME type
3. On the 'Name' field enter the sub domain (i.e. **affiliates**)
4. On the 'Value' field enter **whitelabel.tracknow\.io**
5. If given the option to configure proxy status, select 'DNS Only'
6. Save the record
7. Log into your Tracknow dashboard and navigate to the 'Settings' page
8. On the secondary menu select 'Branding'
9. Scroll down to the 'SSL Custom Domain (for affiliates)' section and enter your custom domain
10. Click 'Save'

<figure><img src="/files/qcKAJBUVm46nhOyClLpo" alt=""><figcaption></figcaption></figure>

<figure><img src="/files/NmHxE1yoAY1ajFXZGD02" alt=""><figcaption></figcaption></figure>


# Custom Email Address

Tracknow offers the option to send automatic emails to your affiliates after various events such as registration, payment request approval/denial, campaign join request approval/denial.

You can set a custom email address for such emails.

By default, the email address from which the emails are sent is a Tracknow email address.\
If you'd like to further customize and brand you portal, you can have the email address appear as your brands email address.

| Default email address  | Custom email address         |
| ---------------------- | ---------------------------- |
| <no-reply@tracknow.io> | <affiliates@your-domain.com> |

***

### Prerequisites

In order to set up a custom email, you'll need to add several DNS records to your domain hosting service (i.e. GoDaddy, Cloudflare, Google Domains).

{% hint style="info" %}
The DNS records are generated by us manually. To receive these records, you need to contact our support team. You can copy and fill out the following template and send it to <support@tracknow.io>
{% endhint %}

```
Hello,

I would like to set up a custom email address with my domain.
Please provide me the necessary DNS records based on the following information:
- The email address I want is: *Enter desired email address (Example: affilaites@your-domain.com)*

Thanks.
```

{% hint style="info" %}
Once the records are generated, they are valid for 72 hours. If the process has not been completed by then, we'll need to generate new records for you.
{% endhint %}

***

### Setting Up the DNS Records

1. Navigate to the area where you manage your DNS records
2. Create a new DNS record of the CNAME type
3. On the 'Name' field enter the name value from the file (i.e. **5k4aehnksge.\_domainkey.your-domain.com**)
4. On the 'Value' field enter the value from the file (i.e **5k4aehnksge.dkim.amazonses.com**)
5. If given the option to configure proxy status, select 'DNS Only'
6. Save the record
7. Repeat this process for all 3 records in the file

<figure><img src="/files/N0zNBV2mTyMDiW4Pls1Y" alt=""><figcaption></figcaption></figure>

{% hint style="info" %}
Once you are done, please send us another email notifying us that you are done so that we can finalize the setup on our end
{% endhint %}


# Custom Homepage Screen

A custom home page allows you to add an additional screen to the affiliate portal that is displayed as the first screen affiliates see upon login.

The custom home page is activated once you add HTML code to the Custom Home Page code block and save your changes.

***

### Setting Up a Custom Homepage

Navigate to **Settings** → **Branding** → **Custom Homepage** → Add your page HTML code → **Save**

<figure><img src="/files/Anso2nBnNaLII1YRA6Tu" alt=""><figcaption></figcaption></figure>

***

### How It Appears for Affiliates

A new screen called **Home** will appear in the main menu of the affiliate portal, displaying the content from your HTML code. This screen will be shown as the default view when affiliates log in.

<figure><img src="/files/0019lqB0mzFSeUXFpHkf" alt=""><figcaption></figcaption></figure>


# Deep Links

When configuring a [campaign](https://docs.tracknow.io/campaigns/creating-campaigns), managers can define a default landing page. Tracknow automatically generates a unique tracking link for each affiliate, which they can share with potential clients. By default, these links direct traffic to the campaign’s primary landing page.

Managers also have the option to add multiple [landing pages](https://docs.tracknow.io/campaigns/landing-pages) to a campaign. This enables affiliates to select the specific page they want to promote.

If an affiliate wants to direct clients to a landing page that hasn’t been predefined by a manager, they can use the **deep link feature**. By entering the desired landing page URL, they can generate a custom tracking link that routes traffic to that specific page.

***

### How Affiliates Can Generate a Deep Link

Affiliates can access their tracking links in two locations:

#### Main Dashboard

On the affiliate portal, navigate to the **Dashboard** screen → **Tracking URL** section → **Expand** the section to reveal the Deep Link options → Enter the new landing page URL in the **Deep Link input field** → The Tracking URL above it will update accordingly

<figure><img src="/files/33TOPYPhfU6T36TAlaxy" alt=""><figcaption></figcaption></figure>

#### Campaign Screen

On the affiliate portal, navigate to **Campaigns** → Click on the relevant campaign → **Tracking URL** section → **Expand** the section to reveal the Deep Link options → Enter the new landing page URL in the **Deep Link input field** → The Tracking URL above it will update accordingly

<figure><img src="/files/ILS1rgxiwvLxqDbB6Mzh" alt=""><figcaption></figcaption></figure>

{% hint style="info" %}
Tracking URLs generated for deep links are not stored in the system. After creating a deep link, affiliates can copy and use the generated tracking URL, but it will not be displayed again after the page is refreshed. The link itself remains active and functional, even though it is no longer visible in the interface.
{% endhint %}

***

### How Managers Can Generate Deep Links for Affiliates

Navigate to **Campaigns** → Click on the relevant campaign → **Tracking Tools / Creatives** → **Landing Page** section → **Expand** the section to reveal the Deep Link options → Select the affiliate for which you'd like to generate this new tracking URL for →  Enter the new landing page URL in the **Deep Link input field** → The Tracking URL above it will update accordingly → Copy it and share with the affiliate

<figure><img src="/files/flHTMEK2tGwdEDNDROGZ" alt=""><figcaption></figcaption></figure>

***

### Passing Parameters in Deep Links

When generating a new tracking URL for a deep link, managers or affiliates can also pass additional parameters using the fields under the Deep Link input field.

<figure><img src="/files/vBbUFV2CVPJ2hFLu8hZL" alt=""><figcaption></figcaption></figure>

When a parameter value is provided, it is appended to the tracking URL. When a user clicks the link, Tracknow creates a new click record and stores the passed parameters with that click. If a conversion is later attributed to that click, the conversion will inherit all of the associated parameters.


# Supported Parameters

When tracking conversion events on your website, you can pass additional details to Tracknow and display them in your dashboard.

This is done by sending each data point under its corresponding parameter within the postback request.

***

### Parameters

{% hint style="info" %}
Please make sure to send values using their correct (dedicated) parameters, as each one is tied to specific processing logic within the system.\
For example, if your affiliate commission is based on a percentage, Tracknow will use the value sent under the **amount** parameter to calculate the commission accordingly.
{% endhint %}

Below are the parameters you can use to send details about various events.\
You can use only the parameters you need or want to see in Tracknow. However, some parameters may still be mandatory depending on the type of integration.

<table><thead><tr><th width="152">Parameter Key</th><th width="161">Corresponding Column</th><th>Description</th></tr></thead><tbody><tr><td><strong>campaign_id</strong></td><td>Campagin/Offer</td><td>The Tracknow campaign ID that this purchase should be associated with. It is required in certain types of integrations</td></tr><tr><td><strong>click_id</strong></td><td>Click ID</td><td>A unique parameter that links the client or purchase to the referring affiliate. It is required in certain types of integrations</td></tr><tr><td><strong>order_id</strong></td><td>Order ID</td><td>The internal order ID from your webstore that identifies the specific order or purchase</td></tr><tr><td><strong>amount</strong></td><td>Amount</td><td>The amount paid by the client, which the affiliate commission can be based on</td></tr><tr><td><strong>commission</strong></td><td>no column</td><td>If you want the affiliate’s commission to be based on a specific value rather than the purchase amount, use this parameter to send that custom value</td></tr><tr><td><strong>currency</strong></td><td>no column</td><td>If purchases are made in different currencies, include the currency code in 3-letter ISO format (e.g., USD, EUR). This allows our system to convert the amount to your campaign’s default currency</td></tr><tr><td><strong>conversion_rate</strong></td><td>no column</td><td>You can provide your own conversion rate if you prefer not to use the system’s default rate</td></tr><tr><td><strong>coupon</strong></td><td>Coupon code</td><td>The coupon code entered by the client during the purchase</td></tr><tr><td><strong>goal</strong></td><td>no column</td><td>A unique parameter used to trigger a specific payout, based on a pre-configured goal value. Click <a href="https://help.tracknow.io/knowledge-base/how-to-use-the-goal-parameter/">here</a> to learn more</td></tr><tr><td><strong>comment</strong></td><td>Comment</td><td>Add any comments or notes related to this purchase or order</td></tr><tr><td><strong>ref_id</strong></td><td>Affiliate</td><td>If you want to attribute this purchase to a specific affiliate, include their Tracknow Affiliate ID in this parameter</td></tr><tr><td><strong>ref_custom_id</strong></td><td>Affiliate</td><td>If you use custom Affiliate IDs, you can identify the affiliate using their custom ID instead of their <strong>ref_id</strong></td></tr><tr><td><strong>first_name</strong></td><td>First Name</td><td>Client's first name</td></tr><tr><td><strong>last_name</strong></td><td>Last Name</td><td>Client's last name</td></tr><tr><td><strong>email</strong></td><td>Email</td><td>Client's email address</td></tr><tr><td><strong>country</strong></td><td>Country</td><td>Client's country (ISO 3166-1 alpha-2 code format i.e UK, US, JP)</td></tr><tr><td><strong>address</strong></td><td>Address</td><td>Client's address</td></tr><tr><td><strong>postcode</strong></td><td>Postcode</td><td>Client's postcode</td></tr><tr><td><strong>phone</strong></td><td>Phone number</td><td>Client's phone number</td></tr><tr><td><strong>new_customer</strong></td><td>no column</td><td>The value should be <strong>true</strong> or <strong>false</strong>, indicating whether the client is new. This helps establish a link between the client and the referring affiliate when using lifetime payouts</td></tr><tr><td><strong>customer_id</strong></td><td>no column</td><td>The value defined in your integration (such as a customer ID or email address) used to link the client to the referring affiliate when using lifetime payouts</td></tr><tr><td><strong>skip_lifetime</strong></td><td>no column</td><td>Send the value <strong>true</strong> if you want to create a lifetime link between the client and the affiliate, but prefer to pay the commission through a different payout instead of the lifetime payout</td></tr><tr><td><strong>gaid</strong></td><td>GAID</td><td>Google advertising ID</td></tr><tr><td><strong>idfa</strong></td><td>IDFA</td><td>A random device identifier assigned by Apple to a user’s iOS device</td></tr><tr><td><strong>custom1</strong></td><td>custom1</td><td>A parameter for any text or values you want to pass that don’t have a dedicated parameter</td></tr><tr><td><strong>custom2</strong></td><td>custom2</td><td>A parameter for any text or values you want to pass that don’t have a dedicated parameter</td></tr><tr><td><strong>custom3</strong></td><td>custom3</td><td>A parameter for any text or values you want to pass that don’t have a dedicated parameter</td></tr><tr><td><strong>custom4</strong></td><td>custom4</td><td>A parameter for any text or values you want to pass that don’t have a dedicated parameter</td></tr><tr><td><strong>custom5</strong></td><td>custom5</td><td>A parameter for any text or values you want to pass that don’t have a dedicated parameter</td></tr><tr><td><strong>custom6</strong></td><td>custom6</td><td>A parameter for any text or values you want to pass that don’t have a dedicated parameter</td></tr><tr><td><strong>custom7</strong></td><td>custom7</td><td>A parameter for any text or values you want to pass that don’t have a dedicated parameter</td></tr><tr><td><strong>custom8</strong></td><td>custom8</td><td>A parameter for any text or values you want to pass that don’t have a dedicated parameter</td></tr><tr><td><strong>sub1</strong></td><td>sub1</td><td>A parameter for any text or values you want to pass that don’t have a dedicated parameter. Affiliates can also use this parameter, but if you use it, your value will override theirs</td></tr><tr><td><strong>sub2</strong></td><td>sub2</td><td>A parameter for any text or values you want to pass that don’t have a dedicated parameter. Affiliates can also use this parameter, but if you use it, your value will override theirs</td></tr><tr><td><strong>sub3</strong></td><td>sub3</td><td>A parameter for any text or values you want to pass that don’t have a dedicated parameter. Affiliates can also use this parameter, but if you use it, your value will override theirs</td></tr><tr><td><strong>sub4</strong></td><td>sub4</td><td>A parameter for any text or values you want to pass that don’t have a dedicated parameter. Affiliates can also use this parameter, but if you use it, your value will override theirs</td></tr><tr><td><strong>sub5</strong></td><td>sub5</td><td>A parameter for any text or values you want to pass that don’t have a dedicated parameter. Affiliates can also use this parameter, but if you use it, your value will override theirs</td></tr><tr><td><strong>sub6</strong></td><td>sub6</td><td>A parameter for any text or values you want to pass that don’t have a dedicated parameter. Affiliates can also use this parameter, but if you use it, your value will override theirs</td></tr><tr><td><strong>sub7</strong></td><td>sub7</td><td>A parameter for any text or values you want to pass that don’t have a dedicated parameter. Affiliates can also use this parameter, but if you use it, your value will override theirs</td></tr><tr><td><strong>sub8</strong></td><td>sub8</td><td>A parameter for any text or values you want to pass that don’t have a dedicated parameter. Affiliates can also use this parameter, but if you use it, your value will override theirs</td></tr><tr><td><strong>itemId</strong></td><td>﻿</td><td>This parameter will hold the item ID/SKU (Mandatory for <a href="https://help.tracknow.io/knowledge-base/catalogs/">catalog-based payouts</a>)</td></tr><tr><td><strong>itemVariation</strong></td><td>﻿</td><td>This parameter will hold the item variation (Optional for catalog-based payouts)</td></tr><tr><td><strong>itemName</strong></td><td>﻿</td><td>This parameter will hold the item name (Optional for <a href="https://help.tracknow.io/knowledge-base/catalogs/">catalog-based payouts</a>)</td></tr><tr><td><strong>itemQuantity</strong></td><td>﻿</td><td>This parameter will hold the quantity of purchased item (Optional for <a href="https://help.tracknow.io/knowledge-base/catalogs/">catalog-based payouts</a>)</td></tr><tr><td><strong>itemPrice</strong></td><td>﻿</td><td>This parameter will hold the item price (Optional for <a href="https://help.tracknow.io/knowledge-base/catalogs/">catalog-based payouts</a>)</td></tr></tbody></table>

***

### Example

These parameters can be passed using different Integration Methods, with the most common being postbacks and tracking pixels.

What these methods have in common is that they both involve generating a URL, appending the relevant parameters to it, and then calling that URL to send the data to Tracknow.

Here's an example of a postback format that reports a purchase made by a client that was referred by an affiliate, the parameters we chose to pass in this example are the order ID, purchase amount, client's first name and email address

```http
https://exmaple-tracking.tracknow.info/postback?click_id={value}&campaign_id={value}&order_id={value}&amount={value}&first_name={value}&email={value}
```

The actual purchase details should replace the `{value}` placeholders next to each parameter key. Once populated with real data, the final postback URL should look like this:

```
https://exmaple-tracking.tracknow.info/postback?click_id=a520dca8-ab08-4640-af65-034be3a68909&campaign_id=1&order_id=23315&amount=150&first_name=John&email=john.example%40gmail.com
```

{% hint style="info" %}
Values that contain special characters, such as the '@' symbol in an email address, must be URL-encoded to ensure they are transmitted correctly within the URL
{% endhint %}


# Tracking URL Passed Parameters

Each [landing page](/campaigns/landing-pages) you create in Tracknow automatically generates a unique tracking URL for every affiliate with access to that page.

Affiliates use this URL to promote the landing page by sharing it across their channels. When a user clicks the tracking link, they are redirected to the corresponding landing page.

By default, the tracking URL looks like this:

```
https://{YOUR NAMESPACE}-tracking.tracknow.info/click?campaign_id={VALUE}&ref_id={VALUE}
```

You can also setup a [custom sub-domain](/customizations/custom-domain) so that tracking URLs will appear from your domain, for example:

```
https://example.yourdomain.com/click?campaign_id={VALUE}&ref_id={VALUE}
```

***

### Default Parameters

Tracking URLs always include the following parameters:

* `campaign_id` – identifies the Tracknow campaign associated with the landing page
* `ref_id` – identifies the specific affiliate link that was clicked

When a user clicks on the tracking URL, Tracknow generates a click record and stores these parameters on that click record.

Whenever a conversion postback is sent to our system indicating a specific `click_id` (a click record identifier), the conversion attribution is based on these parameters.

* The `campaign_id` value will determine under which campaign this conversion will be added
* The `ref_id` value will determine which affialite will receive the commission for that conversion.

Click records can be seen on your Tracknow dashboard under **Logs** → **Clicks**

***

### Additional Parameters

You can also append additional parameters to a tracking URL, which will be captured and stored with the click record.

When a conversion is later reported via postback using the corresponding `click_id`, it inherits all parameters associated with that click, including any custom values passed in the original tracking URL.

Navigate to **Campaigns** → Click on the name of the relevant campaign → **Tracking Tools / Creatives** → **Landing Page** section → Click the small **arrow** at the top right corner to reveal supported parameter keys

<figure><img src="/files/r05L7O0vcc1RU3PtZbBn" alt=""><figcaption></figcaption></figure>

<table><thead><tr><th width="154">Field</th><th width="144">Parameter Key</th><th>Description</th></tr></thead><tbody><tr><td>UTM Source</td><td>utm_source</td><td>Google Analytics dedicated parameter. Used to pass a UTM Source value</td></tr><tr><td>UTM Medium</td><td>utm_medium</td><td>Google Analytics dedicated parameter. Used to pass a UTM Medium value</td></tr><tr><td>UTM Content</td><td>utm_content</td><td>Google Analytics dedicated parameter. Used to pass a UTM Content value</td></tr><tr><td>Goal</td><td>goal</td><td>Allows you to pass a <a href="https://docs.tracknow.io/payouts/goal-based-payouts">goal value</a> that is stored with the click record. When a conversion postback is later received with the corresponding <code>click_id</code>, the system uses this stored goal value to trigger the payout configured for that specific goal.</td></tr><tr><td>Sub 1</td><td>sub1</td><td>A parameter for any text or values you want to pass that don’t have a dedicated parameter</td></tr><tr><td>Sub 2</td><td>sub2</td><td>A parameter for any text or values you want to pass that don’t have a dedicated parameter</td></tr><tr><td>Sub 3</td><td>sub3</td><td>A parameter for any text or values you want to pass that don’t have a dedicated parameter</td></tr><tr><td>Sub 4</td><td>sub4</td><td>A parameter for any text or values you want to pass that don’t have a dedicated parameter</td></tr><tr><td>Sub 5</td><td>sub5</td><td>A parameter for any text or values you want to pass that don’t have a dedicated parameter</td></tr><tr><td>Sub 6</td><td>sub6</td><td>A parameter for any text or values you want to pass that don’t have a dedicated parameter</td></tr><tr><td>Sub 7</td><td>sub7</td><td>A parameter for any text or values you want to pass that don’t have a dedicated parameter</td></tr><tr><td>Sub 8</td><td>sub8</td><td>A parameter for any text or values you want to pass that don’t have a dedicated parameter</td></tr><tr><td>IDFA</td><td>idfa</td><td>IDFA is a random device identifier assigned by Apple to a user’s iOS device</td></tr><tr><td>GAID</td><td>gaid</td><td>Google Analytics dedicated parameter. Used to pass a Google Advertising ID value</td></tr></tbody></table>


# Passing click\_id to a Landing Page

Each time someone clicks on an affiliate's tracking URL, that click is logged by our system. Click records hold information like:

1. The affiliate whose link was clicked
2. The campaign that the link is associated with
3. Basic metadata about the client (IP address and user agent)

**Every click record has a click ID**. This parameter is essential for ensuring reliable tracking.

When a client clicks an affiliate link, they are redirected to your chosen landing page. You can enable passing the client’s click\_id in the URL so that when they complete a purchase or another tracked action, this click\_id is sent along with the purchase details to your Tracknow dashboard. This allows the system to accurately attribute the purchase to the correct affiliate.

Think of it like a client visiting a store after being recommended by an affiliate. When they walk in, they are wearing a sticker with the affiliate’s name. When the client makes a purchase, the seller checks the sticker to see which affiliate referred them and credits that affiliate accordingly.

***

### Set Up

Navigate to **Campaigns** → Locate the relevant campaign → click the three-dot icon under the **Actions** column → **Edit** → **Tracking** tab → Add the click\_id parameter key and macro to the **Default Landing Page** URL and to the **Deep Link Passed Parameters** field

<figure><img src="/files/ObtBPxXhDrd4mPN9Vi9z" alt=""><figcaption></figcaption></figure>

Now, each time a client clicks an affiliate link, he will be directed to your landing page with his click\_id in the URL

<figure><img src="/files/O1YizNVBTzRhLERGqjr7" alt=""><figcaption></figcaption></figure>

***

### Storing the `click_id` in a Cookie

After the `click_id` is passed to your website, you must store it in a browser cookie to ensure it persists while the user navigates across different pages. This prevents the value from being lost during the session and ensures it remains available when the client completes the tracked event.

You can use the following script template to store the `click_id` in a cookie:

```javascript
<script>
// Get a query parameter by name from the URL
function getQueryParam(name) {
  const urlParams = new URLSearchParams(window.location.search);
  return urlParams.get(name);
}

// Set a cookie for the root domain, available across subdomains
function setCookie(name, value, days) {
  const maxAge = days * 24 * 60 * 60; // days to seconds
  const domain = "." + window.location.hostname.split('.').slice(-2).join('.'); // example.com

  document.cookie = `${name}=${encodeURIComponent(value)}; path=/; domain=${domain}; max-age=${maxAge}; secure;`;
}

// Main: look for click_id and store it
(function () {
  const clickId = getQueryParam("click_id");
  if (clickId) {
    setCookie("click_id", clickId, 365); // store for 1 year
  }
})();
</script>
```

{% hint style="info" %}
Please ensure this script is implemented in the \<head> section of your website so that it is loaded on all pages. This ensures the script remains effective even if the landing page changes, and no code adjustments will be required.
{% endhint %}


# Shopify Integration

Tracknow integrates with Shopify stores to automatically transmit data for completed purchases into your Tracknow dashboard. This enables accurate tracking and attribution of purchases made by customers referred by your affiliates.

***

### Methods of Integration

There are two supported methods for integrating Tracknow with a Shopify store:

{% columns %}
{% column %}
**Tracknow Plugin**

Tracknow provides a Shopify app that can be installed on a Shopify store to enable purchase tracking
{% endcolumn %}

{% column %}
**Webhooks**

Implement the required scripts and configure Shopify webhooks to enable purchase tracking
{% endcolumn %}
{% endcolumns %}

<table><thead><tr><th width="369">Plugin</th><th>Webhooks</th></tr></thead><tbody><tr><td>Simple installation process</td><td>More manual and technical implementation</td></tr><tr><td>Higher chance of missing some purchases due to Shopify privacy limitations</td><td>Lower chance of missing some purchases due to Shopify privacy limitations</td></tr><tr><td>More control over what purchases will be tracked</td><td>All purchases are tracked (filtration is handled on Tracknow side)</td></tr><tr><td>Only relevant purchase details are sent to Tracknow</td><td>The entire order payload is sent to Tracknow</td></tr></tbody></table>

***

### Prerequisites

Both integration methods require you to enable passing our unique affiliate identifier `click_id` to your landing page.\
\
For instructions, click [here](https://docs.tracknow.io/integrations/passing-click_id-to-a-landing-page).

***

### Plugin Integration

Login to the Shopify admin dashboard → **Settings** → **Apps** → **Shopify App Store** → Search for the [**Tracknow Integration**](https://apps.shopify.com/tracknow-affiliate-software) app → Install the app

<figure><img src="/files/y0K7zvZ9oLUwPLBcWB9q" alt=""><figcaption></figcaption></figure>

Navigate back to the Shopify dashboard → Open the **Tracknow Integration** app → **Setup Configuration**

<figure><img src="/files/6kzYzhgyRsOIuryIEAdj" alt=""><figcaption></figcaption></figure>

Fill out the configuration form → **Update**

<figure><img src="https://help.tracknow.io/wp-content/uploads/2026/01/image-19.png" alt=""><figcaption></figcaption></figure>

<table><thead><tr><th width="216">Field</th><th>Description</th></tr></thead><tbody><tr><td><strong>Tracknow Namespace Name</strong></td><td>Enter the Tracknow namespace to which data should be sent. This value is available in the Tracknow dashboard main menu.</td></tr><tr><td><strong>Tracknow Campaign ID</strong></td><td>Enter the Tracknow Camapign ID to which data should be sent</td></tr><tr><td><strong>Enable Coupon Filter</strong></td><td>Enter a value to limit tracking to orders that used a coupon code containing the specified string. Orders without a coupon code will still be tracked if the customer has a Tracknow referral identifier cookie.</td></tr></tbody></table>

Navigate to **Settings** → **Customer Events** → Confirm that the plugin status is **Connected**

<figure><img src="/files/6yO90OVFPdPRMGTGxANM" alt=""><figcaption></figcaption></figure>

***

### Webhook Integration

Login to the Shopify admin dashboard → **Online Store** → **Themes** → Three-dot icon next to your **Current Theme** → **Edit Code**

<figure><img src="/files/9RDoRIFRuWVymVSm2ilf" alt=""><figcaption></figcaption></figure>

Expand the **layout** tab in the file explorer → Select the **theme.liquid** file

<figure><img src="/files/lEJTyEkbfmiYY92IgWsi" alt=""><figcaption></figcaption></figure>

Locate the \</head> section closing tag → Insert the following script into the \<head> section of the page, immediately before the closing \</head> tag → **Save**

<pre class="language-javascript"><code class="lang-javascript">&#x3C;script>
  window.tracknow =
    window.tracknow ||
    function () {
      (window.tracknow.q = window.tracknow.q || []).push(arguments);
    };

  tracknow("config", {
    namespace: "<a data-footnote-ref href="#user-content-fn-1">{REPLACE WITH TRACKNOW NAMESAPCE}</a>",
    shopify: true,
  });
&#x3C;/script>

&#x3C;script async src="https://static.tracknow.io/js/tracking.min.js">&#x3C;/script>
</code></pre>

{% hint style="info" %}
Replace the **{REPLACE WITH TRACKNOW NAMESAPCE}** placeholder with your actual Tracknow namespace before pasting this script into the **theme.liquid** file
{% endhint %}

<figure><img src="/files/9BGFnc4HtErPD4ykFemW" alt=""><figcaption></figcaption></figure>

This script loads the Tracknow JavaScript library that handles storing the Tracknow referral identifier (click\_id) in the customer’s browser.

Navigate to **Settings** → **Notifications** → **Webhooks** → **Create Webhook**

<figure><img src="/files/bS0hU7WhGKq2MUquyXHy" alt=""><figcaption></figcaption></figure>

Configure the webhook using the following settings → **Save**

<figure><img src="/files/ACJLkwda7u3tu1VAAsxY" alt=""><figcaption></figcaption></figure>

<table><thead><tr><th width="218">Field</th><th>Value</th></tr></thead><tbody><tr><td>Event</td><td>Order Payment</td></tr><tr><td>Format</td><td>JSON</td></tr><tr><td>URL</td><td>https:/<strong>{namespace}</strong>-tracking.tracknow.info/wh/shopify/<strong>{campaignId}</strong>?orderIdField=order_number</td></tr><tr><td>Webhook API version</td><td>2026-01</td></tr></tbody></table>

{% hint style="info" %}
Replace the **{namespace}** placeholder with your actual Tracknow namespace before pasting this URL\
Replace the **{campaignId}** placeholder with your actual Tracknow campaign ID before pasting this URL
{% endhint %}

***

### Important Notes

* Ensure that the Shopify store does not use both integration methods simultaneously, as this may result in tracking issues and duplicate order events
* When switching between integration methods, fully disable the existing integration before enabling the new one

[^1]:


# WooCommerce Integration

Tracknow integrates with WooCommerce stores to automatically transmit data for completed purchases into your Tracknow dashboard. This enables accurate tracking and attribution of purchases made by customers referred by your affiliates.

***

### Methods of Integration

There are two supported methods for integrating Tracknow with a WooCommerce store:

{% columns %}
{% column %}
**Tracknow Plugin**

Tracknow provides a plugin that can be installed on a WooCommerce store to enable purchase tracking
{% endcolumn %}

{% column %}
**Postback**

Implement the required scripts and configure postbacks to enable purchase tracking
{% endcolumn %}
{% endcolumns %}

<table><thead><tr><th width="369">Plugin</th><th>Postback</th></tr></thead><tbody><tr><td>Simple installation process</td><td>More manual and technical implementation</td></tr><tr><td>A pre-configured set of purchase details are sent</td><td>Full control over which details are sent</td></tr></tbody></table>

***

### Prerequisites

Both integration methods require you to enable passing our unique affiliate identifier `click_id` to your landing page.\
\
For instructions, click [here](https://docs.tracknow.io/integrations/passing-click_id-to-a-landing-page).

***

### Plugin Integration

Login to the WordPress admin dashboard → **Plugins** → **Add Plugin** →  Search for the [Tracknow for WooCommerce](http://kb.local/wp-admin/plugin-install.php?tab=plugin-information\&plugin=tracknow-for-woocommerce\&TB_iframe=true\&width=600\&height=550) plugin → Install the plugin and activate it

<figure><img src="/files/RQJtwncTJokpOilz68sf" alt=""><figcaption></figcaption></figure>

Navigate to **WooCommerce** → **Settings** → **Tracknow** tab → Fill out the plugin configuration → **Save Changes**

<figure><img src="/files/nr4KzMDHEXbHuLlil88H" alt=""><figcaption></figcaption></figure>

<table><thead><tr><th width="216">Field</th><th>Description</th></tr></thead><tbody><tr><td><strong>Namespace</strong> (Mandatory)</td><td>Enter the Tracknow namespace to which data should be sent. This value is available in the Tracknow dashboard main menu</td></tr><tr><td><strong>Default Campaign</strong> (Mandatory)</td><td>Enter the Tracknow Camapign ID to which data should be sent</td></tr><tr><td><strong>Enable Tracking</strong> (Mandatory)</td><td>Check this checkbox to enable sending data (activates plugin data transfer)</td></tr><tr><td><strong>Include Client Personal Info</strong> (Optional)</td><td>Check this checkbox in order to see client details for each conversion on Tracknow (First name, Last name, Email, Address)</td></tr><tr><td><strong>Enable Lifetime Tracking</strong> (Mandatory if using lifetime)</td><td>Check this checkbox if your affiliate program associates a client with his referring affiliate for lifetime</td></tr><tr><td><strong>Custom Coupon Meta Key</strong> (Mandatory if custom coupon field is used)</td><td>Specify the custom meta key you use to store coupon codes if it differs from the default WooCommerce order coupon field</td></tr><tr><td><strong>Coupon Contains Filter</strong> (Optional)</td><td>Provide a string value to restrict data transmission to purchases that either include our unique affiliate identifier or use a coupon code containing that specified string</td></tr><tr><td><strong>Thank You Page Pixel</strong> (Optional)</td><td>A fallback option that fires postbacks when client reaches the thank you page. Leave off by default</td></tr><tr><td><strong>API Key</strong> (Optional)</td><td>Enter the Tracknow API key you generated to enable automatic syncing of conversion statuses from WooCommerce to Tracknow</td></tr><tr><td><strong>Auto Approve on Completed</strong> (Optional)</td><td>Enable this checkbox to automatically approve conversions in Tracknow when the corresponding WooCommerce order reaches the “Completed” status</td></tr><tr><td><strong>Auto Decline on Cancelled</strong> (Optional)</td><td>Enable this checkbox to automatically reject conversions in Tracknow when the corresponding WooCommerce order reaches the “Cancelled” status</td></tr><tr><td><strong>Enable Debug Logs</strong> (Optional)</td><td>For Tracknow team troubleshooting only. Leave this option disabled unless instructed by our support team</td></tr></tbody></table>

***

### Postback Integration

Login to the WordPress admin dashboard → **Appearance** → **Theme File Editor** → Locate your current theme's **functions.php** file

<figure><img src="/files/JWDIddgJStIQCzquia3X" alt=""><figcaption></figcaption></figure>

Add the following code inside the functions.php file:

```php
function add_custom_script_to_head() {
    ?>
    <script>
        // Get a query parameter by name from the URL
        function getQueryParam(name) {
            const urlParams = new URLSearchParams(window.location.search);
            return urlParams.get(name);
        }

        // Set a cookie for the root domain, available across subdomains
        function setCookie(name, value, days) {
            const maxAge = days * 24 * 60 * 60; // Convert days to seconds
            const domain = "." + window.location.hostname
                .split('.')
                .slice(-2)
                .join('.'); // example.com

            document.cookie = `${name}=${encodeURIComponent(value)}; path=/; domain=${domain}; max-age=${maxAge}; secure;`;
        }

        // Main: look for click_id and store it
        (function () {
            const clickId = getQueryParam("click_id");

            if (clickId) {
                setCookie("click_id", clickId, 365); // Store for 1 year
            }
        })();
    </script>
    <?php
}

add_action('wp_head', 'add_custom_script_to_head');
```

This script captures our unique identifier (`click_id`) from the URL query parameters and stores it in a browser cookie for later use.

It is added to your website’s header to ensure it loads and runs across all pages.

{% hint style="info" %}
If your website includes pages that are not powered by WordPress, you will need to manually add this script to those pages as well to ensure consistent tracking.
{% endhint %}

Next, add the following code to your theme’s **functions.php** file:

```php
function tracknow_tracking( $order_id ) {
    // Ensure the order exists
    $order = wc_get_order( $order_id );
    if ( ! $order ) {
        return;
    }

    // Retrieve the `click_id` from cookies if it exists
    $click_id = isset($_COOKIE['click_id']) ? $_COOKIE['click_id'] : null;

    // Get order details
    $order_total    = $order->get_total();
    $order_shipping = $order->get_shipping_total();
    $coupons        = $order->get_used_coupons();
    $coupon_code    = ! empty( $coupons ) ? $coupons[0] : '';

    // Common query parameters
    $query_args = [
        'order_id' => $order_id,
        'amount'   => $order_total - $order_shipping,
        'coupon'   => $coupon_code,
    ];

    // Add tracking ID
    if ( $click_id ) {
        $query_args['click_id'] = $click_id;
    } else {
        $query_args['campaign_id'] = {CAMPAIGN ID}; // Replace with actual campaign ID if needed
    }

    // Determine if we're on the thank you page
    if ( is_wc_endpoint_url( 'order-received' ) ) {
        // Use success.jpg (pixel tracking)
        $tracking_url = add_query_arg( $query_args, 'https://{NAMESPACE}-tracking.tracknow.info/success.jpg' );
        echo '<img src="' . esc_url( $tracking_url ) . '" width="1" height="1" style="display:none;" alt="" />';
    } else {
        // Use postback endpoint (server-side GET)
        $postback_url = add_query_arg( $query_args, 'https://{NAMESPACE}-tracking.tracknow.info/postback' );
        wp_remote_get( $postback_url );
    }
}

// Hook into WooCommerce order completion to trigger the tracking
add_action( 'woocommerce_thankyou', 'tracknow_tracking', 40 );
add_action( 'woocommerce_order_status_processing', 'tracknow_tracking', 45 );
add_action( 'woocommerce_pre_payment_complete', 'tracknow_tracking', 50 );
add_action( 'woocommerce_payment_complete', 'tracknow_tracking', 55 );
```

This code is responsible for gathering the order data, generating the postback URL and firing it to your Tracknow dashboard when the order is complete.

{% hint style="info" %}
Replace the **{NAMESPACE}** placeholder with your actual Tracknow namespace before pasting this code Replace the **{CAMPAIGN ID}** placeholder with your actual Tracknow campaign ID before pasting this code
{% endhint %}


# Google Tag Manager Integration

You can integrate with Tracknow in order to be able to track sales on your website using Google Tag Manager.\
In this integration, GTM is used in order to load the necessary scripts.

***

### Prerequisites <a href="#prerequisites" id="prerequisites"></a>

This integration method require you to enable passing our unique affiliate identifier `click_id` to your landing page.&#x20;

For instructions, click [here](https://docs.tracknow.io/integrations/passing-click_id-to-a-landing-page).

***

### Storing the `click_id` Using GTM <a href="#storing-the-click-id-using-gtm" id="storing-the-click-id-using-gtm"></a>

Once the click\_id is passed to the webstore, it should be saved in a browser cookie to ensure it persists as the customer navigates between pages. The `click_id` must still be available after a successful purchase so it can be included in the postback to Tracknow together with the purchase details.

In Google Tag Manager, create a new **Page View** trigger and set it to fire on **All Page Views**. This ensures the `click_id` is captured and saved no matter which page the customer lands on, so it won’t be missed if they enter the site on a deep link.

<figure><img src="/files/muNUAReSbCBxYCSHfzpD" alt=""><figcaption></figcaption></figure>

Finally, you’ll need to add the script responsible for storing the `click_id`.

In GTM, go to **Tags** → **New** → Create a **Custom HTML** type tag.

```javascript
<!-- 1) Stub out 'tracknow' so calls queue immediately -->
<script>
window.tracknow =
window.tracknow ||
function () {
(window.tracknow.q = window.tracknow.q || []).push(arguments);
};

// Queue initial configuration with domain/namespace
tracknow("config", {
namespace: "ENTER YOUR NAMESPACE HERE",
});
</script>

<!-- 2) Load the Tracknow library asynchronously -->
<script async src="https://static.tracknow.io/js/tracking.min.js"></script>
```

Copy the code above, **replace the ENTER YOUR NAMESPACE HERE placeholder with your actual Tracknow namespace** and paste the adjusted code in the GTM custom HTML code box.

<figure><img src="/files/WytEMs3dCj6S3ooDSWMh" alt=""><figcaption></figcaption></figure>

Select the trigger you previously created as this tag’s trigger.

<figure><img src="/files/x7XfrvJYPJcPQl4DSdMs" alt=""><figcaption></figcaption></figure>

***

### Sending Purchase Data Using GTM <a href="#sending-purchase-data-using-gtm" id="sending-purchase-data-using-gtm"></a>

To send purchase data to Tracknow, use the webstore’s **Thank You / Order Confirmation** page as the trigger for firing the postback. This ensures the postback is sent only after the purchase has been successfully completed.

In GTM, create a new **Page View** trigger and set it to fire on **Some Page Views**. Then configure the condition so it fires only when the webstore’s **Thank You** page is viewed: set **Variable** to **Page URL**, choose **Contains** as the match type, and enter the Thank You page URL path (e.g., /thank-you).

<figure><img src="/files/cwv9LLz38VKgR93utZgB" alt=""><figcaption></figcaption></figure>

Next, you’ll need to add the script responsible for storing sending the postback.

In GTM, go to **Tags** → **New** → Create a **Custom HTML** type tag.

```javascript
<script>
tracknow("postback", {
namespace: "ENTER NAMESPACE HERE",
params: {
campaign_id: "ENTER CAMPAIGN ID HERE",// Mandatory
amount: ENTER AMOUNT VARIABLE HERE, //Mandatory
order_id: ENTER ORDER ID VARIABLE HERE, //Optional
},
});
</script>
```

Copy the code above and update the placeholders as follows:

* Replace **ENTER CAMPAIGN ID HERE** with the **Tracknow campaign ID** you want to attribute the conversion to.
* Replace **ENTER NAMESPACE HERE** with your **Tracknow** **namespace**.

You can include additional parameters in the postback to capture more purchase details from the webstore by adding them under the script’s **params** object. To see the full list of parameters Tracknow supports, [click here](https://docs.tracknow.io/integrations/supported-parameters).

For any parameter that should be populated dynamically (for example, the order total or order ID), replace the placeholder value in the code with the correct **macro** (Data Layer Variable Name) for that value (as provided by your webstore/GTM setup).

<figure><img src="/files/G8a0ukGuhWrYhMCxA6SP" alt=""><figcaption></figcaption></figure>

Select the postback trigger you previously created as this tag’s trigger.

<figure><img src="/files/pg06Yc7c5mBYkkrIswjb" alt=""><figcaption></figcaption></figure>

***

### Important Notes <a href="#important-notes" id="important-notes"></a>

On single-page applications (SPAs), navigation typically happens without a full page reload. As a result, a standard **Page View** trigger may not fire when the user moves between routes. In these cases, use a **History Change** trigger to detect URL changes and fire your tag accordingly.


# Stripe Integration (Payment Link)

If your webstore uses Stripe as your payment processing platform, you are able to track the purchases and view them directly on your Tracknow dashboard after integration.

***

### Prerequisites <a href="#prerequisites" id="prerequisites"></a>

This integration method require you to enable passing our unique affiliate identifier `click_id` to your landing page.

For instructions, click [here](https://docs.tracknow.io/integrations/passing-click_id-to-a-landing-page).

***

### Storing the `click_id`&#x20;

Add a script on every page of your website to store this parameter.

In order to store the `click_id` parameter, you will need to implement the following code on **all of the pages of your website**:

```
(function() {
    const v = new URLSearchParams(window.location.search).get("click_id");
    if (!v) return;
    
    const d = new Date();
    d.setTime(d.getTime() + (365 * 24 * 60 * 60 * 1000));
    
    document.cookie = `tn_click_id=${encodeURIComponent(v)}; expires=${d.toUTCString()}; path=/; Secure; SameSite=Lax`;
    localStorage.setItem('tn_click_id', v);
})();
```

This code will ensure that no matter which page of your website the client will land on, the `click_id` parameter will be saved and stored.

***

### Adding the Stored `click_id` to the Payment Link

Since the stripe payment page is not on the same domain as your website, the `click_id` parameter will not be available by default and we’ll need to manually transfer it to the payment page as well.

This can be achieved by adding the following code to **every page that links to the Stripe payment page**:

```
(function() {
  function getCookie(name) {
    let cookieArr = document.cookie.split(";");
    for (let i = 0; i < cookieArr.length; i++) {
      let cookiePair = cookieArr[i].split("=");
      if (name.trim() === cookiePair[0].trim()) {
        return decodeURIComponent(cookiePair[1].trim());
      }
    }
    return null;
  }

  function updatePaymentLinks() {
    let clickId = getCookie("tn_click_id") || localStorage.getItem('tn_click_id');
    if (!clickId) return;

    document.querySelectorAll('a[href^="https://buy.stripe.com"]').forEach(paymentLink => {
      let url = new URL(paymentLink.href);
      url.searchParams.set('client_reference_id', clickId); // Automatically handles "?" or "&"
      paymentLink.href = url.toString();
    });
  }

  updatePaymentLinks();
})();
```

This code will check if there is a stored `click_id` parameter and if it found one, it will append it to the payment link itself as `client_reference_id`.

***

### Sending Data from Stripe to Tracknow When a Purchase is Completed

1. Login to your Stripe account and click the ‘Developers’ screen
2. Navigate to the ‘Webhooks’ tab
3. Click ‘Create an event destination’
4. In the ‘Endpoint URL’ field fill out your Tracknow Stripe Webhook URL: [`https://{NAMESPACE}-tracking.tracknow.info/stripe/postback`](https://ptb-tracking.tracknow.info/stripe/postback) **(Use your actual Tracknow namespace in place of `{NAMESPACE}`. You can find it in the main menu of the Tracknow dashboard.)**
5. Under ‘Select events to listen to’, select ‘charge.succeeded’ & ‘checkout.session.completed’
6. Click ‘Add endpoint’

<figure><img src="/files/Q3N98m5mormIWZVksEWS" alt=""><figcaption></figcaption></figure>

<figure><img src="/files/ZBZlkMzJsBWHwuHgnwyK" alt=""><figcaption></figcaption></figure>

This setup will look for events such as successfully completed payments and checkouts and when an event like that occurs, Stripe will automatically send the purchase data to your Tracknow dashboard via the Webhook URL you inserted.


# WIX Integration

Tracknow integrates with WIX stores to automatically transmit data for completed purchases into your Tracknow dashboard. This enables accurate tracking and attribution of purchases made by customers referred by your affiliates.

***

### Prerequisites <a href="#prerequisites" id="prerequisites"></a>

Both integration methods require you to enable passing our unique affiliate identifier `click_id` to your landing page. For instructions, click [here](https://docs.tracknow.io/integrations/passing-click_id-to-a-landing-page).

***

### Integration

On your Wix dashboard navigate to **Settings** → **Custom Code** → Add Custom Code to the head section and choose to load code on each new page.

```
<script>
import wixLocation from 'wix-location';
import { local } from 'wix-storage';

$w.onReady(function () {
  const clickId = wixLocation.query.click_id;

  if (clickId) {
    local.setItem("click_id", String(clickId));
  }
});
</script>
```

<figure><img src="/files/LobcW9a0PiNPxrbhc29V" alt=""><figcaption></figcaption></figure>

Next, enable Velo Dev Mode for your website if it isn't on already.

<figure><img src="/files/MtGAtoqYupncerb3QSHz" alt=""><figcaption></figcaption></figure>

Click **My Store** on the left menu → **Store Pages** → **Thank You Page**

<figure><img src="/files/3rIht0FQ2bhRXhJCwrx3" alt=""><figcaption></figcaption></figure>

Add an HTML embedded code by clicking **Add** → **More** → **Embeds** on the left menu.

<figure><img src="/files/5qu0stxy8r2vXlagxgoQ" alt=""><figcaption></figcaption></figure>

Add the following code:

```
<script type="text/javascript">
  window.onmessage = (event) => {
    const data = event.data;
    if (!data || data.type !== "ORDER_AND_CLICK") return;

    const order = data.order;
    const clickId = data.click_id || "";

    // --- Calculate amount WITHOUT shipping ---
    const orderTotal = Number(order?.totals?.total ?? 0);

    const shippingAmount =
      Number(order?.totals?.shipping ?? 0) ||
      Number(order?.shippingInfo?.shippingFee ?? 0);

    const amountWithoutShipping = Math.max(
      0,
      (orderTotal - shippingAmount).toFixed(2)
    );

    // --- Extract coupon code (if any) ---
    let couponCode = "";
    if (order?.discount?.coupon?.code) {
      couponCode = order.discount.coupon.code;
    } else if (Array.isArray(order?.discounts) && order.discounts[0]?.coupon?.code) {
      couponCode = order.discounts[0].coupon.code;
    }

    var img = document.createElement("img");
    img.src =
      "https://{namespace}-tracking.tracknow.info/success.jpg" +
      "?campaign_id={campaign ID}" +
      "&amount=" + encodeURIComponent(amountWithoutShipping) +
      "&order_id=" + encodeURIComponent(order?.number ?? "") +
      "&click_id=" + encodeURIComponent(clickId) +
      "&coupon=" + encodeURIComponent(couponCode);

    img.height = "1";
    img.width = "1";
    img.style.display = "none";
    document.body.appendChild(img);
  };
</script>
```

{% hint style="info" %}
Replace the **{namespace}** placeholder with your actual Tracknow namespace before pasting this URL.\
Replace the **{campaign ID}** placeholder with your actual Tracknow campaign ID before pasting this URL.
{% endhint %}

<figure><img src="/files/ucoG2jBPMSCvhFcKsyZQ" alt=""><figcaption></figcaption></figure>

Add the following code to the **Thank You Page** code page and replace ‘thankYouPage1’ ID to the actual thank you page ID if it’s different and also replace embedded html id from “html3” to the ID Wix generated for that element.

```
import { local } from 'wix-storage';

$w.onReady(function () {
  const clickId = local.getItem("click_id") || "";

  $w('#thankYouPage1').getOrder()
    .then((order) => {
      $w('#html3').postMessage({
        type: "ORDER_AND_CLICK",
        order: order,
        click_id: clickId
      });
    })
    .catch(() => {});
});
```

<figure><img src="/files/8EazlZVLQkDpwxXvE0Hg" alt=""><figcaption></figcaption></figure>


# Postback Integration

Tracknow integrates with your website to automatically transmit data for the specific events you want to track, ensuring they are accurately recorded in your Tracknow dashboard.

In this guide, we’ll outline how to configure automatic event tracking using postbacks.

This integration method requires you to detect the relevant events on your backend (server-side) and trigger a postback to Tracknow containing the associated event data.

***

### Prerequisites

This integration method requires you to enable passing our unique affiliate identifier `click_id` to your landing page.\
\
For instructions, click [here](https://docs.tracknow.io/integrations/passing-click_id-to-a-landing-page).

***

### Client Flow

1. Client clicks an affiliate link
2. Tracknow generates the unique affiliate identifier `click_id` and appends it to the landing page URL as a query parameter before the client is redirected to your landing page
3. Client lands on your website with his `click_id`
4. The client's `click_id` is stored in a cookie so that it is not lost while the client navigates between pages on your website
5. Client completes the action you wish to track
6. A postback URL is generated on your end and fired to your Tracknow dashboard

***

### Base URL

The postback base URL is:

```
https://{namespace}-tracking.tracknow.info/postback
```

{% hint style="info" %}
Replace the **{namespace}** placeholder with your actual Tracknow dashboard namespace.

It can be found on your main Tracknow dashboard menu.
{% endhint %}

***

### Parameters

The parameters define the event data you want to transmit to Tracknow.

They are appended to the base URL as query string parameters in `key=value` format. Multiple parameters are separated by the `&` symbol and the query string begins after the `?` symbol.

#### Example

```
https://{namespace}-tracking.tracknow.info/postback?key1=value1&key2=value2&key3=value3
```

#### Mandatory Parameters

Certain parameters must be included in every postback, as they are required for Tracknow to identify the associated campaign and the referring affiliate.

Additional parameters may also be mandatory depending on your configuration, such as when lifetime attribution is enabled.

For a complete list of supported parameters and detailed implementation guidelines, refer to the full parameter documentation [here](https://docs.tracknow.io/integrations/supported-parameters).


# AppsFlyer Integration for Partners

This guide explains how to set up AppsFlyer mobile attribution with Tracknow, so installs and in-app events can be attributed to the correct affiliate, campaign, and click.

AppsFlyer is a Mobile Measurement Partner, MMP, used by mobile apps to track installs, in-app events, and attribution data. This data can be sent to Tracknow using AppsFlyer attribution links and postbacks.

***

### Overview

This article is intended for partners who want to:

* Work with AppsFlyer for the first time
* Migrate an advertiser to AppsFlyer
* Track mobile app installs through Tracknow
* Track in-app events such as registrations, purchases, deposits, subscriptions, or custom events
* Receive AppsFlyer postbacks in Tracknow

The basic tracking flow is:

1. The user clicks a Tracknow affiliate tracking link.
2. Tracknow redirects the user to the AppsFlyer attribution link.
3. AppsFlyer tracks the app install or in-app event.
4. AppsFlyer sends a postback to Tracknow.
5. Tracknow attributes the conversion to the correct affiliate and campaign.

***

### Integrating with AppsFlyer

#### Initiating a New AppsFlyer Integration

To start a new AppsFlyer integration, the advertiser must invite you, the partner, to integrate with AppsFlyer.

This step is handled inside the advertiser’s AppsFlyer account.

The advertiser should follow AppsFlyer’s official partner integration instructions and invite your partner account in AppsFlyer before traffic starts running.

Reference: [AppsFlyer Help Center](https://support.appsflyer.com)

This is required so AppsFlyer can recognize you as the partner and allow attribution links, install postbacks, and in-app event postbacks to be configured correctly.

***

#### Updating an Existing AppsFlyer Integration

If you need to update an existing AppsFlyer integration, send an email request to:

```
integrations@appsflyer.com
```

Most integration update requests are usually completed within 2 business days.

***

### Creating the Campaign in Tracknow

In Tracknow, create a campaign for the mobile app.

Go to:

**Admin Panel → Campaigns → Add Campaign**

Recommended setup:

| Field                | Recommended Value                                                |
| -------------------- | ---------------------------------------------------------------- |
| Campaign Type        | Mobile App                                                       |
| Tracking Type        | Redirect                                                         |
| Conversion Method    | Server Postback                                                  |
| Default Landing Page | AppsFlyer Attribution Link                                       |
| Goals                | Install, Registration, Purchase, First Deposit, or custom events |

The campaign default landing page should be the AppsFlyer attribution link with Tracknow macros included.

***

### Creating the Default Landing Page Using an AppsFlyer Attribution Link

<figure><img src="/files/H3OYQPQubQrTZoC0SZpE" alt=""><figcaption><p>Partner Screen Attribution (Your App)</p></figcaption></figure>

You will need the following values from AppsFlyer:

* AppsFlyer App ID
* Your AppsFlyer Partner ID, PID
* Required tracking parameters

Example AppsFlyer attribution link:

```
https://app.appsflyer.com/[APP_ID]?pid=[APPSFLYER_PID]&af_siteid={ref_id}&af_channel={click_id}&clickid={click_id}&af_c_id={campaign_id}&af_sub_siteid={sub1}
```

<figure><img src="/files/atjNEBoYrlOwdZPk4chz" alt=""><figcaption><p>Active Advertiser Integration</p></figcaption></figure>

```
https://app.appsflyer.com/yourappid?pid=tracknow8n_int&af_siteid={ref_id}&c=1&af_channel={click_id}&af_sub_siteid={sub1}&af_c_id={campaign_id}&af_click_lookback=7d&clickid={click_id}
```

Replace the values below:

| Value             | Description                    |
| ----------------- | ------------------------------ |
| `[APP_ID]`        | The AppsFlyer App ID           |
| `[APPSFLYER_PID]` | Your AppsFlyer Partner ID      |
| `{click_id}`      | Tracknow unique click ID macro |
| `{affiliate_id}`  | Tracknow affiliate ID macro    |
| `{campaign_id}`   | Tracknow campaign ID macro     |
| `{sub1}`          | Tracknow sub1                  |

Example:

```
https://app.appsflyer.com/com.example.app?pid=yourpartner_int&clickid={click_id}&af_siteid={affiliate_id}&af_c_id={campaign_id}
```

The `clickid` parameter is required because AppsFlyer must return the Tracknow click ID in the postback.

For the full list of AppsFlyer attribution link parameters, see AppsFlyer’s official documentation:

[AppsFlyer attribution link parameters](https://support.appsflyer.com/hc/en-us/articles/207273946-Postback-macros-for-ad-networks)

***

### Recommended AppsFlyer Attribution Parameters

| AppsFlyer Parameter | Tracknow Macro            | Description                                |
| ------------------- | ------------------------- | ------------------------------------------ |
| `pid`               | Your AppsFlyer Partner ID | Identifies you as the partner in AppsFlyer |
| `clickid`           | `{click_id}`              | Unique Tracknow click ID                   |
| `af_siteid`         | `{ref_id}`                | Affiliate ID in Tracknow                   |
| `af_sub_siteid`     | `{sub1}`                  | Optional sub ID                            |
| `af_c_id`           | `{campaign_id}`           | Campaign ID in Tracknow                    |

***

### Integrating Install and In-App Event Postbacks

AppsFlyer should send install and in-app event postbacks to Tracknow using your Tracknow postback URL.

You must send AppsFlyer your custom Tracknow tracking domain in place of [REPLACEME-tracking.tracknow.info](https://REPLACEME-tracking.tracknow.info/postback).

***

#### Global Install Postback

<figure><img src="/files/Ktj0ilST1xpiQgJArUMK" alt=""><figcaption><p>Partner Integration Screen (Your App)</p></figcaption></figure>

<figure><img src="/files/YuKleeD3gKBs8f8ynwzF" alt=""><figcaption><p>Partner Integration Screen (Your App)</p></figcaption></figure>

Install postback URL & In-app event postback URL:

```
https://REPLACEME-tracking.tracknow.info/postback
```

| Tracknow Parameter | AppsFlyer Macro | Description                                    |
| ------------------ | --------------- | ---------------------------------------------- |
| `click_id`         | {Click ID}      | Unique Tracknow click ID returned by AppsFlyer |
| `goal`             | {Event name}    | Tracknow goal name or event identifier         |
| `amount`           | {Event revenue} | Event Order Amount                             |
| `country`          | {Country code}  | Event Country Code                             |

***

#### Global In-App Event Postback

For in-app events, AppsFlyer should send the event name or mapped event ID to Tracknow.

In-app event postback example:

```
https://REPLACEME-tracking.tracknow.info/postback?click_id={Click ID}&goal={Event name}
```

The `mapped-iae` macro returns the mapped AppsFlyer in-app event value.

| Tracknow Parameter | AppsFlyer Macro | Description                         |
| ------------------ | --------------- | ----------------------------------- |
| `click_id`         | {Click ID}      | Unique Tracknow click ID            |
| `goal`             | {Event name}    | AppsFlyer mapped in-app event value |
| `campaign_id`      | {Campaign ID}   |                                     |

Example event name mapping:

| AppsFlyer Event            | Tracknow Goal   |
| -------------------------- | --------------- |
| `af_complete_registration` | `registration`  |
| `af_purchase`              | `purchase`      |
| `af_subscribe`             | `subscription`  |
| `first_deposit`            | `first_deposit` |
| `kyc_approved`             | `kyc_approved`  |

Make sure the value sent by AppsFlyer matches the goal configured in Tracknow.

***

### Advanced Additions for AppsFlyer Attribution Links

#### Additional Postbacks

If you are an existing AppsFlyer partner and you are migrating from another platform to Tracknow, add the following parameter to your AppsFlyer attribution links:

```
&af_additional_postback=1
```

Example:

```
https://app.appsflyer.com/com.example.app?pid=yourpartner_int&clickid={click_id}&af_siteid={affiliate_id}&af_c_id={campaign_id}&af_cost_model=CPA&af_additional_postback=1
```

Use this when more than one postback URL should fire for the same transaction.

***

#### Disable Install Postback

If you only want to receive postbacks for AppsFlyer events and do not want to receive install postbacks, add:

```
&af_installpostback=false
```

Example:

```
https://app.appsflyer.com/com.example.app?pid=yourpartner_int&clickid={click_id}&af_siteid={ref_id}&af_c_id={campaign_id}&af_installpostback=false
```

Use this only when installs should not be tracked in Tracknow.

***

### AppsFlyer Event Troubleshooting

There are four main parts to confirm when checking whether the AppsFlyer integration is set up correctly.

***

#### 1. Event Creation in Tracknow

Confirm that the required goals or events exist in Tracknow.

Examples:

* Install
* Registration
* Purchase
* First Deposit
* Subscription
* KYC Approved
* Custom in-app event

The goal name in Tracknow should match the value sent from AppsFlyer in the postback.

***

#### 2. Default Landing Page

Confirm that the Tracknow campaign default landing page is the AppsFlyer attribution link.

Example:

```
https://app.appsflyer.com/[APP_ID]?af_siteid={ref_id}&af_sub_siteid={sub2}&pid=[APPSFLYER_PID]&clickid={click_id}&af_c_id={campaign_id}
```

Common AppsFlyer parameters:

| AppsFlyer Parameter | Tracknow Macro            | Definition                             |
| ------------------- | ------------------------- | -------------------------------------- |
| `af_siteid`         | `{ref_id}`                | ID of the affiliate in Tracknow        |
| `af_sub_siteid`     | `{sub1}`                  | Sub ID from the affiliate tracking URL |
| `pid`               | Your AppsFlyer Partner ID | Partner ID from AppsFlyer              |
| `clickid`           | `{click_id}`              | Unique Tracknow click ID               |
| `af_c_id`           | `{campaign_id}`           | Campaign ID from Tracknow              |

***

#### 3. AppsFlyer In-App Event Postback

If you do not have access to the AppsFlyer event postback screen, ask the advertiser to confirm the setup with a screenshot.

<figure><img src="/files/1eGcWo4DR4kePb49gZ94" alt=""><figcaption></figcaption></figure>

The Partner Event Identifier should correspond with the Tracknow goal value that should be recorded for the conversion.

Example:

```
https://REPLACEME-tracking.tracknow.info/postback?click_id={Click ID}&goal={Event name}
```

***

#### 4. Tracknow Postback

Confirm that AppsFlyer is sending the correct postback to Tracknow.

Install example:

```
https://REPLACEME-tracking.tracknow.info/postback?click_id={Click ID}&order_id={Postback ID}&goal=install
```

In-app event example:

```
hhttps://REPLACEME-tracking.tracknow.info/postback?click_id={Click ID}&order_id={Postback ID}&goal={Event name}
```

Revenue event example:

```
https://REPLACEME-tracking.tracknow.info/postback?click_id={Click ID}&goal=purchase&amount={Event revenue}&order_id={Postback ID}
```

***

### Advanced Privacy

The Advanced Privacy postback mechanism may apply when all of the following are true:

* The user’s device is running iOS 14.5+
* Apple’s App Tracking Transparency, ATT, applies
* Advanced Privacy is enabled in AppsFlyer

Advanced Privacy postbacks may be clickless. This means Tracknow may need fallback values such as affiliate ID and campaign ID to attribute the conversion correctly.

To support this, include the same fallback values in both the AppsFlyer attribution link and the AppsFlyer postback URL.

***

#### Attribution Link Example

```
https://app.appsflyer.com/com.example.app?pid=yourpartner_int&clickid={click_id}&af_siteid={ref_id}&af_c_id={campaign_id}
```

***

#### Advanced Privacy Postback Example

```
https://REPLACEME-tracking.tracknow.info/postback?click_id={Click ID}&ref_id={af_siteid}&campaign_id={af_c_id}&goal=install
```

Fallback parameters:

| Tracknow Parameter | AppsFlyer Macro |
| ------------------ | --------------- |
| `click_id`         | `{click_id}`    |
| `ref_id`           | `{af_siteid}`   |
| `campaign_id`      | `{af_c_id}`     |

If no click ID is available, Tracknow may rely on the available fallback values, depending on the campaign configuration.

For complete details, review the AppsFlyer resources:

* [AppsFlyer Advanced Privacy guide](https://support.appsflyer.com)
* [AppsFlyer postback management guide](https://support.appsflyer.com)

***

### Sample Setup

#### Tracknow Default Landing Page

```
https://app.appsflyer.com/[APP_ID]?pid=[APPSFLYER_PID]&clickid={click_id}&af_siteid={ref_id}&af_c_id={campaign_id}
```

***

#### Install Postback

```
https://YOUR_TRACKNOW_DOMAIN/postback?click_id=$$click(clickid)&goal=install
```

***

#### In-App Event Postback

```
https://REPLACEME-tracking.tracknow.info/postback?click_id={Click ID}&goal={Event name}
```

***

#### Purchase Event with Revenue

```
https://REPLACEME-tracking.tracknow.info/postback?click_id={Click ID}&goal=purchase&amount={Event revenue}
```

### Testing the Integration

Before launching live traffic, test the full flow.

Recommended test flow:

1. Confirm the advertiser invited you as a partner in AppsFlyer.
2. Confirm the AppsFlyer attribution link includes the Tracknow macros.
3. Add the AppsFlyer attribution link as the campaign default landing page in Tracknow.
4. Generate a Tracknow affiliate tracking link.
5. Click the Tracknow tracking link.
6. Confirm the redirect reaches AppsFlyer.
7. Complete the app install or in-app event.
8. Confirm the event appears in AppsFlyer.
9. Confirm the postback is received in Tracknow.
10. Confirm the conversion is attributed to the correct affiliate and campaign.

***

### Troubleshooting

#### The conversion was not received in Tracknow

Check the following:

* The advertiser invited you as a partner in AppsFlyer.
* The AppsFlyer postback URL is active.
* The postback URL uses the correct Tracknow domain.
* The AppsFlyer event is enabled for postbacks.
* The event name matches the Tracknow goal.
* The campaign is active in Tracknow.
* The affiliate is approved for the campaign.

***

#### The conversion was received but was not assigned to an affiliate

This usually means the click ID was missing or incorrect.

Check that the AppsFlyer attribution link includes:

```
clickid={click_id}
```

And that the AppsFlyer postback sends it back as:

```
click_id={Click ID}
```

***

#### In-app events are not tracked

Check the following:

* The in-app event exists in AppsFlyer.
* The event is enabled for postbacks.
* The AppsFlyer event is mapped to the correct Tracknow goal.
* The postback includes the event name or mapped event ID.

Example:

```
goal={Event name}
```

***

#### Revenue is missing

Check that the postback includes the AppsFlyer revenue and currency macros:

```
amount={Event revenue}
```

Also confirm that the AppsFlyer event contains revenue data.

***

### Important Notes

* The advertiser must invite you as a partner in AppsFlyer before the integration can be completed.
* To update an existing AppsFlyer integration, contact `integrations@appsflyer.com`.
* The `clickid` parameter is required for accurate click-based attribution.
* Goal names in Tracknow should match the event values sent from AppsFlyer.
* If revenue is required, AppsFlyer must send both amount and currency.
* During migration, additional postback settings may be required.
* Always test the full tracking flow before launching live traffic.


# Adding an advertiser

Creating an advertiser in Tracknow allows you to:

* Associate campaigns and offers with the advertiser
* Filter reports and views to display only data relevant to that advertiser
* Grant advertiser account access and restrict visibility to their associated campaigns

***

To add an advertiser, click **Advertisers** → **Add Advertiser** → Fill out the fields relevant to you about the advertiser → **Create Advertiser**

<figure><img src="/files/CFROx2eFEZ4Y8qxnOwMr" alt=""><figcaption></figcaption></figure>


# Advertiser account access

You can create accounts for advertiser personnel to grant them access to their own portal, similar to a manager role, and configure their permissions accordingly.

This is useful if you want the advertiser to be able to:

* Approve or deny conversions directly in Tracknow
* Approve or deny affiliates applying to participate in the advertiser’s campaigns
* Monitor affiliate activity and tracking performance

***

To create an advertiser account, click **Settings** → **Advertiser user Management** → **Add User Advertiser**

<figure><img src="/files/3jQRs6VwEmGNYbmCxyaA" alt=""><figcaption></figcaption></figure>

Enter the advertiser team member’s details and ensure you select the correct advertiser to associate this user with.

You can also adjust the user’s permissions based on the level of access you want to grant.