Refer a Friend
This article explains the Tracknow Refer a Friend feature (also called the referral program or customer referral program) and covers: what it is, how to create a program, how to design the referral widget, how to install it on your site, how to test it, and how to go live. The feature is currently in beta.
What Is the Refer a Friend Feature?
Refer a Friend lets you run a customer referral program alongside your affiliate program in Tracknow.
Your affiliate program is for partners who promote your business. Refer a Friend is for your clients, letting them refer new clients to your business and earn commissions for each successful referral.
Each client in the program gets a unique referral link. When a new client signs up or makes a purchase through that link, Tracknow tracks the referral and credits the referring client with a commission based on the rules you set.
With Refer a Friend, you can:
- Run a customer referral program and an affiliate program at the same time, independently of each other.
- Manage referring clients separately from affiliates.
- Track referrals and conversions automatically.
- Pay commissions to clients for successful referrals.
Key Terms
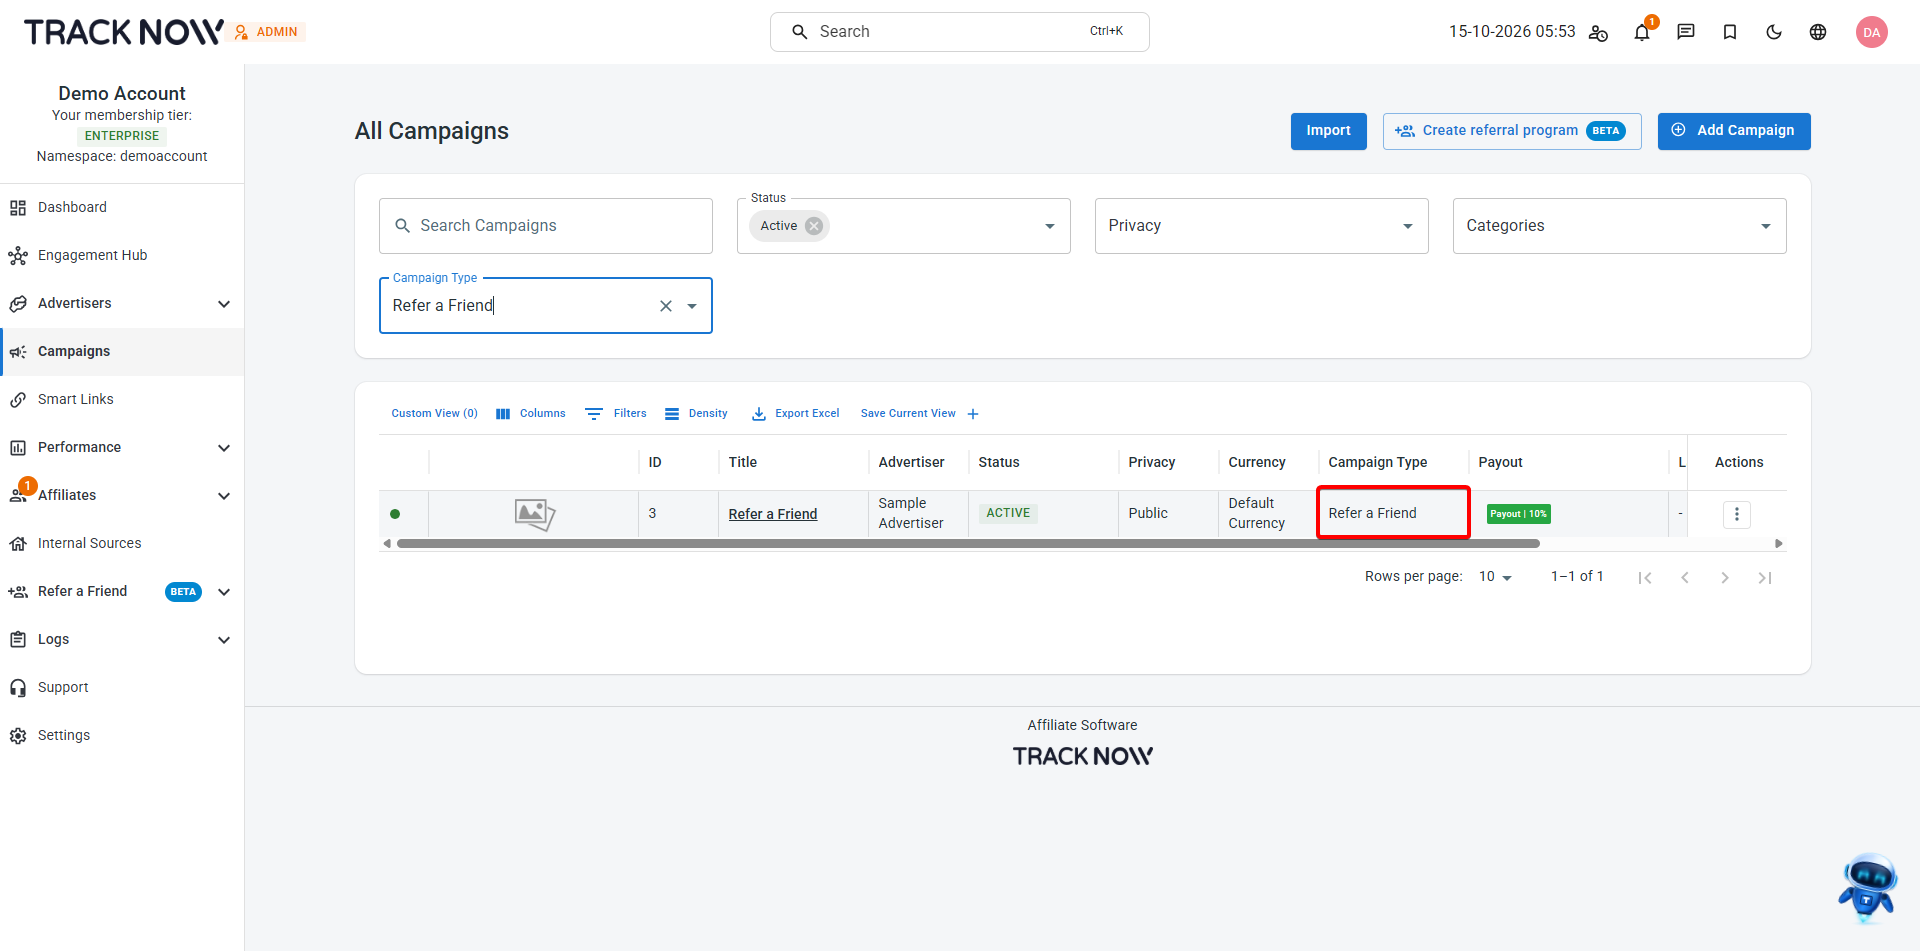
- Refer a Friend program (referral program): A program that rewards your existing clients for referring new clients. Each program is created as a campaign in Tracknow.
- Referrer: An existing client who refers friends and earns rewards. Referrers are not affiliates and are managed separately from them.
- Friend (referred friend, invitee): A new client who signs up through a referrer's link.
- Referral link (invite link): The unique link each referrer shares. It is made of your landing page URL followed by
?ref=and the referrer's unique code, for examplehttps://yoursite.com/?ref=alex-river. - Referral widget: The panel shown to logged-in clients on your site. Referrers use it to copy and share their referral link (by link, email, LinkedIn, X or QR code), see their clicks, friends and earnings, view their rewards and cash out.
- Reward: The commission a referrer earns for a successful referral.
- Test mode: Rewards are recorded in the activity but are not added to the balance or paid.
- Live: Real rewards are earned and paid.
Where to Find Refer a Friend
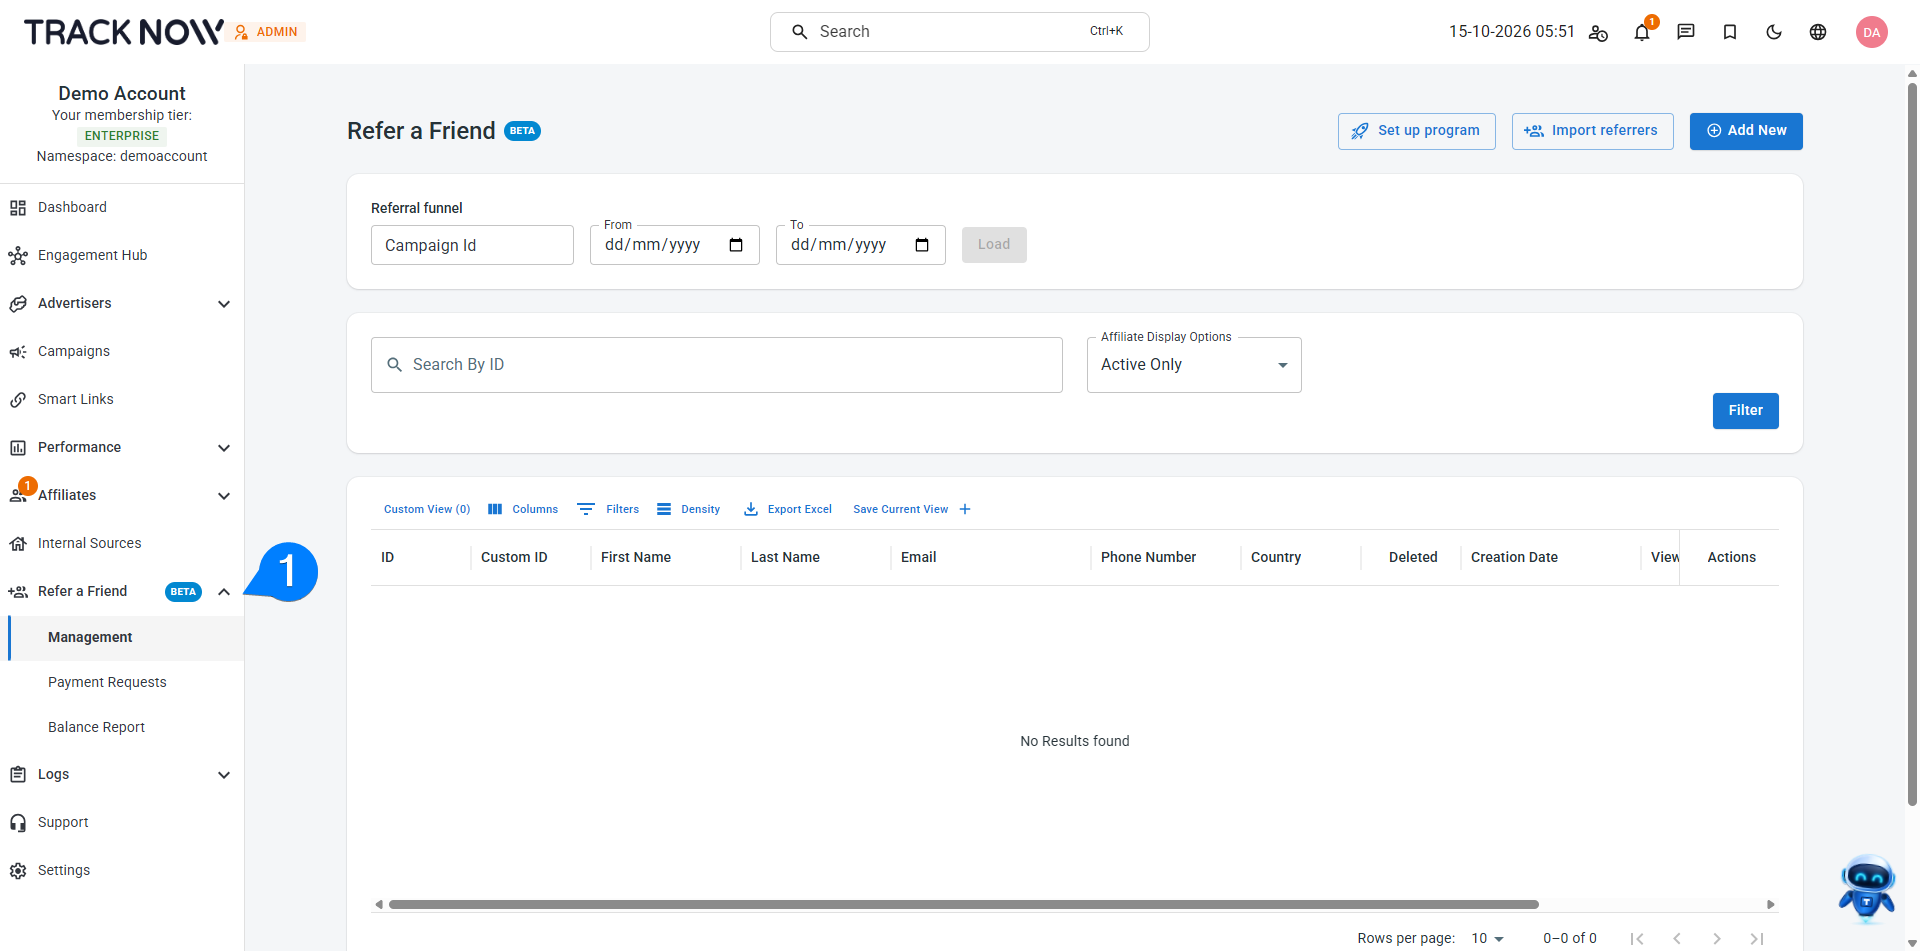
In the left menu of the Tracknow admin panel, click Refer a Friend. It contains three pages: Management, Payment Requests and Balance Report.
After a program is created, its settings are on the Referral Widget page, which you reach through Campaigns > the program name > Referral Widget. This page has three tabs: Design, Install and Test and Go Live.
Creating a Refer a Friend Program
Location: Refer a Friend > Management > Set up program
- In the left menu, click Refer a Friend, then Management.
- Click Set up program in the top right corner.
The Create referral program wizard opens. It has five steps: Type, Details, Rewards, Payouts and Review. The What your referrers see panel on the right shows a live preview of the referral widget and updates as you make your choices.
To configure the program and payouts manually instead of using the wizard, click Use advanced setup at the bottom of the wizard.
Step 1: Type
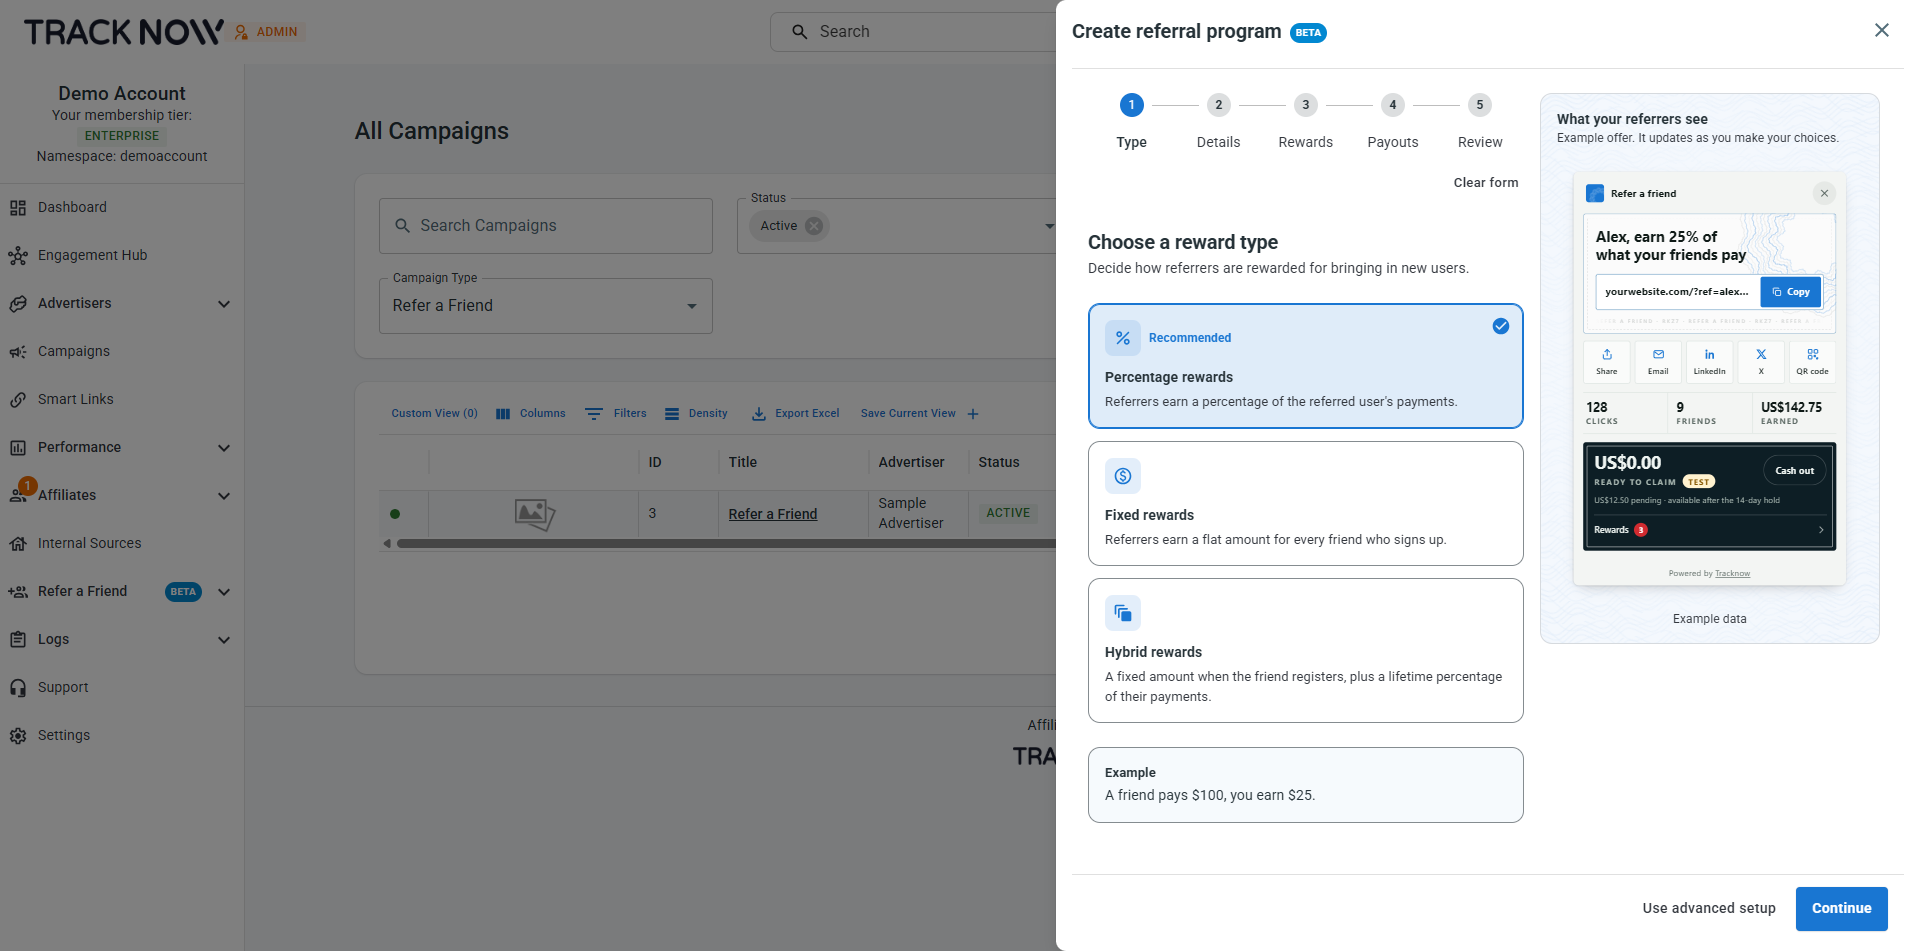
Choose how referrers are rewarded for bringing in new clients:
- Percentage rewards (recommended): Referrers earn a percentage of the referred client's payments.
- Fixed rewards: Referrers earn a flat amount for every friend who signs up.
- Hybrid rewards: Referrers earn a fixed amount when the friend registers, plus a lifetime percentage of their payments.
Click Continue.
Step 2: Details
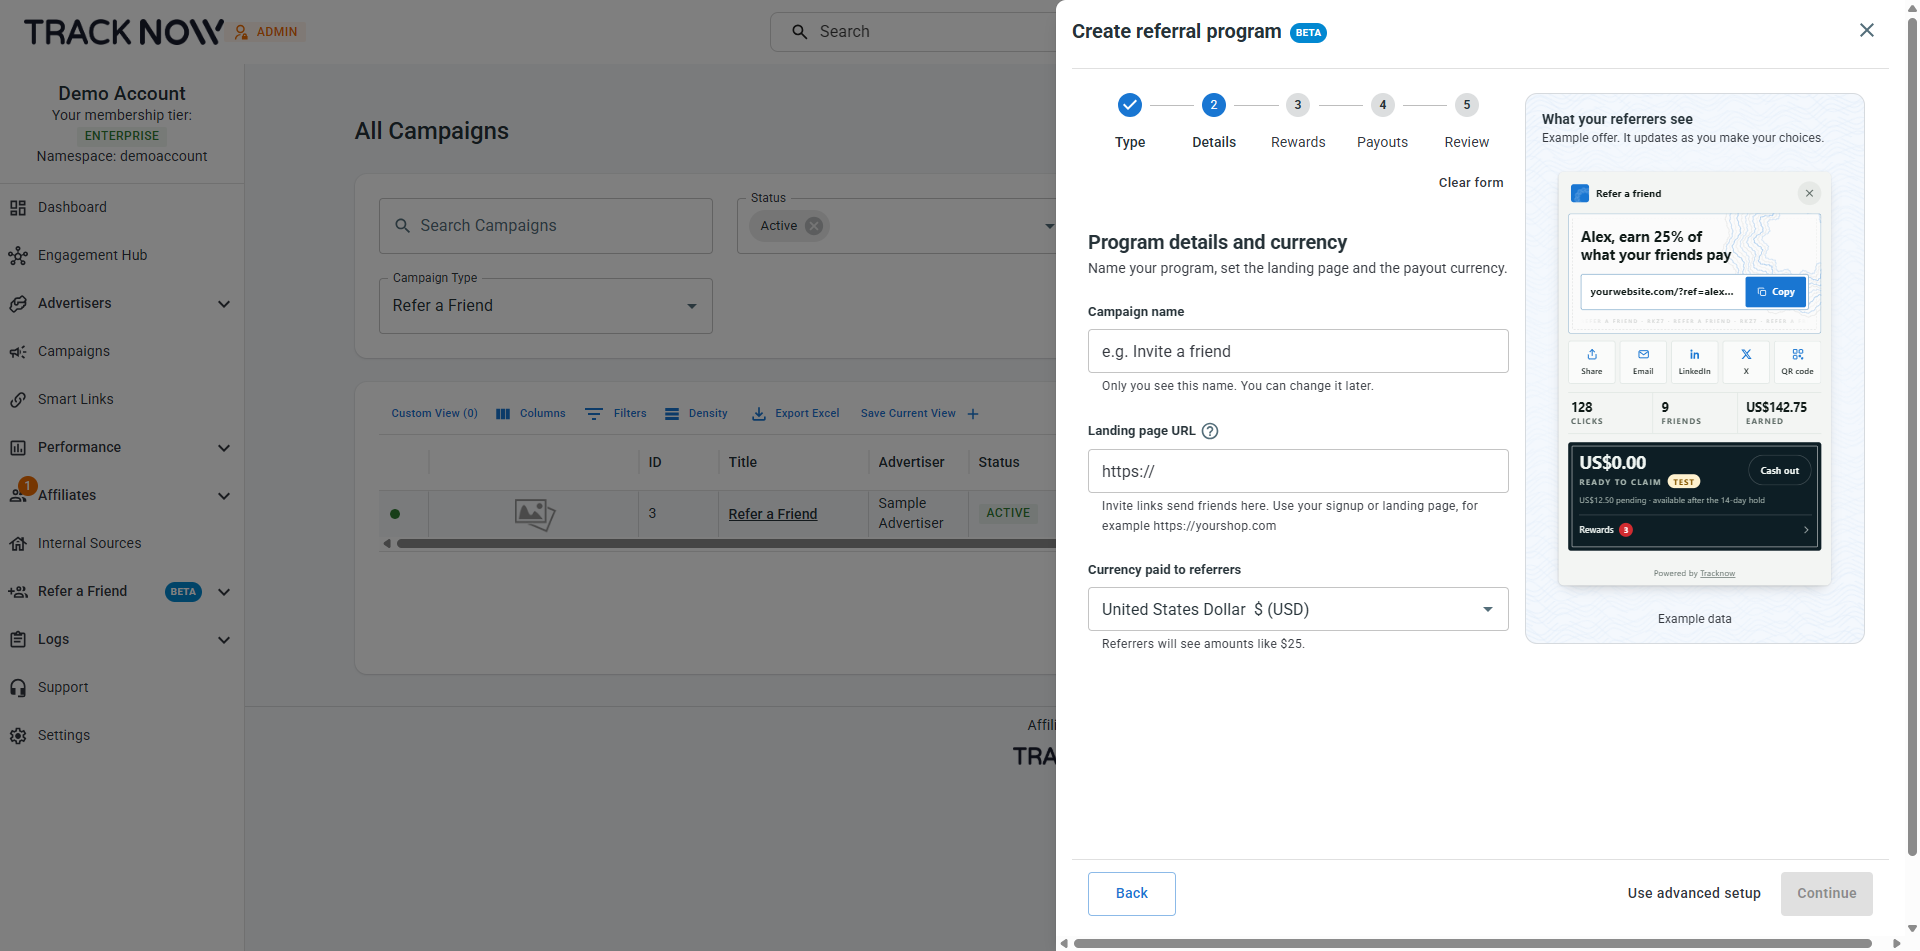
- Campaign name: The program name. Only you see it, and you can change it later.
- Landing page URL: The page invite links send friends to, such as your signup or landing page.
- Currency paid to referrers: The currency referrers earn and see their rewards in.
Click Continue.
Step 3: Rewards
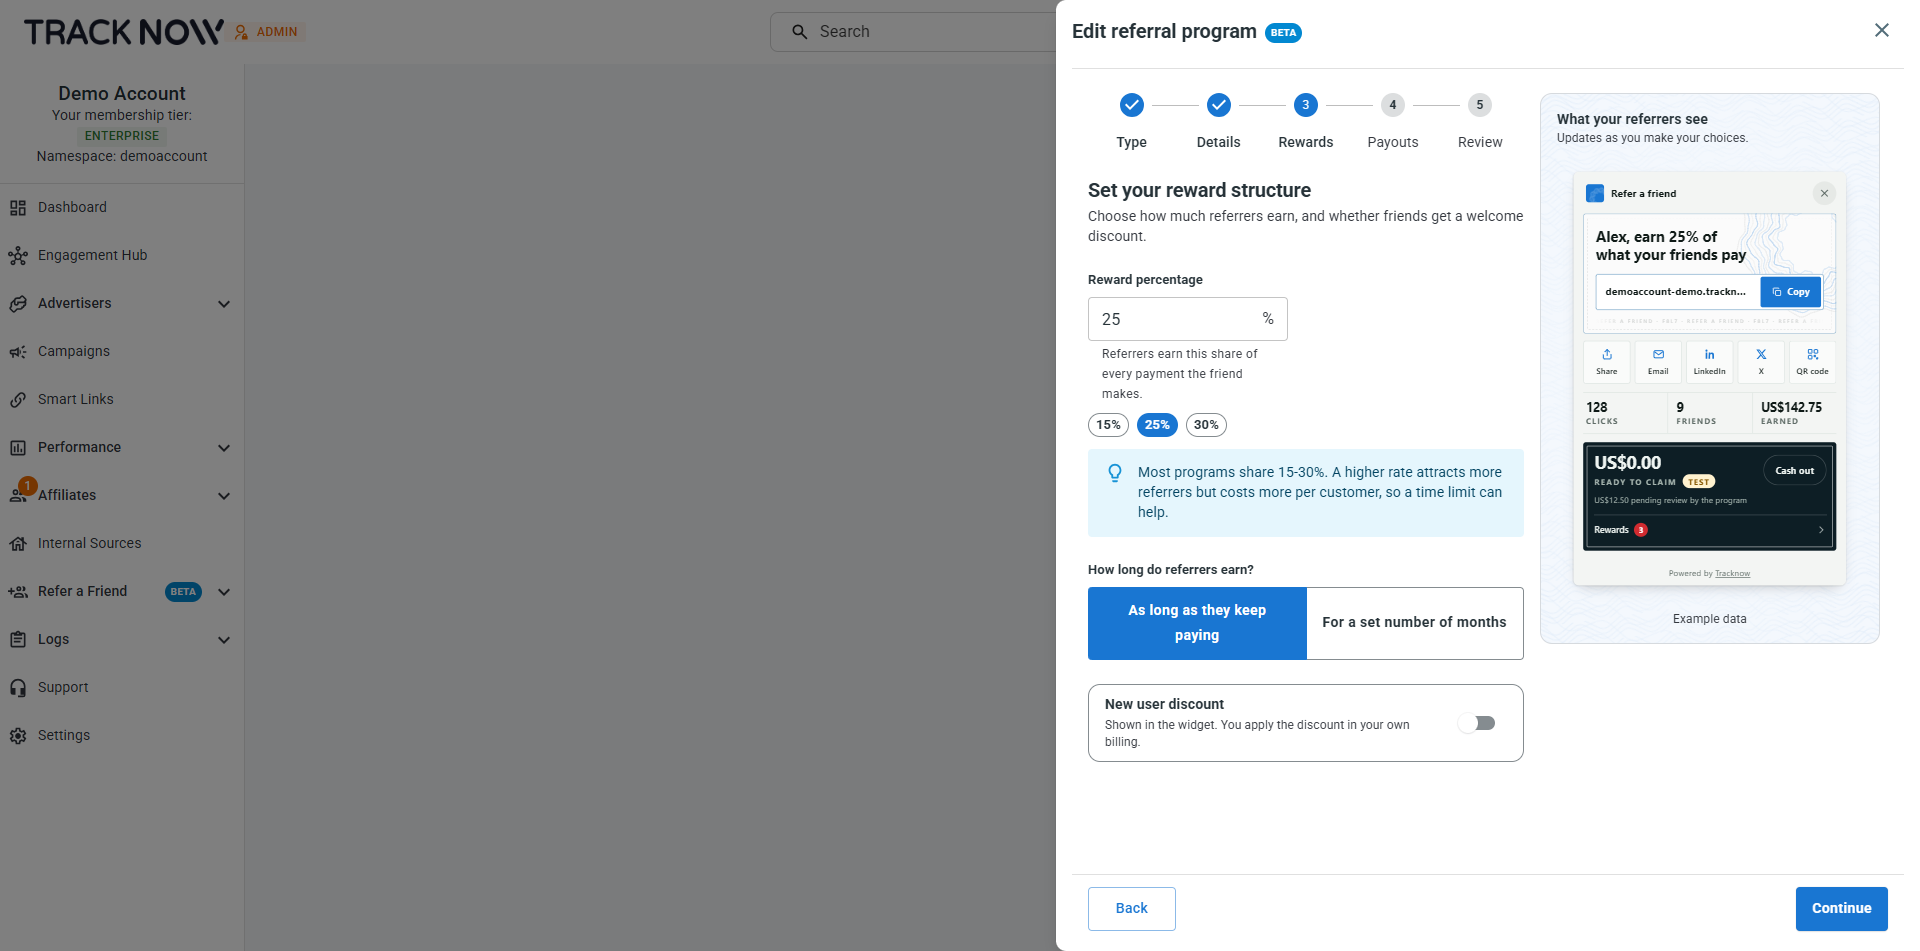
Set how much referrers earn. With percentage rewards:
- Reward percentage: Enter the share of every payment the friend makes that the referrer earns, or select a preset (15%, 25% or 30%). Most programs use 15 to 30%.
- How long do referrers earn?: Select As long as they keep paying or For a set number of months.
- New user discount: Turn on to show a welcome discount for referred friends in the widget. Tracknow only displays the discount; you apply it in your own billing system.
Click Continue.
Step 4: Payouts
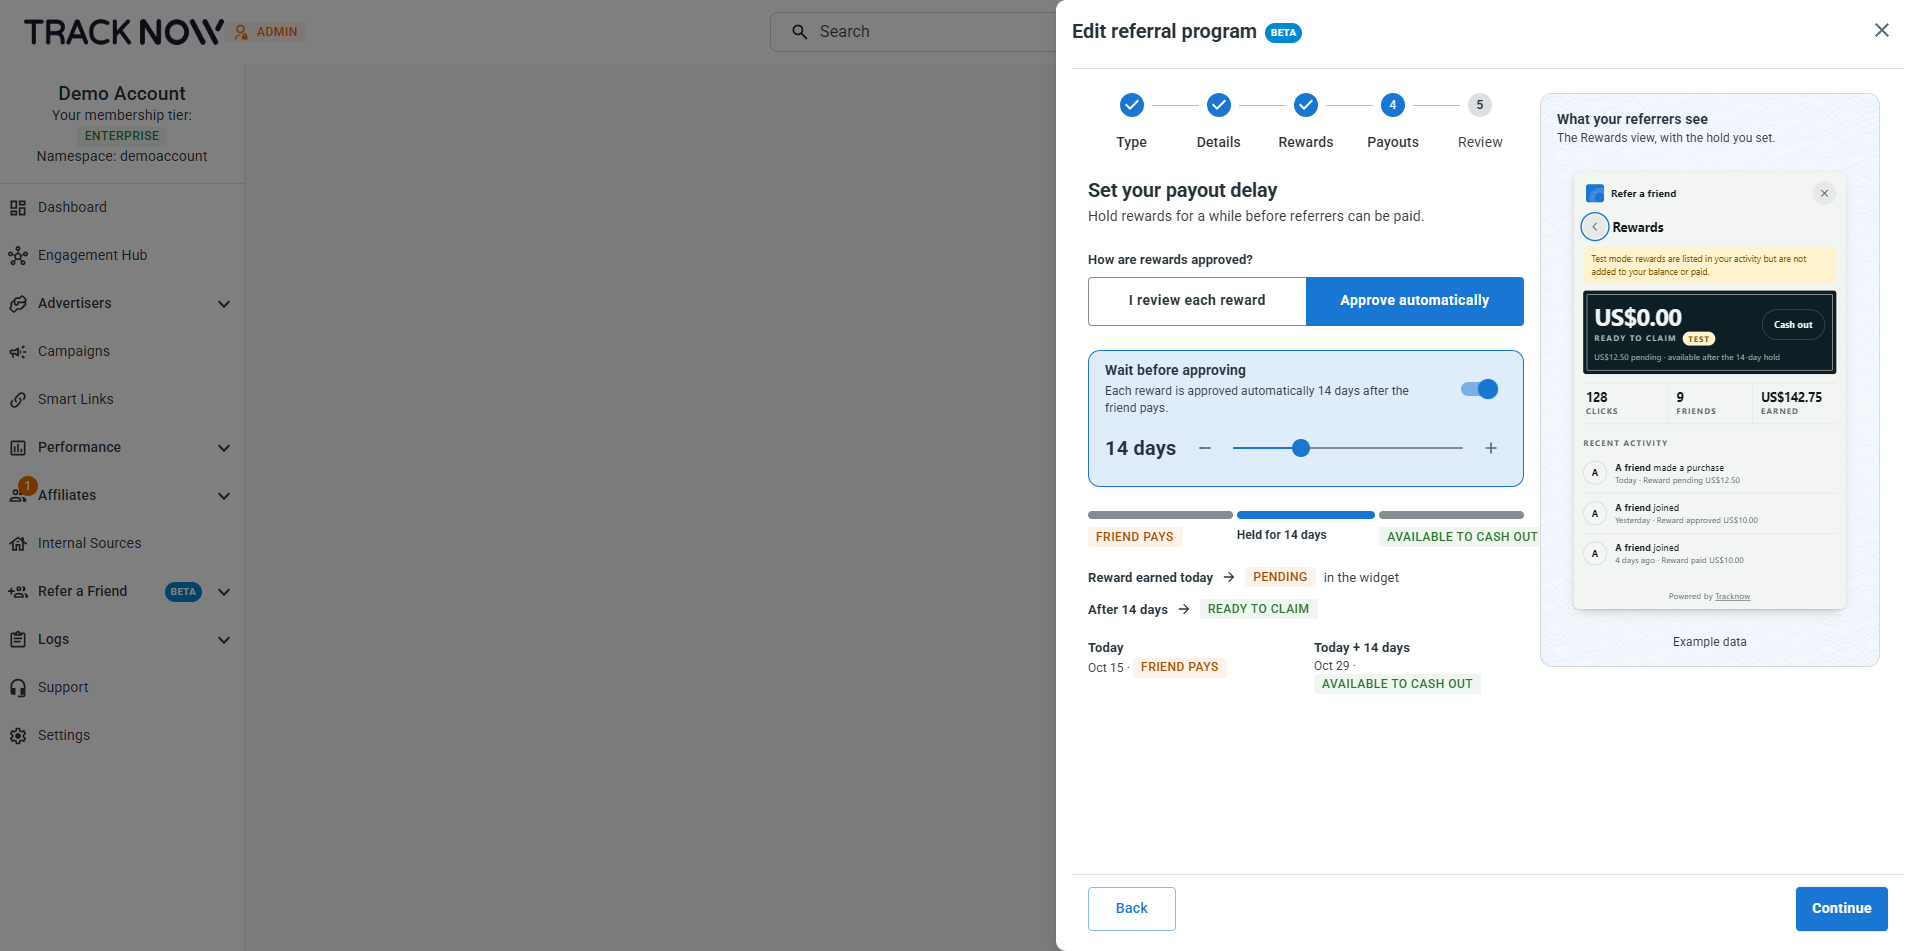
Under How are rewards approved?, choose:
- I review each reward: You approve each reward manually before it can be paid.
- Approve automatically: Rewards are approved without manual review.
If approval has been customized in your payout settings, the step shows Custom (edited in payout settings) with an Open payout settings link.
Click Continue.
Step 5: Review
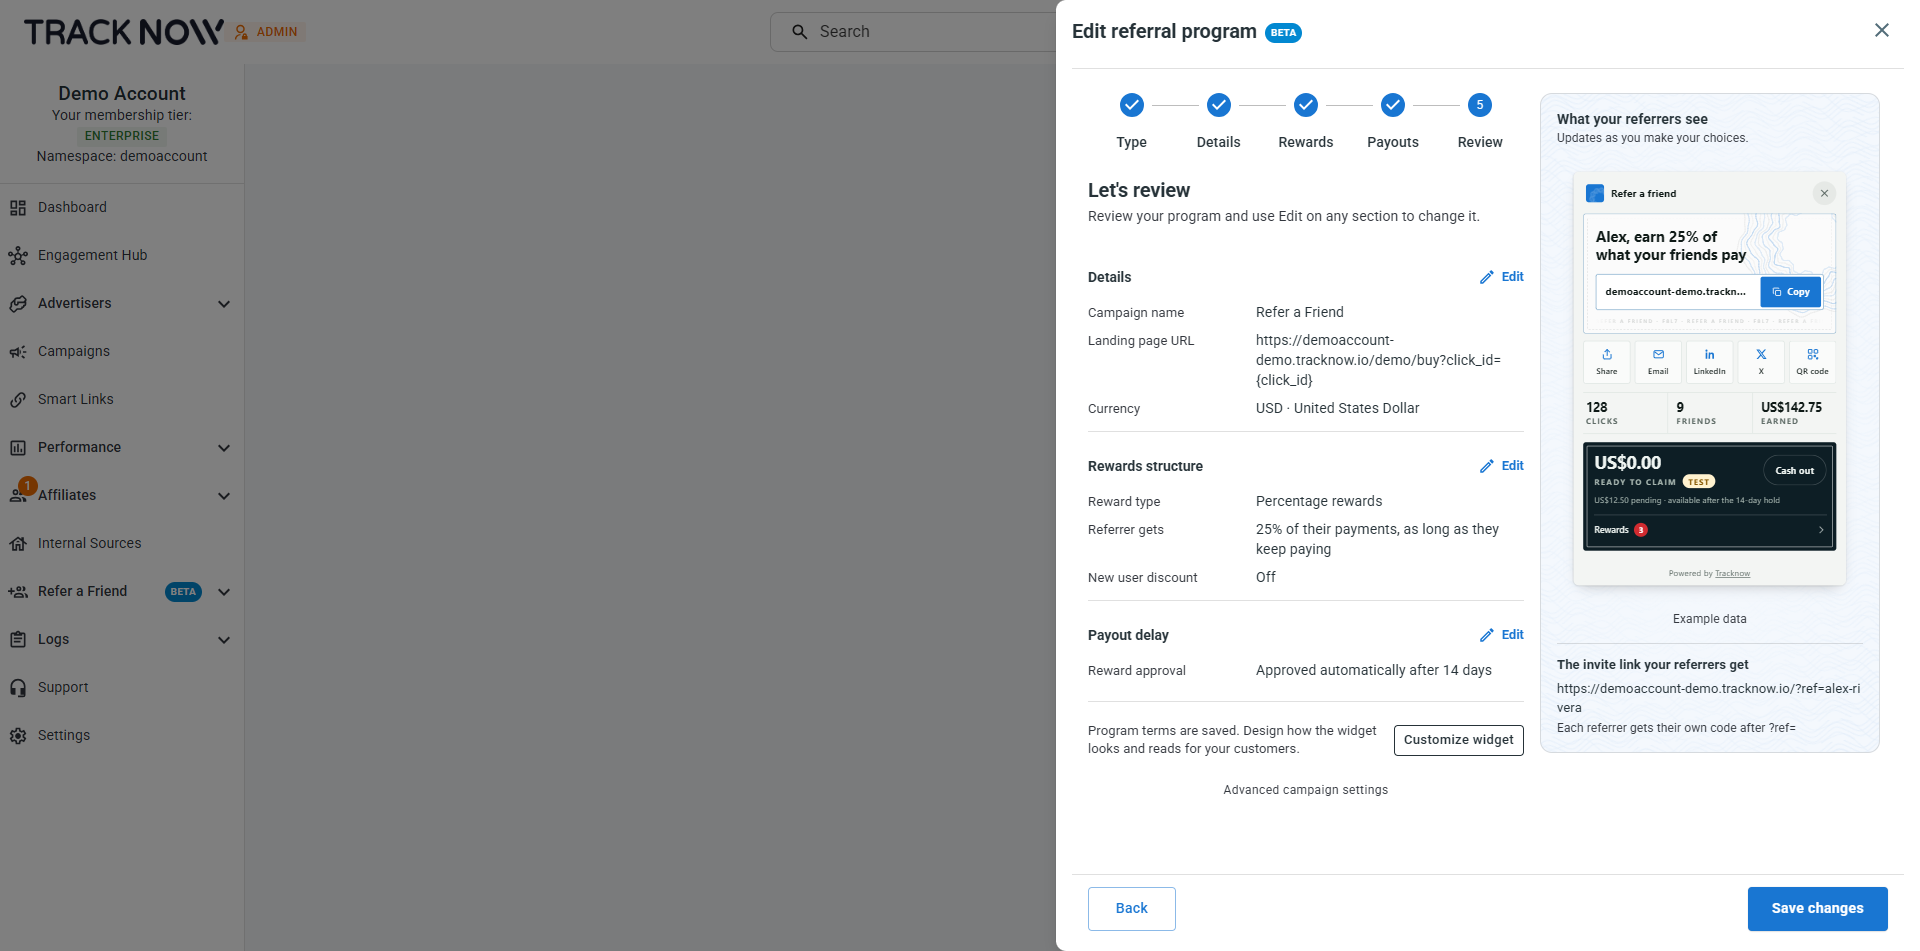
Review the program summary. Click Edit next to any section (Details, Rewards structure or Payout delay) to change it.
The right panel also shows the invite link format referrers get: your landing page URL followed by ?ref= and the referrer's unique code.
Changes apply to new rewards from the moment you save, including future purchases by friends who already signed up. Rewards already earned don't change.
Click Save to create the program. You are then taken to the Referral Widget page, which has three tabs: Design, Install and Test and Go Live. From this page you can also click Edit program, Import referrers or Campaign settings at any time.
Designing the Widget
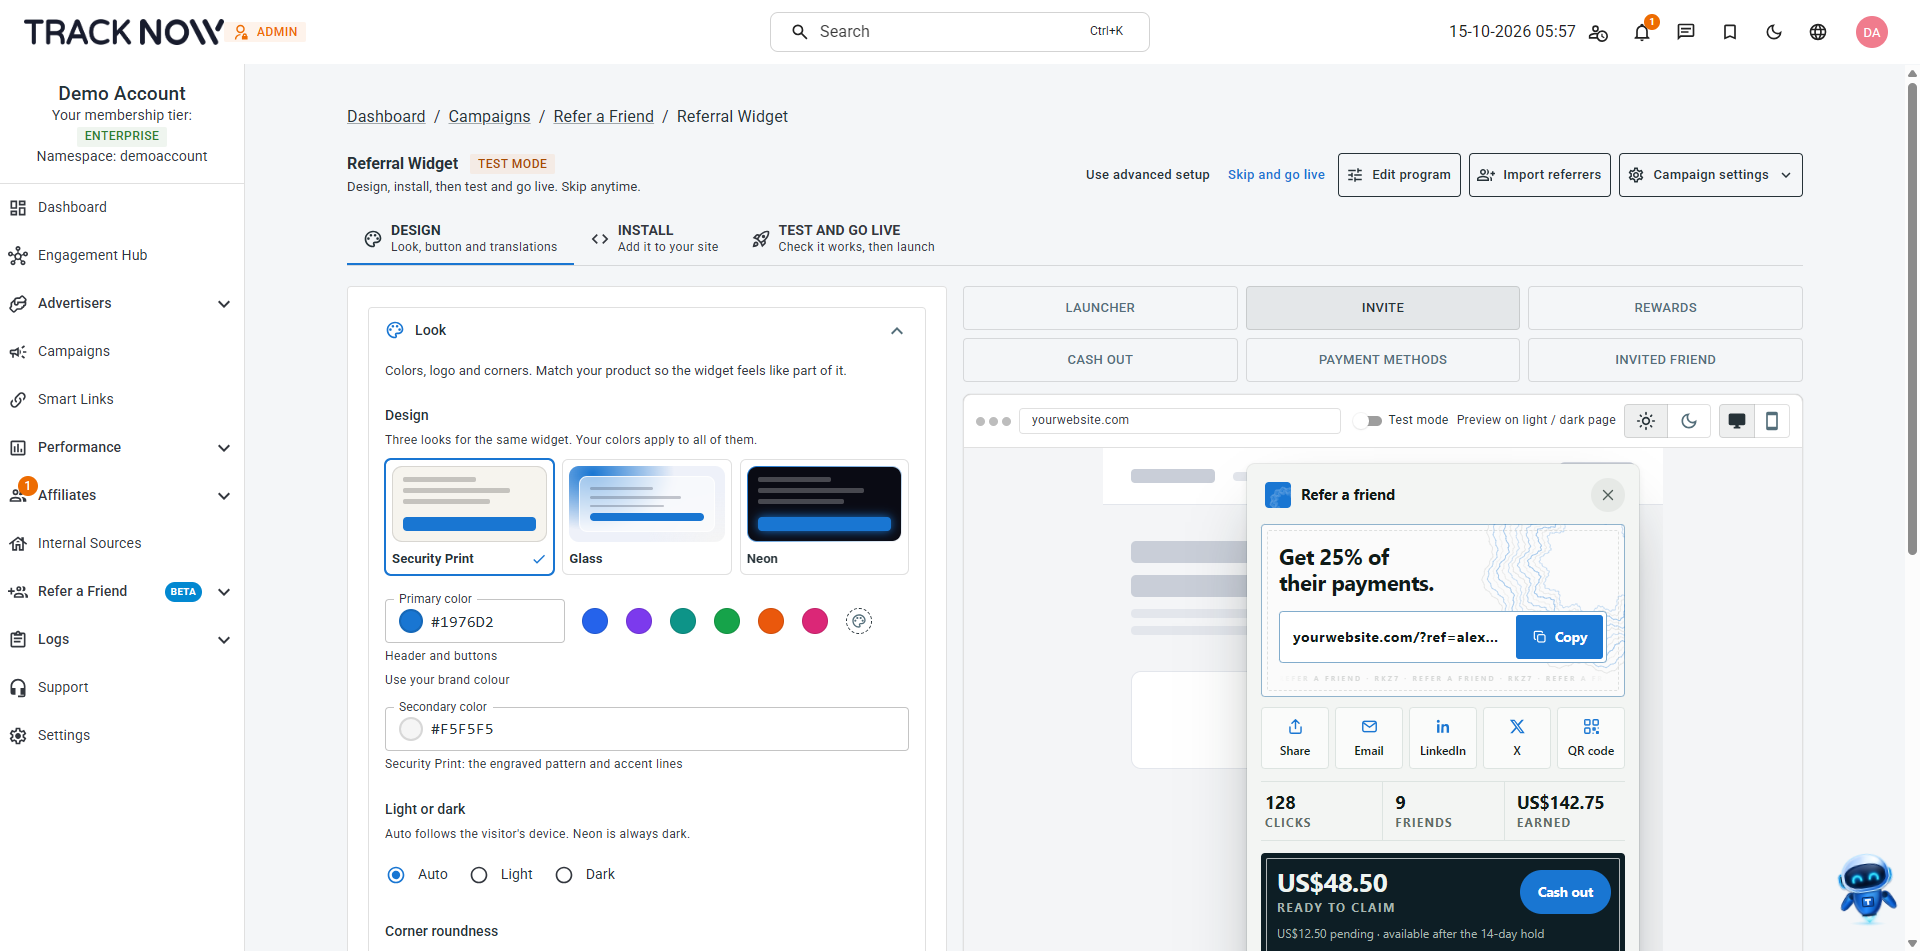
Location: Campaigns > program name > Referral Widget > Design tab
The Design tab controls how the referral widget looks on your site. Every change shows immediately in the preview on the right.
Above the preview, select a screen to view it: Launcher, Invite, Rewards, Cash out, Payment methods or Invited friend. You can also switch the preview between light and dark pages, and between desktop and mobile. The preview uses sample data.
In the Look section, set:
- Design: Choose a style: Security Print, Glass or Neon. Your colors apply to all three.
- Primary color: Used for the header and buttons. Enter a hex code or select a preset color.
- Secondary color: For Security Print, used for the engraved pattern and accent lines.
- Light or dark: Select Auto (follows the visitor's device), Light or Dark. Neon is always dark.
- Corner roundness: Drag the slider to set the corner radius.
- Logo: Shown in the widget header. Select None, Upload or URL.
- Custom CSS (advanced): Add your own CSS to style the widget further.
The tab also includes further sections, such as Launcher, for the widget button and translations.
Installing the Widget
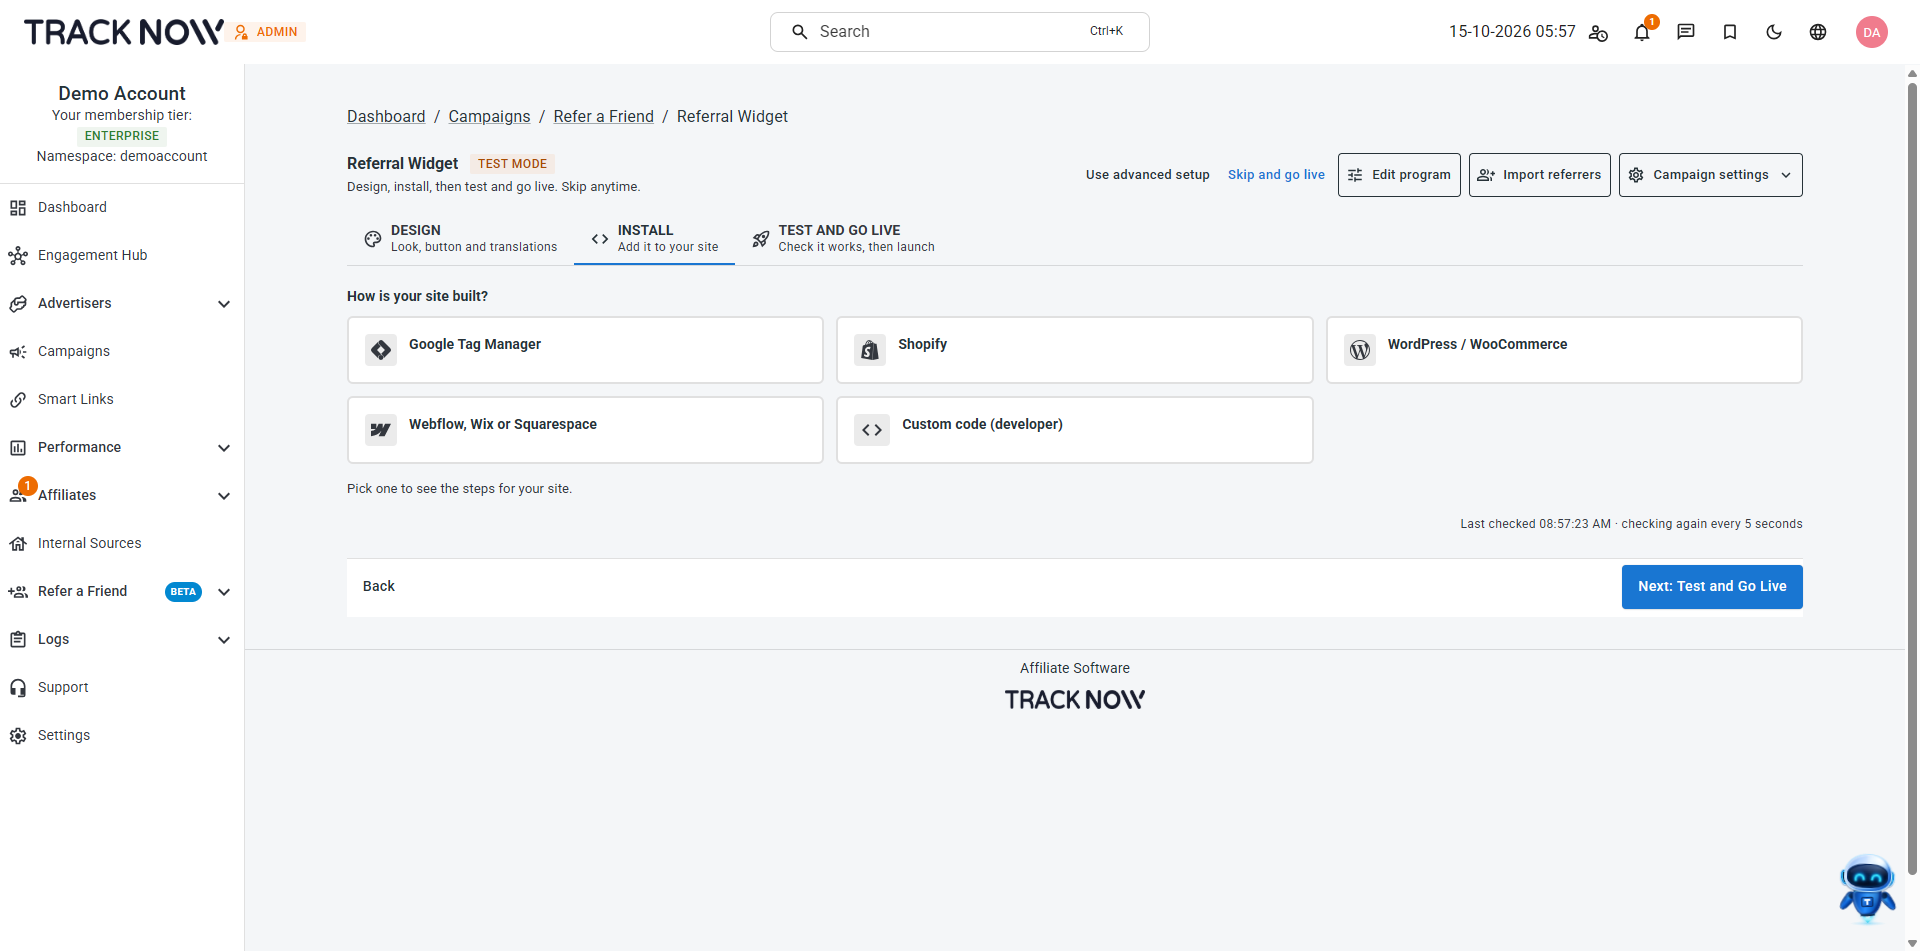
Location: Campaigns > program name > Referral Widget > Install tab
The Install tab gives you the code needed to add the widget to your site and track referrals.
- Under How is your site built?, select your platform: Google Tag Manager, Shopify, WordPress / WooCommerce, Webflow, Wix or Squarespace, or Custom code (developer).
- Select how you want to install it:
- I'll install it: Follow the steps on the page using copy-ready code for your stack.
- Send to my developer: Get a ready brief to copy or email to your developer.
- Use an AI agent: Get a single task to give to Claude Code, Cursor or any other coding agent.
After you select a platform and an installation method, the page shows the step-by-step installation instructions for that platform.
For Custom code with I'll install it, there are four steps:
- Script: Add the Tracknow script to the page head of every page of your app. The snippet is pre-filled with your namespace and also loads the widget, so no other script tag is needed. Click Copy, or Show the full snippet to see the complete code.
- Key: Click the button in this step to generate a key that lets your server start widget sessions. This requires a developer or a server.
- Start the widget: Start the widget for logged-in users. Your server requests a short-lived session from Tracknow, and the widget starts with it. This requires backend access.
- Signup event: Tell Tracknow when a referred friend signs up by sending your own user ID once the account exists, so the referrer can earn the reward. This requires access to your signup code.
Under More Options, you can optionally add an invitee banner and purchase events.
Each step shows To do until Tracknow detects it. The page checks your installation automatically every 5 seconds. If a step doesn't complete, expand Not turning green? under it for troubleshooting.
Testing and Going Live
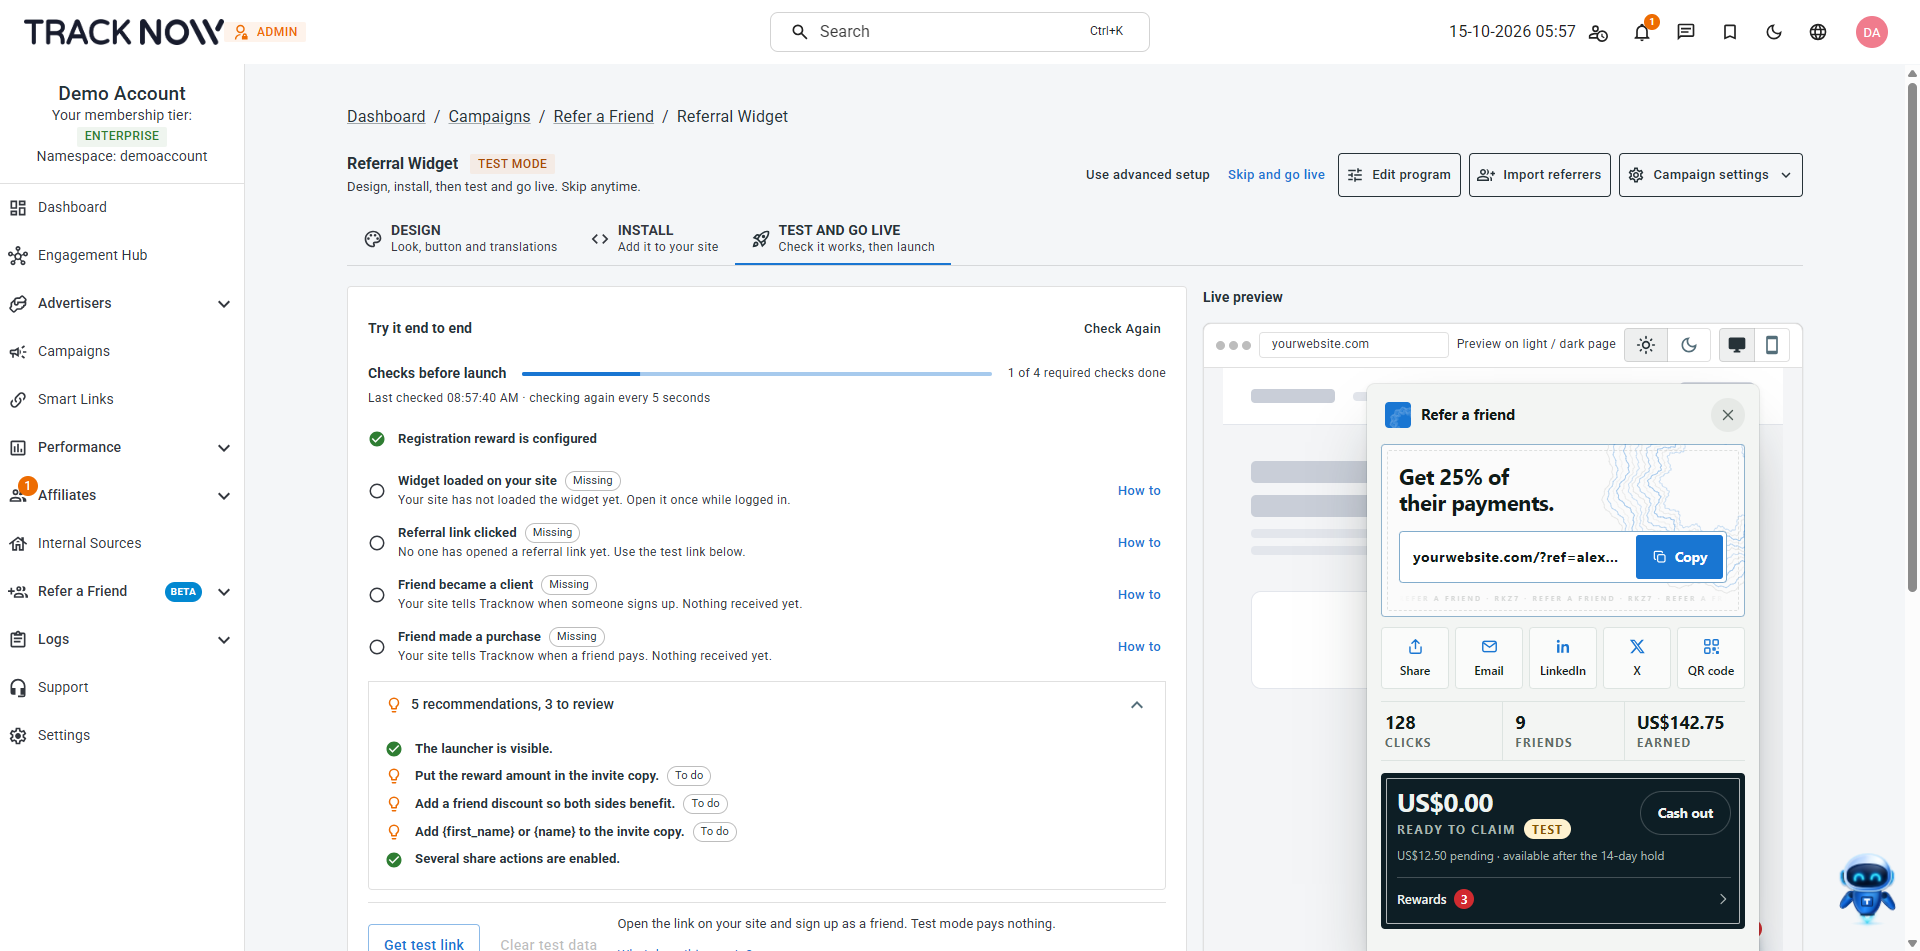
Location: Campaigns > program name > Referral Widget > Test and Go Live tab
The Test and Go Live tab checks that your setup works before referrers earn real rewards.
Readiness checks
Checks before launch lists the required checks and your progress:
- Registration reward is configured
- Widget loaded on your site: Open your site once while logged in.
- Referral link clicked: Open a referral link, such as the test link.
- Friend became a client: Your site tells Tracknow when someone signs up.
- Friend made a purchase: Your site tells Tracknow when a friend pays.
Each incomplete check is marked Missing and has a How to link. Checks refresh every 5 seconds, or click Check Again.
Below the checks, Recommendations suggests improvements to your program, such as adding the reward amount, a friend discount or {first_name} to the invite copy. Items marked To do are optional.
Running a test
Click Get test link, open the link on your site and sign up as a friend. Use this to complete the readiness checks. Test mode pays nothing: rewards are listed in the activity but are not added to the balance or paid.
Going live
Where your program is shows whether the program is in Test mode or Live. When live, real rewards are earned and paid. To return to testing, click Back to Test Mode.
Once live:
- Import referrers: Add the clients who should refer friends. Each gets their own referral link.
- Open conversions: See real signups and rewards on the Conversions page.
- Review rewards: Manage reward approvals, based on the rule set in your payout settings.
- Clear test data: Remove data created during testing.
- Advanced payout settings: Configure revenue share, tiers and caps.
Frequently Asked Questions
What is the difference between Refer a Friend and the affiliate program? The affiliate program is for partners who promote your business. Refer a Friend is for your existing clients, who refer new clients and earn commissions. Both programs can run at the same time, independently, and referrers are managed separately from affiliates.
How do I create a Refer a Friend program? Go to Refer a Friend > Management and click Set up program. Complete the five wizard steps (Type, Details, Rewards, Payouts, Review) and click Save. To configure everything manually, click Use advanced setup at the bottom of the wizard.
What reward types are available? Percentage rewards (a percentage of the referred friend's payments), fixed rewards (a flat amount for every friend who signs up) and hybrid rewards (a fixed amount when the friend registers, plus a lifetime percentage of their payments). Percentage rewards are recommended.
What reward percentage should I set? Most programs use 15 to 30%. A higher rate attracts more referrers but costs more per client. Setting a time limit on earnings can help control costs.
How long do referrers earn rewards? You choose in Step 3 (Rewards) of the setup wizard: as long as the referred friend keeps paying, or for a set number of months.
Can I give referred friends a discount? Yes. Turn on New user discount in Step 3 (Rewards) of the setup wizard. Tracknow shows the discount in the widget, but you must apply it in your own billing system.
How are rewards approved? In Step 4 (Payouts) of the setup wizard, choose I review each reward to approve rewards manually, or Approve automatically. If approval was customized in payout settings, it shows as Custom (edited in payout settings).
How do I edit my program after creating it? On the Referral Widget page (Campaigns > program name > Referral Widget), click Edit program. This opens the same five-step wizard.
What happens to existing rewards if I change the program? Changes apply to new rewards from the moment you save, including future purchases by friends who already signed up. Rewards already earned don't change.
How do I add referrers to the program? Click Import referrers on the Referral Widget page or the Refer a Friend > Management page. Each imported referrer gets their own referral link.
Where do referrers get their referral link? In the referral widget on your site, once the widget is installed and they are logged in. The link is your landing page URL followed by ?ref= and the referrer's unique code.
How do I customize how the widget looks? Go to Campaigns > program name > Referral Widget > Design tab. You can change the style (Security Print, Glass or Neon), colors, light or dark mode, corner roundness and logo, and add custom CSS.
How do I install the widget on my site? Go to the Install tab on the Referral Widget page, select how your site is built (Google Tag Manager, Shopify, WordPress / WooCommerce, Webflow, Wix or Squarespace, or Custom code), then follow the step-by-step instructions the page shows for that platform.
I don't have a developer. How can I install it? On the Install tab, choose Send to my developer to get a ready brief you can email to someone, or Use an AI agent to get a single task for Claude Code, Cursor or another coding agent. Steps 2 to 4 of the custom code installation require a developer, server or backend access.
Why is an installation step not turning green? Tracknow checks your installation automatically every 5 seconds. If a step stays at To do, expand Not turning green? under that step for troubleshooting.
How do I test the program without paying real rewards? On the Test and Go Live tab, click Get test link, open the link on your site and sign up as a friend. In test mode, rewards appear in the activity but are not added to the balance or paid.
How do I switch between test mode and live? The Where your program is section of the Test and Go Live tab shows the current status. When live, real rewards are earned and paid. To return to testing, click Back to Test Mode.
Where can I see referrals and rewards? On the Test and Go Live tab, click Open conversions to see signups and rewards on the Conversions page, or Review rewards to manage approvals.
Topics Not Covered in This Article
This article does not cover: the Use advanced setup option, the Step 3 fields for fixed and hybrid rewards, starting widget sessions in detail, Campaign settings, Advanced payout settings, and the Payment Requests and Balance Report pages.